
Procrastinating never got anyone anywhere
Moderators: User administrators, Moderators
-
adie89
- Registered user
- Posts: 293
- Joined: 04 Sep 2012, 21:25
- 80-90 Mem No: 11532
- Location: Wiltshire
Re: Procrastinating never got anyone anywhere
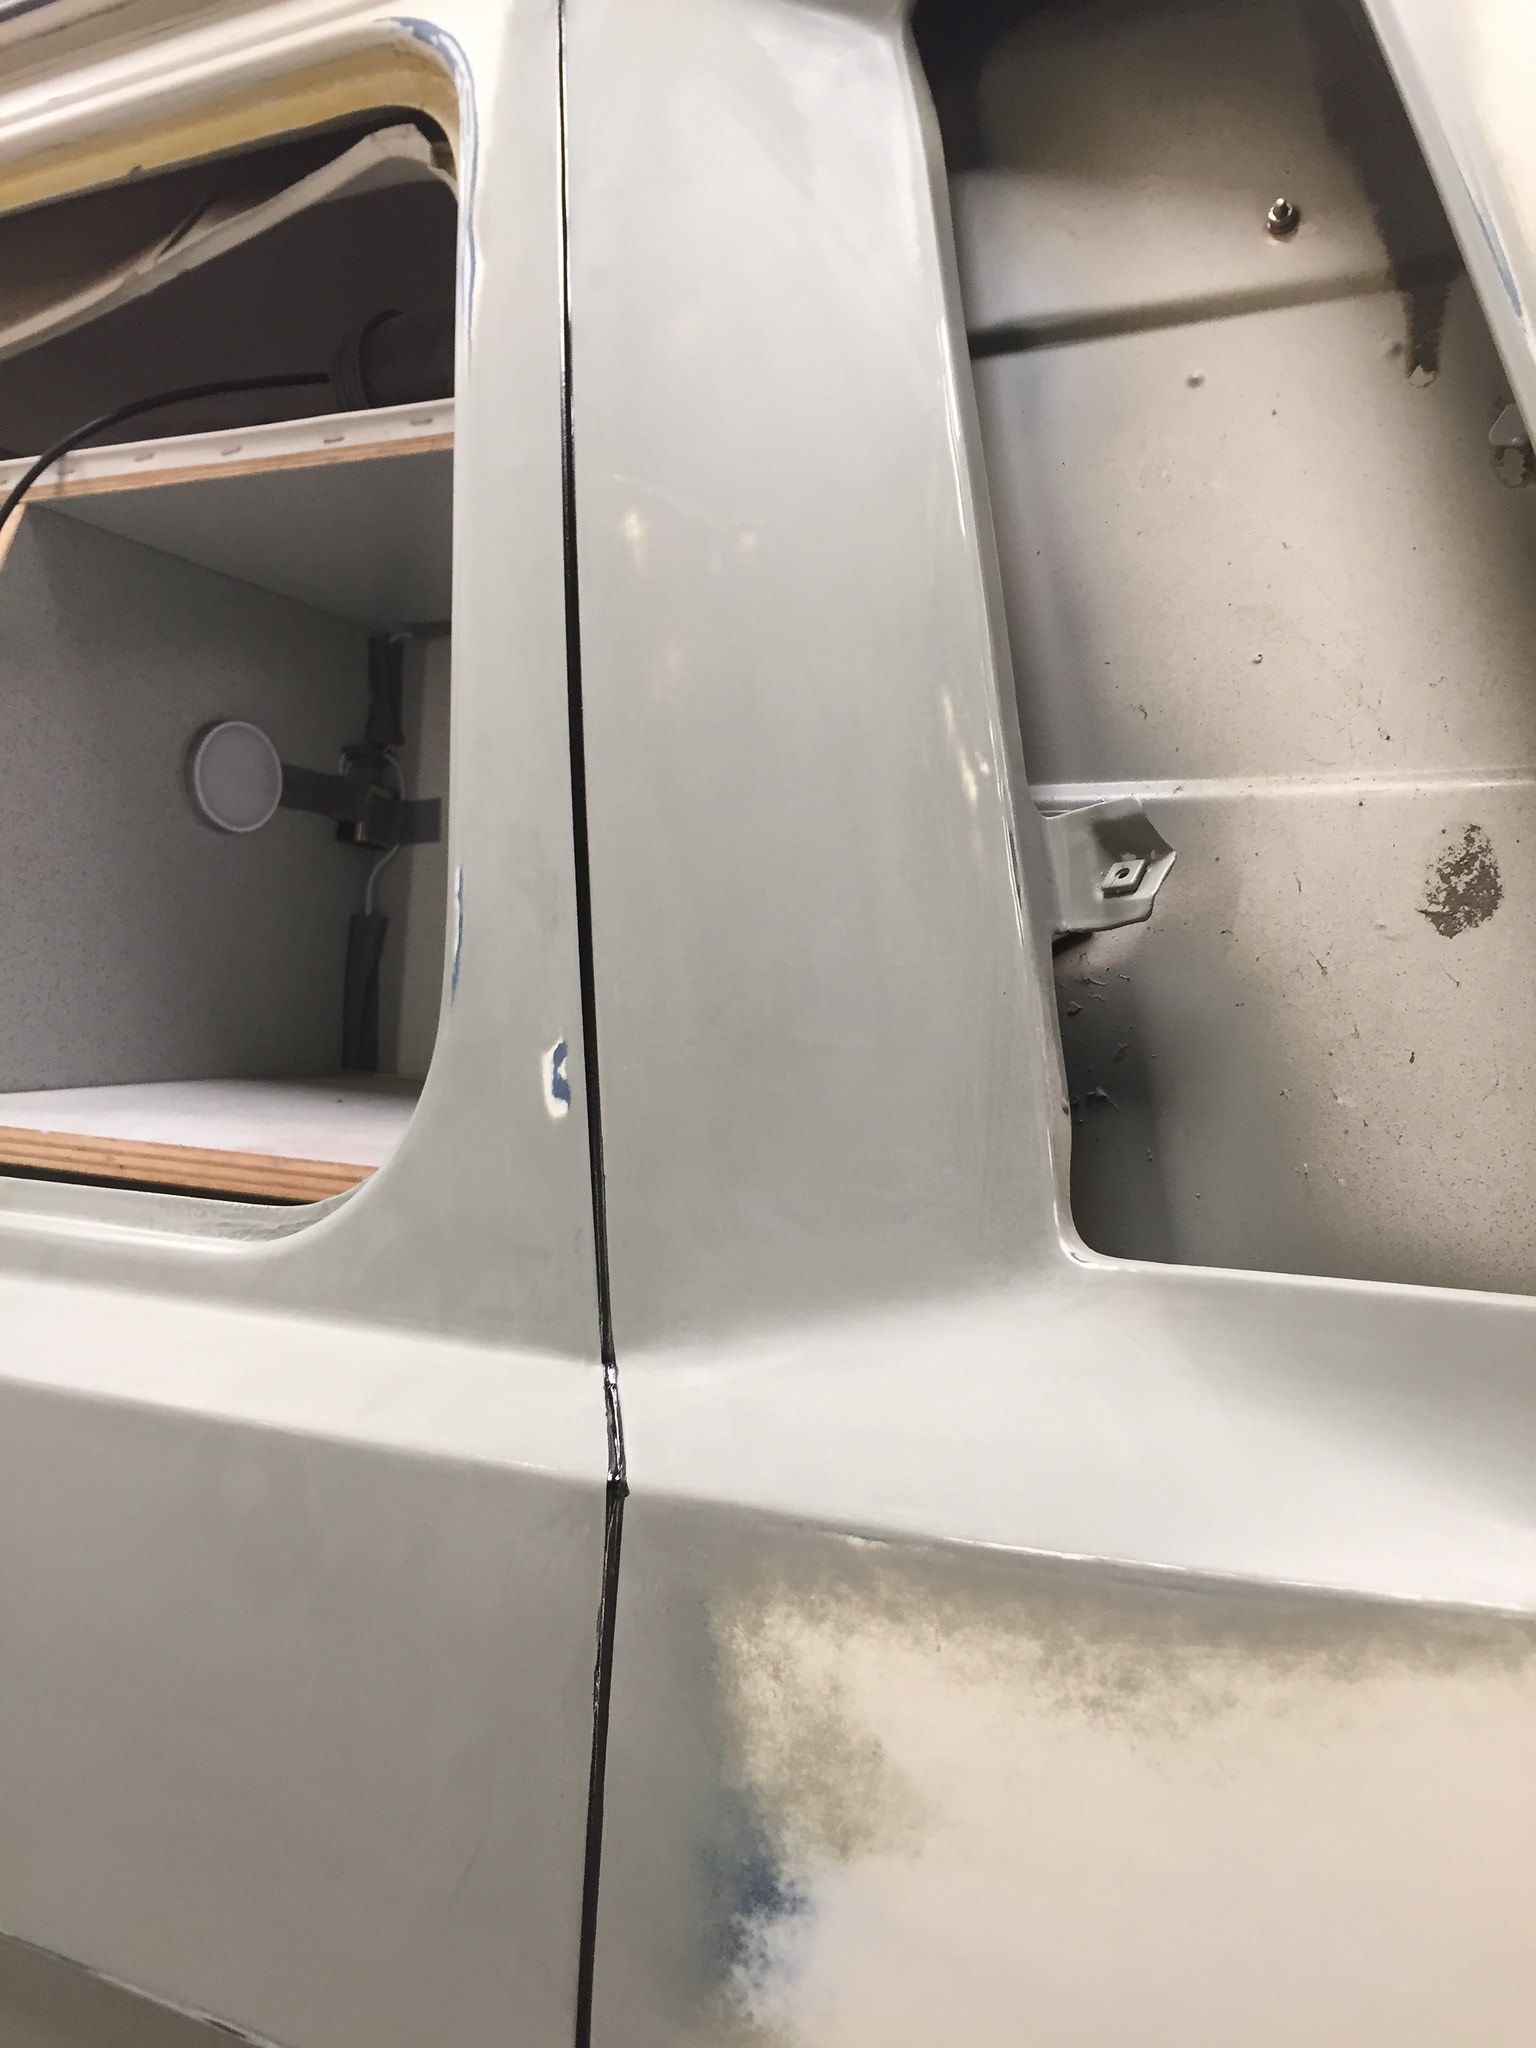
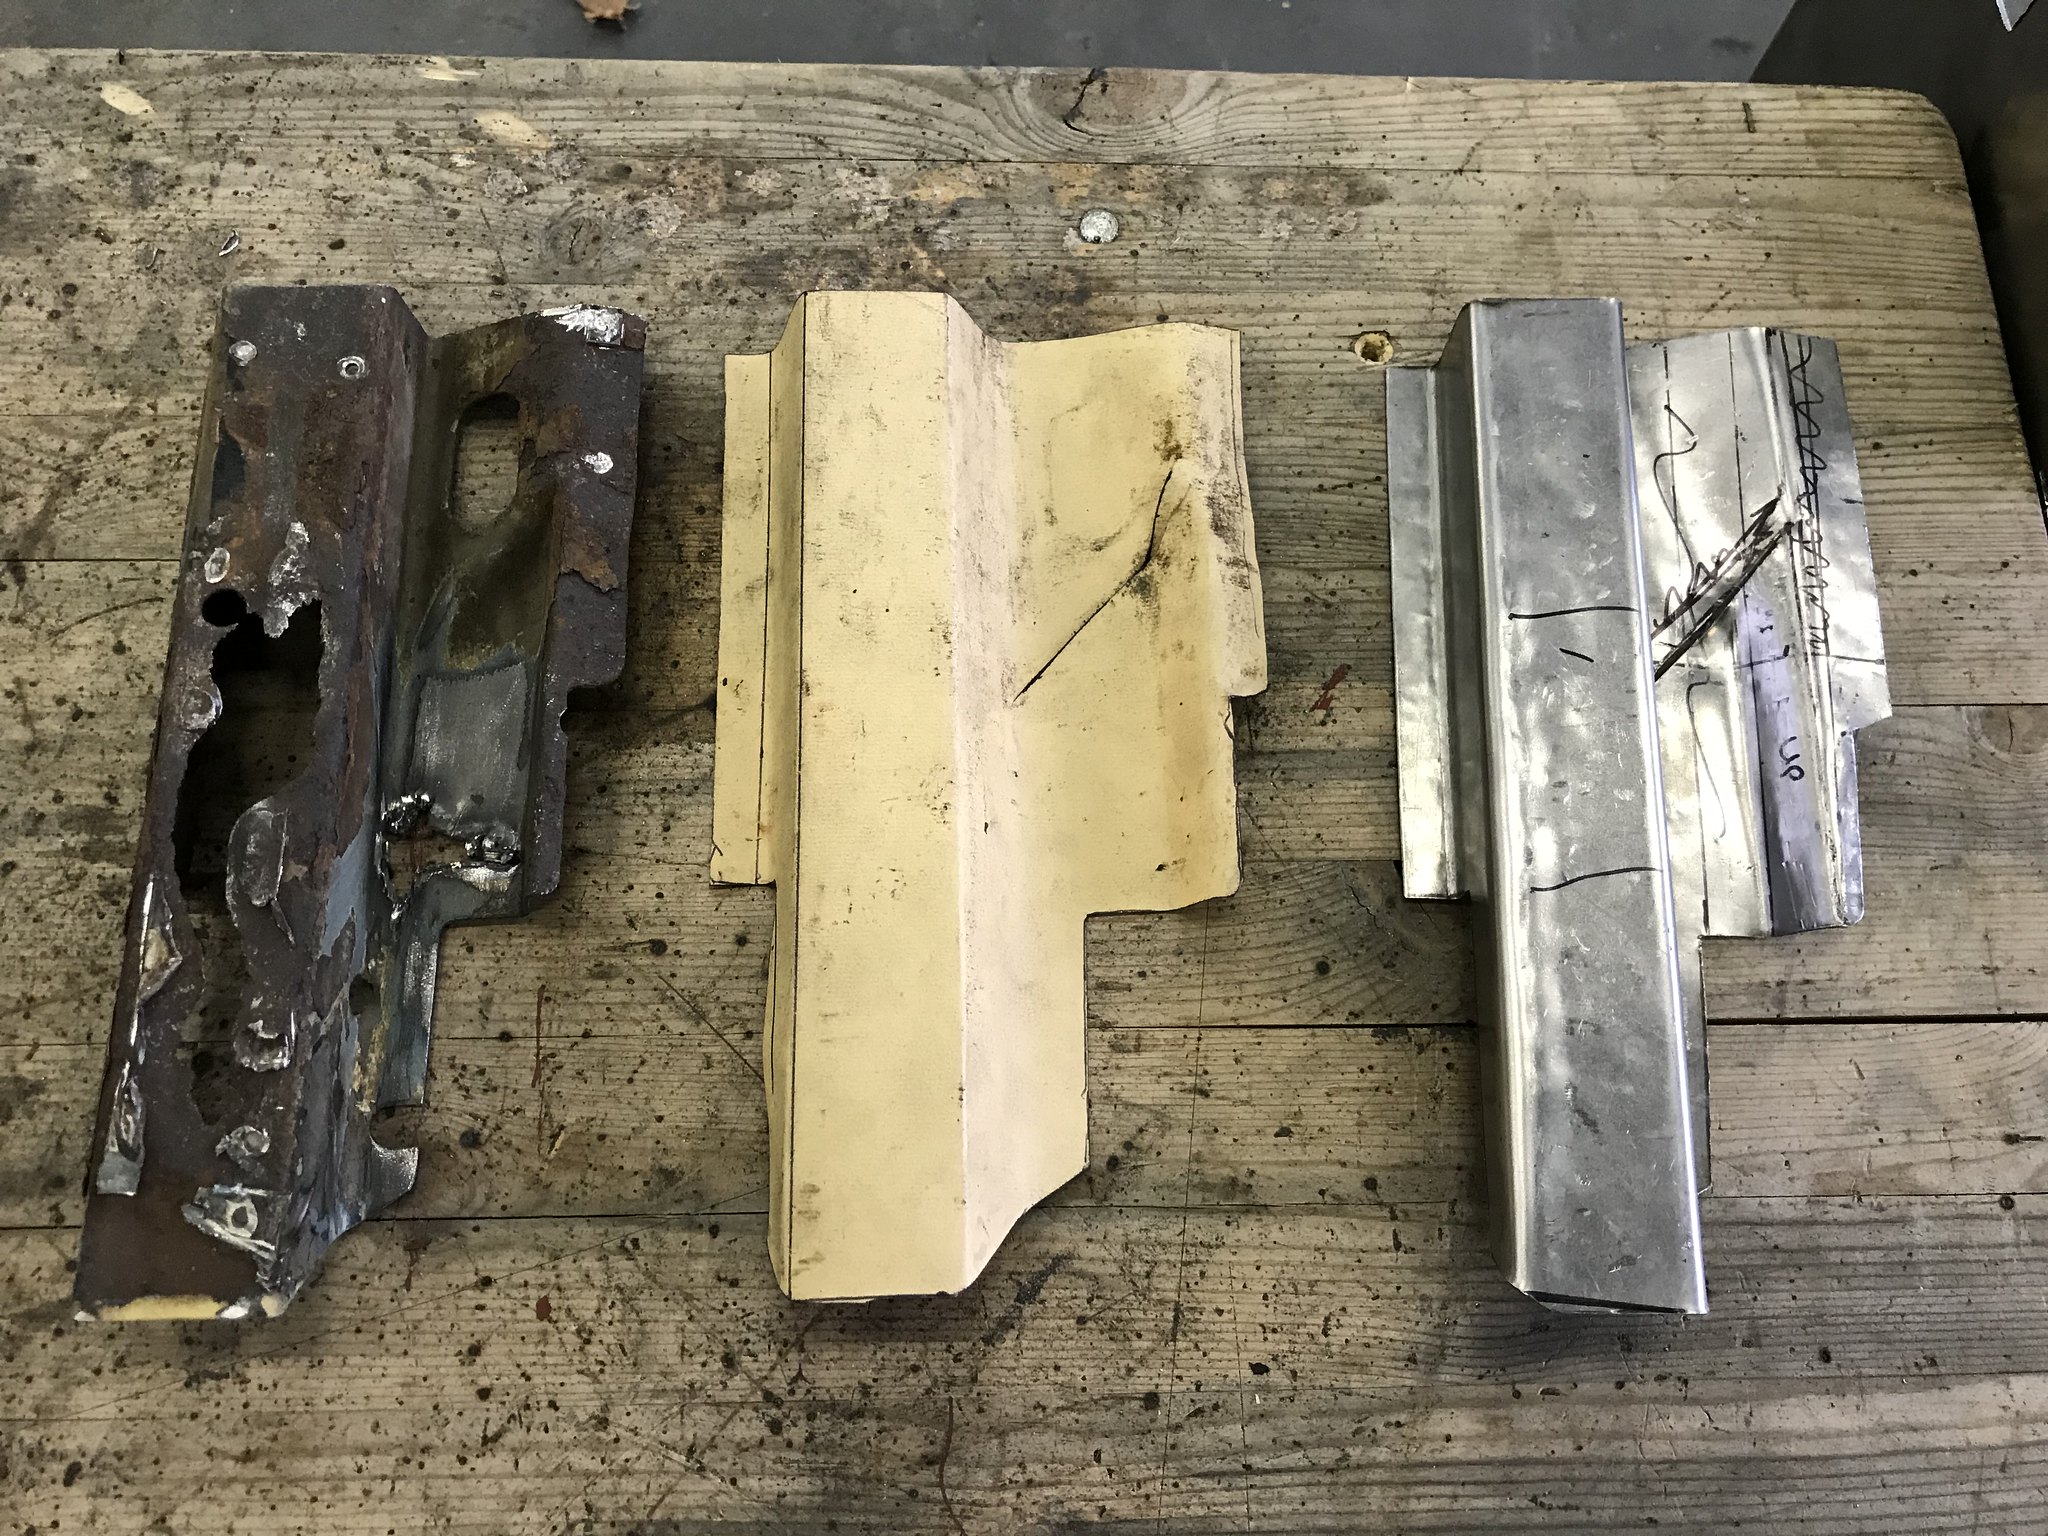
Out of interest this was my first ever go at repairing a car body. The window opposite the sliding door. The lower frame had rotted a bit on the sticky up bit that the seal sits over and then leaked to disintegrate the inner frame. So two new bits were folded up, the outline traced on the body work and then butt welded in. The inner and outer were then panel bonded and spot welded together. It was rough but I learned a lot and it would be under the leatherette around the frame so it was a nice safe practice. For time, a few quid of sheet metal and some paint... it does the job in a non critical area.
Greta: 85’ LHD 2.5L Subaru 14in Syncro
http://forum.club8090.co.uk/viewtopic.php?t=165773
http://forum.club8090.co.uk/viewtopic.php?t=165773
-
adie89
- Registered user
- Posts: 293
- Joined: 04 Sep 2012, 21:25
- 80-90 Mem No: 11532
- Location: Wiltshire
Re: Procrastinating never got anyone anywhere
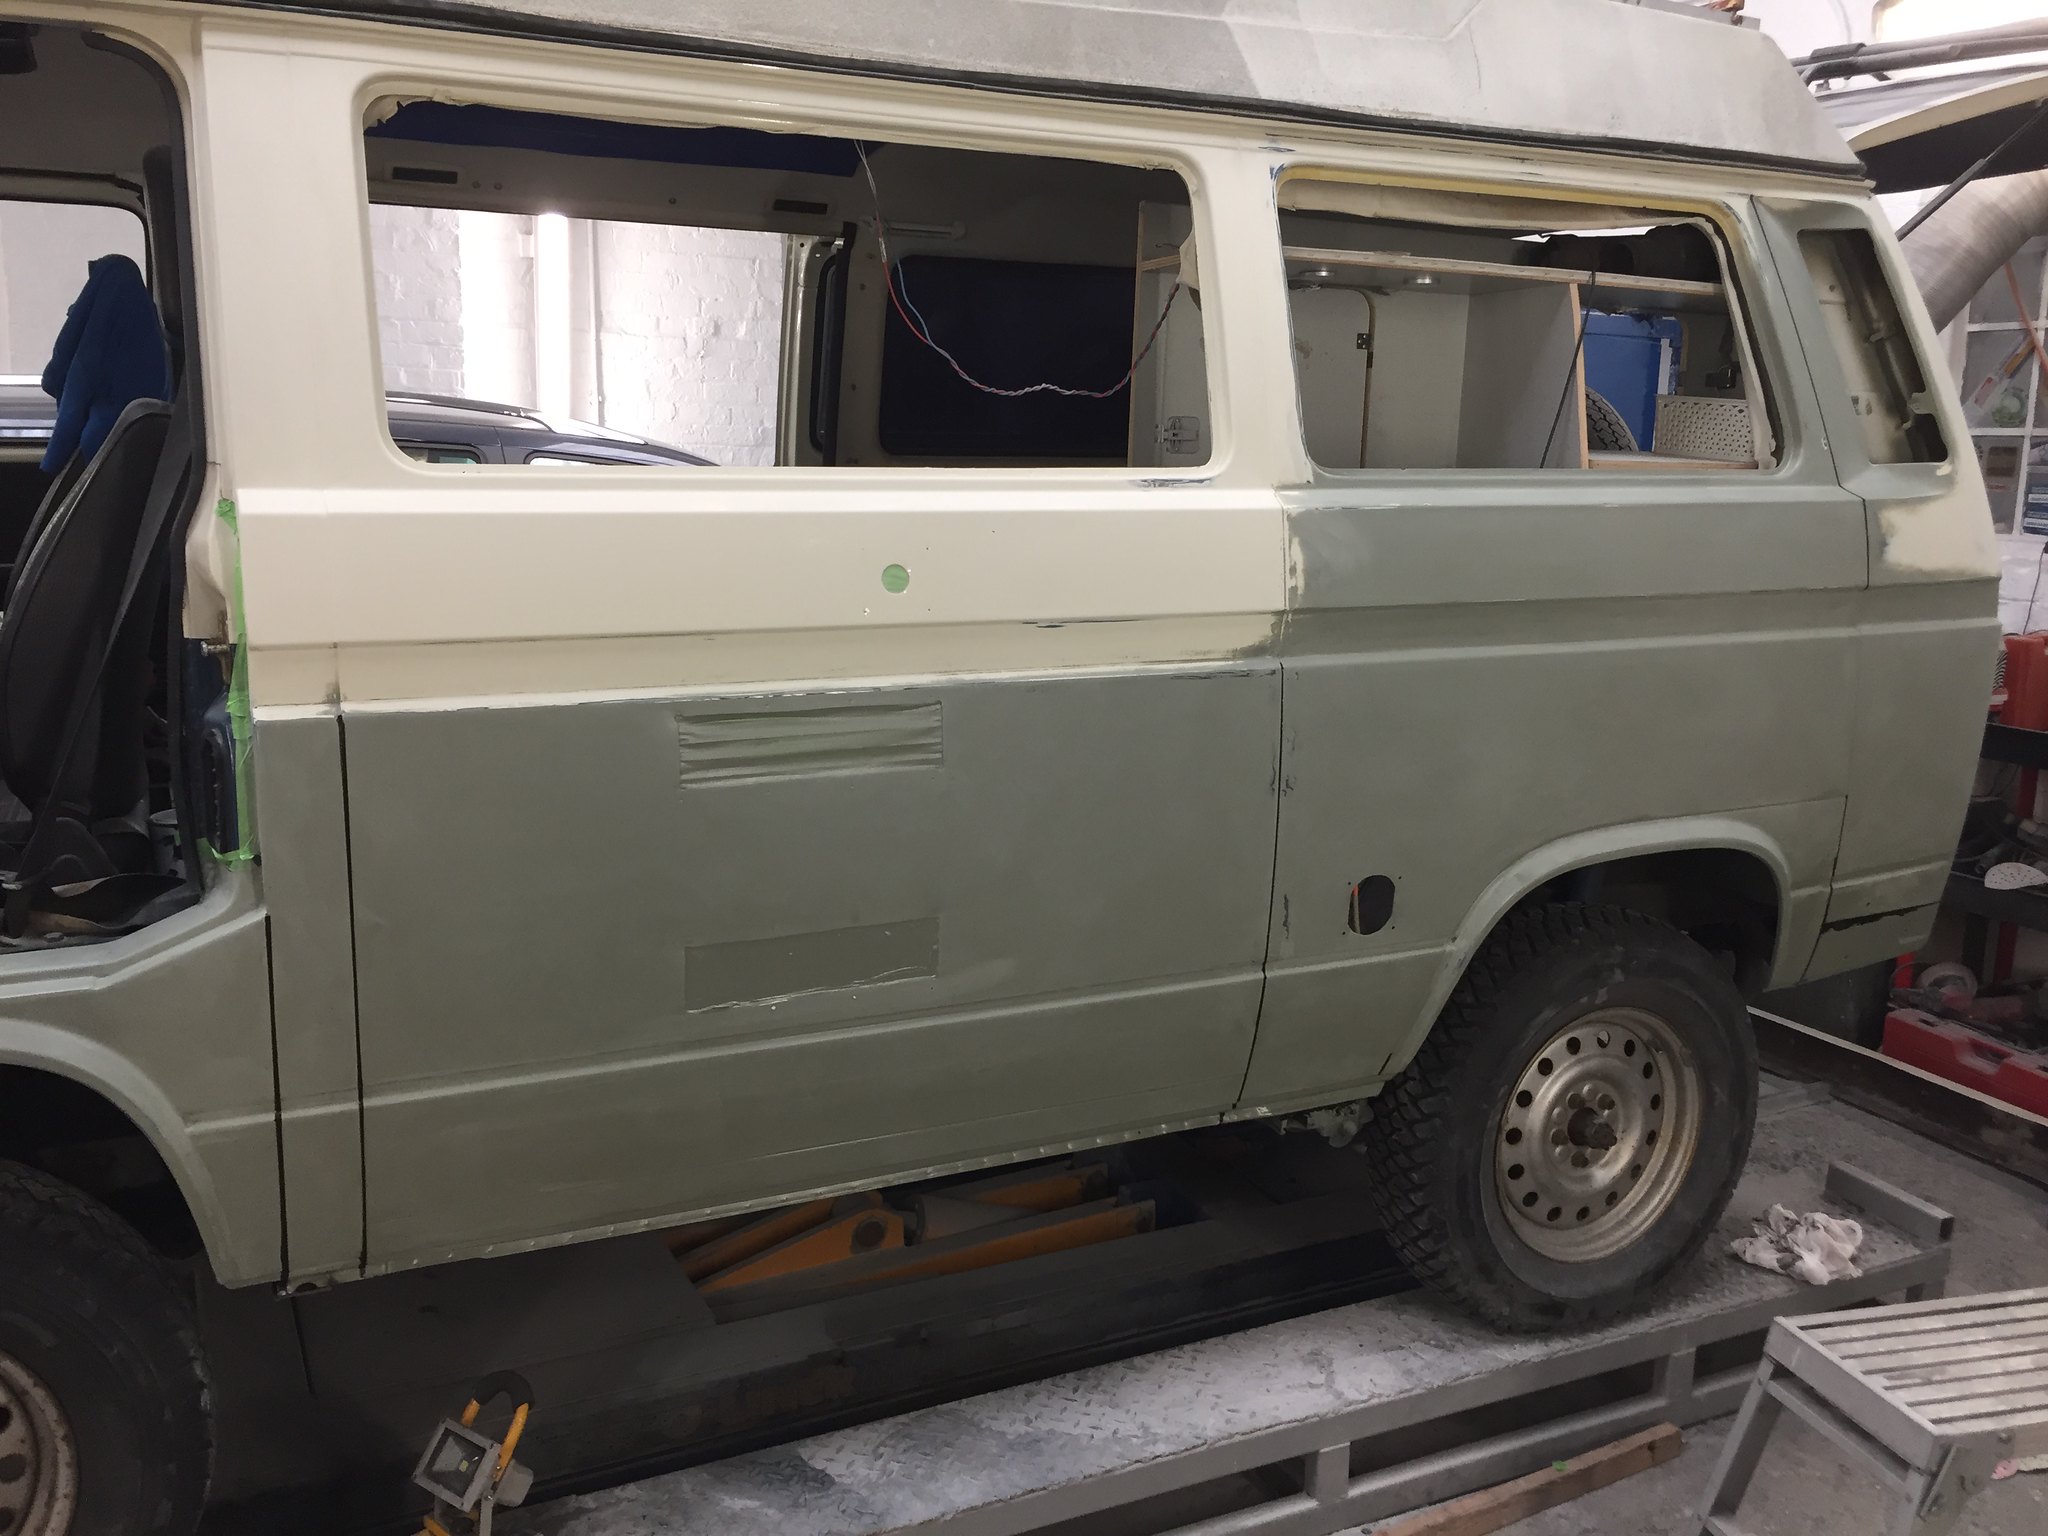
I then progressed to the classic fridge panel repair. Once the side panel and sill was removed it looked like this
The c pillar was passable from a previous repair but the b pillar was
Most the sill was fine except for the b pillar and and the edge where a previous repair had been seam welded on.
The jacking point was still thick but the chassis leg needed a patch
So the repairs started with the inner sill which was patch repaired from 1.5mm steel, inner sill is on the floor underneath.
You can better where the patches went in here
Then the inner b pillar was rebuilt in patches, as a beginner this was a PITA and I would have paid for the inner pillar just to save the time, you can see how many patches it took, welded from both sides
The jacking point was repaired with 2mm bar then thickened with weld
Then the outer B went back on with a repair panel. .
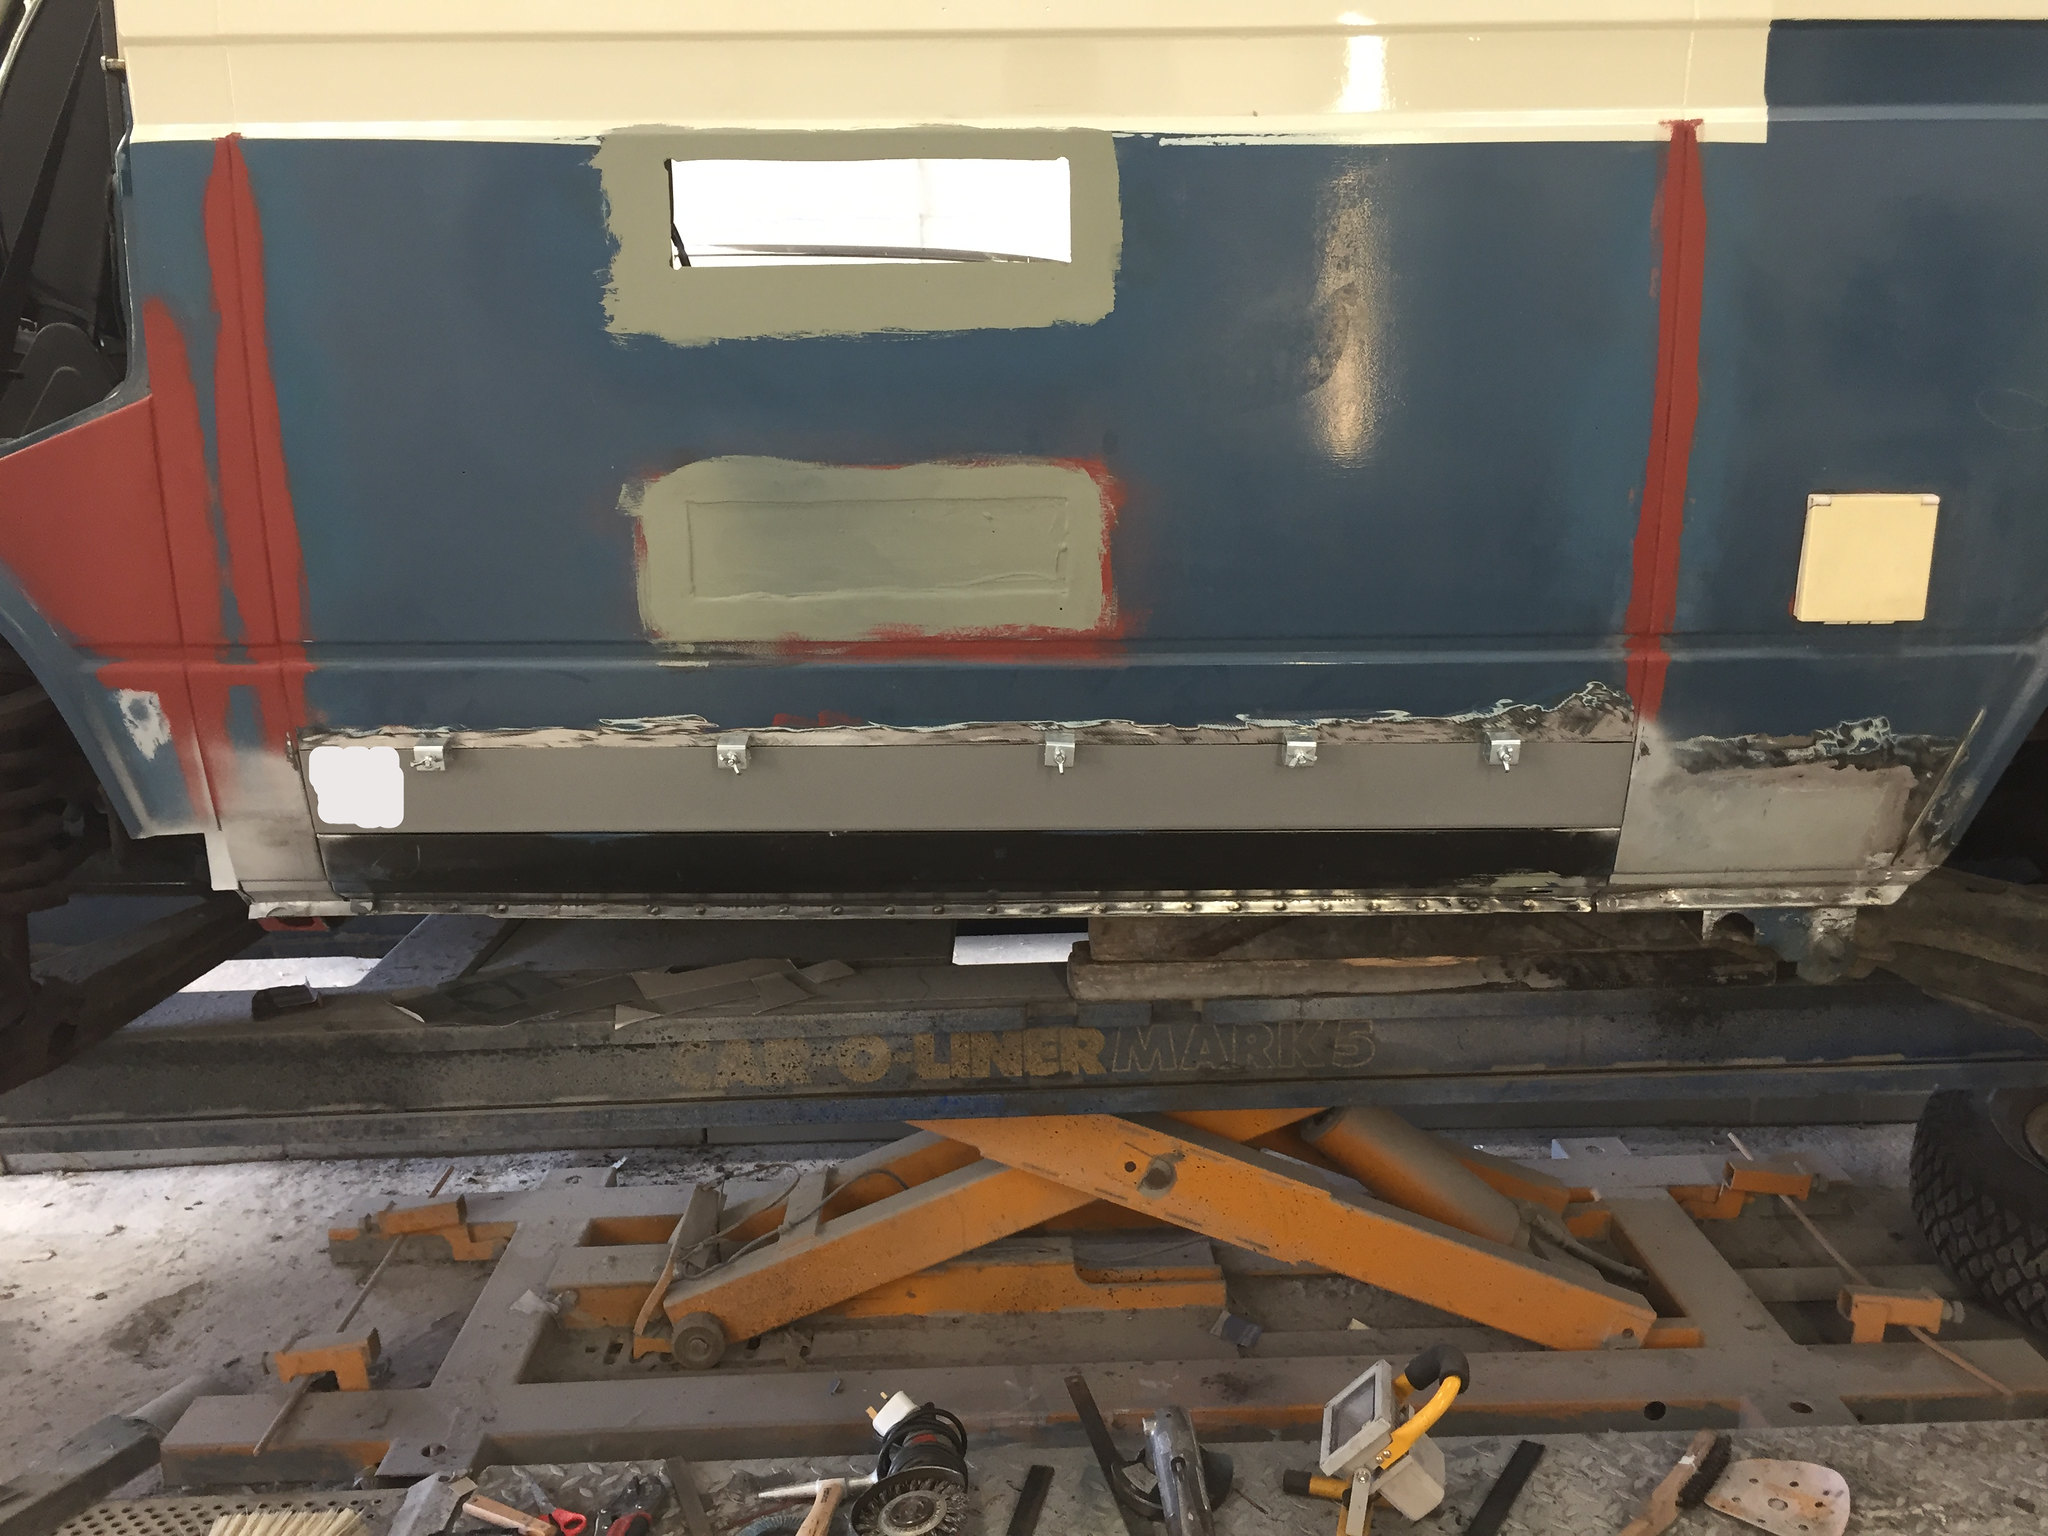
Then onto the outer sill, I started with the cheap nasty repair panel that goes from sill to centreline, this was replaced with an original sill in the end, it meant the sills were correct and where the floor had rotted away it was replaced with the original panel it can be seen upside down a few pictures back, the green is the epoxy commercial vehicle primer from glasurit, it’s expensive but incredibly tough, and unlike normal primer, waterproof. Everything got colour coat before final closing in.
The fit of the sill dictated where everything else sat, it was panel bonded then spot welded on the bottom edge, one weld every 30mm or so. The top edge to the floor was plug welded. Sorry no pic of that.
Then I repaired the infill panel that mates outer sill to inner b.
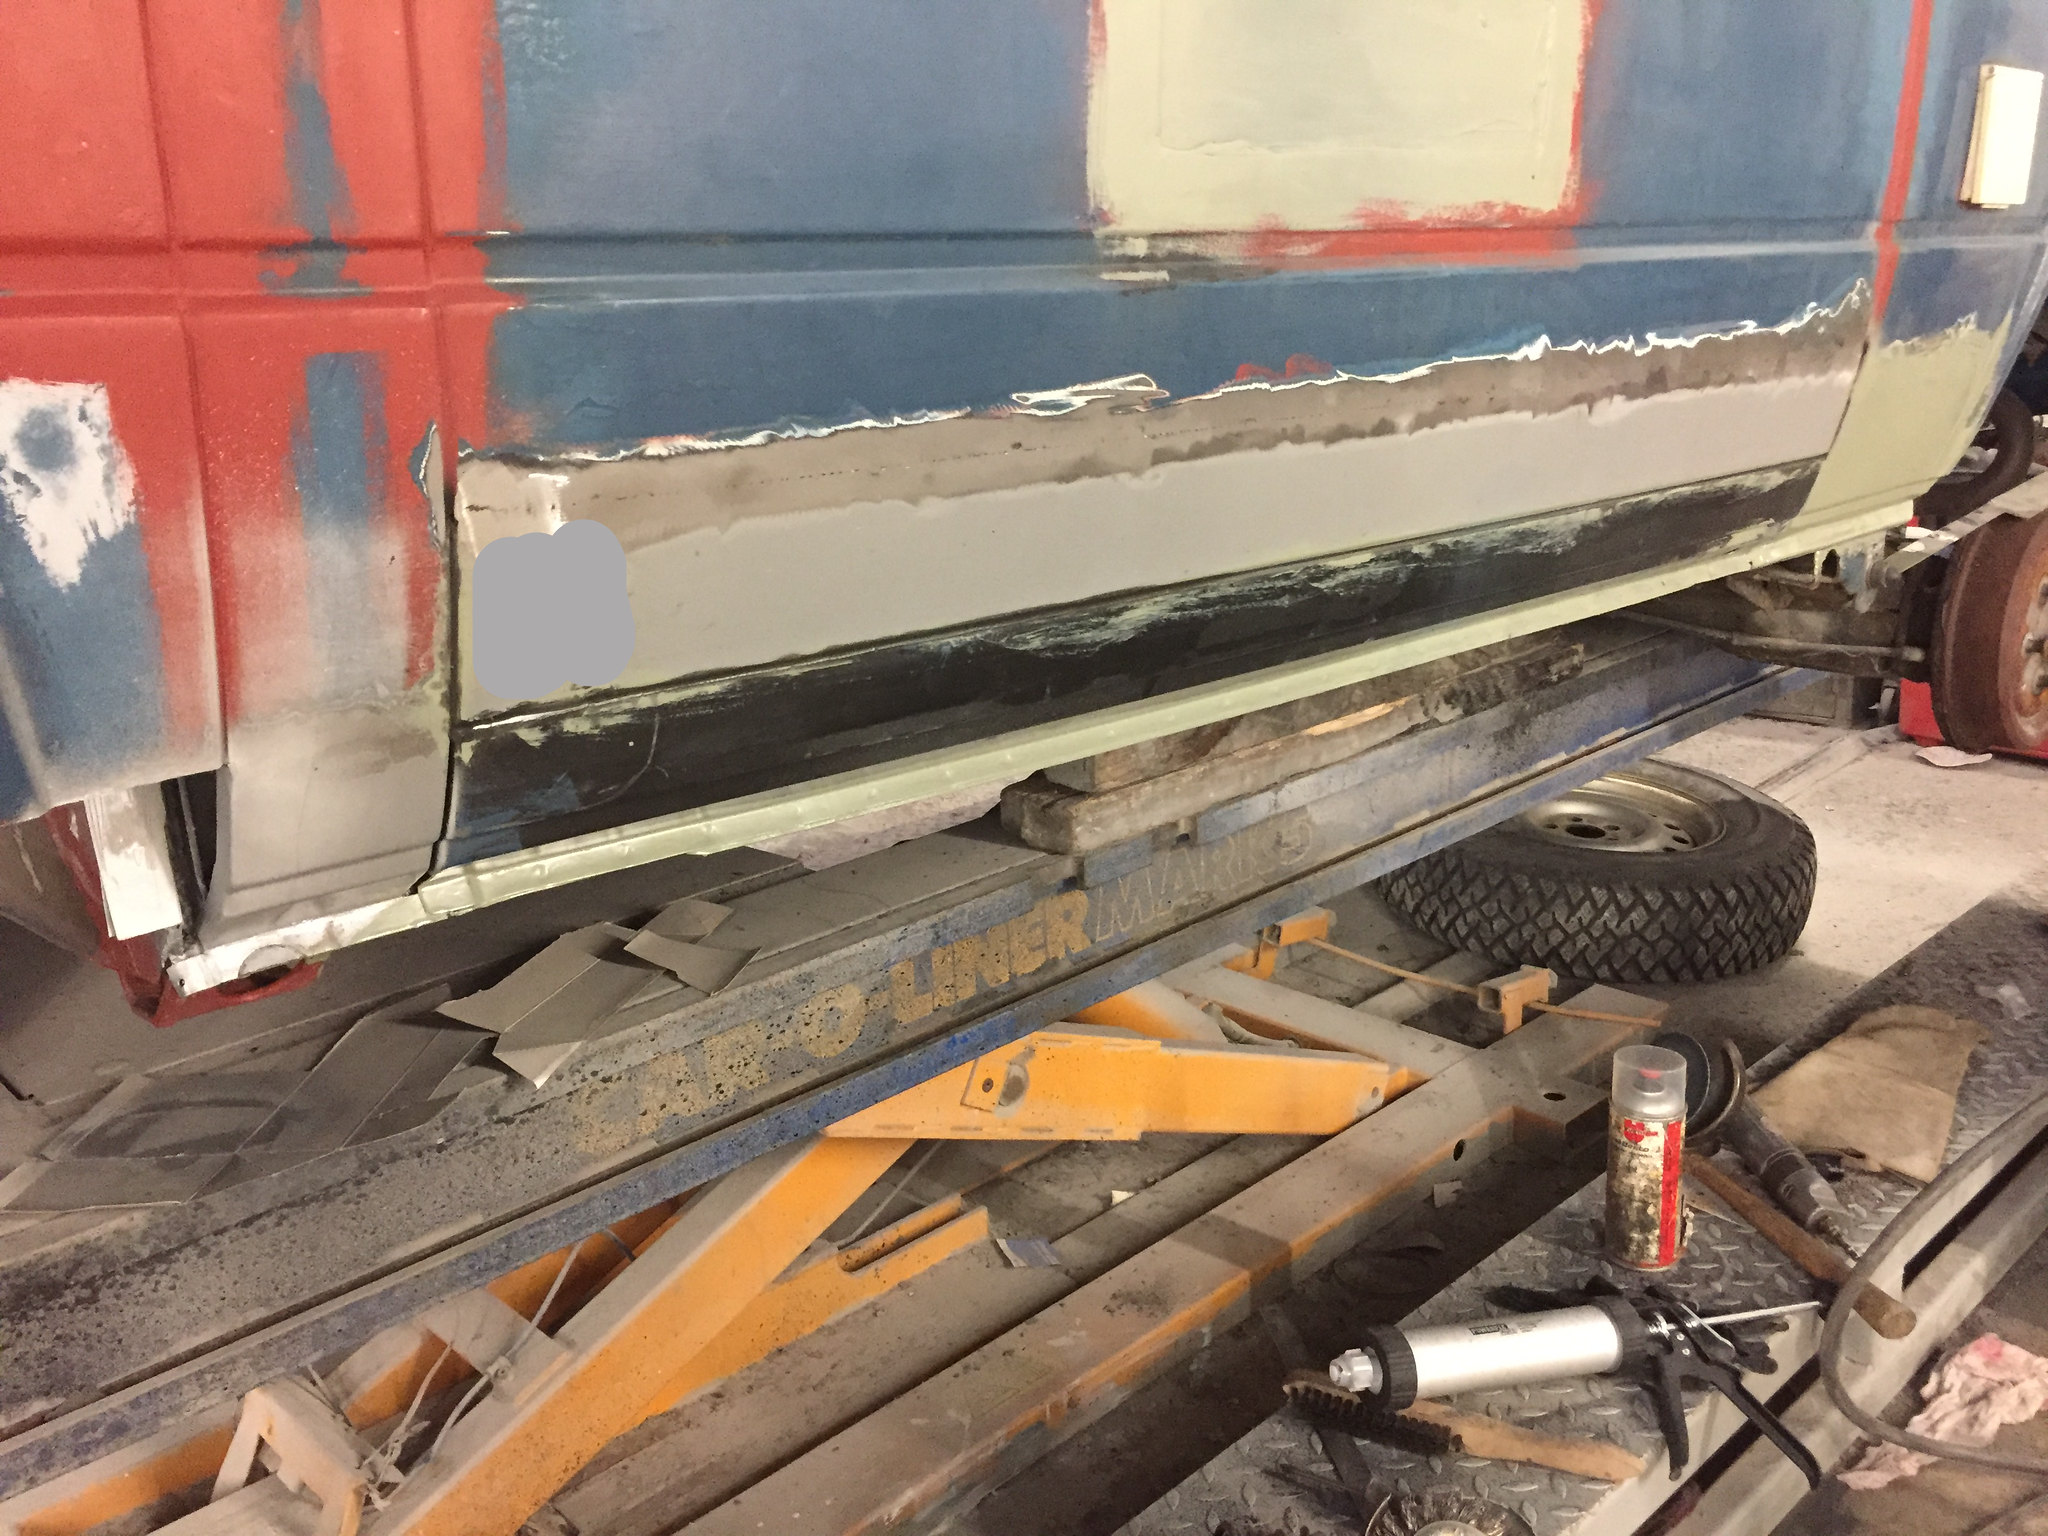
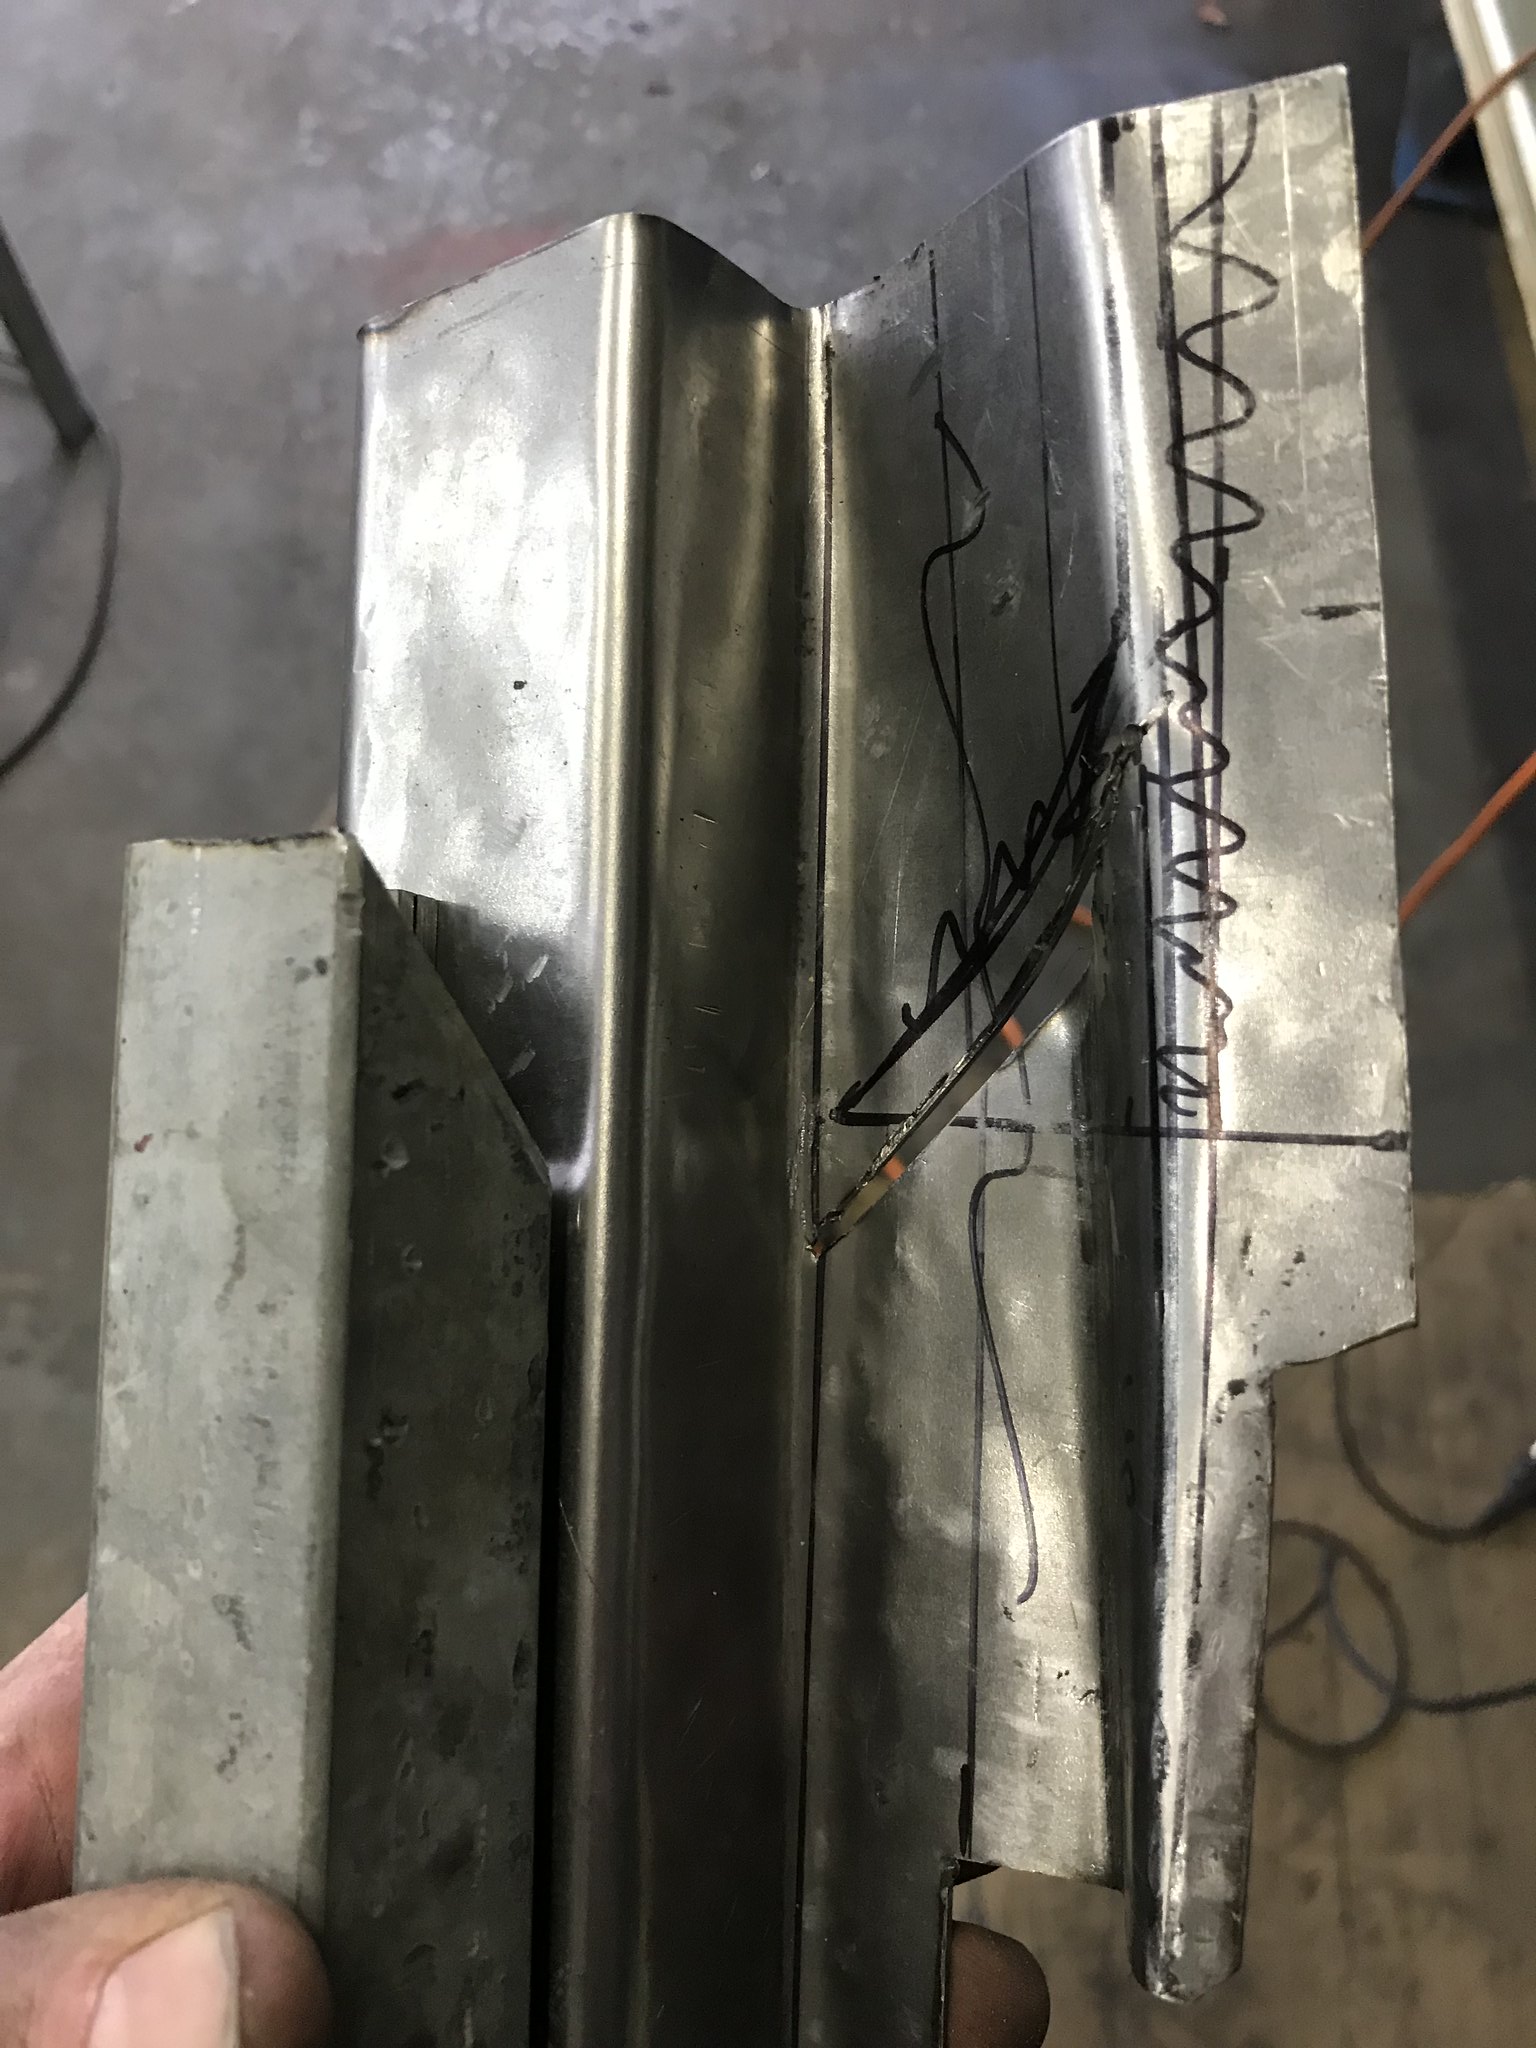
Then I got a machine shop to take my nasty lower side panel (the long grey panel) to fold it up in the correct place for the seam and some edge flaps on, then like the front panel, panel bond the edges plug weld to the outer sill from the inside and use butt weld clamps before butt welding to the side panel.

You can see the spot welds in the pic above. This one shows the same repair before butt welding with the rear quarter closed in too.
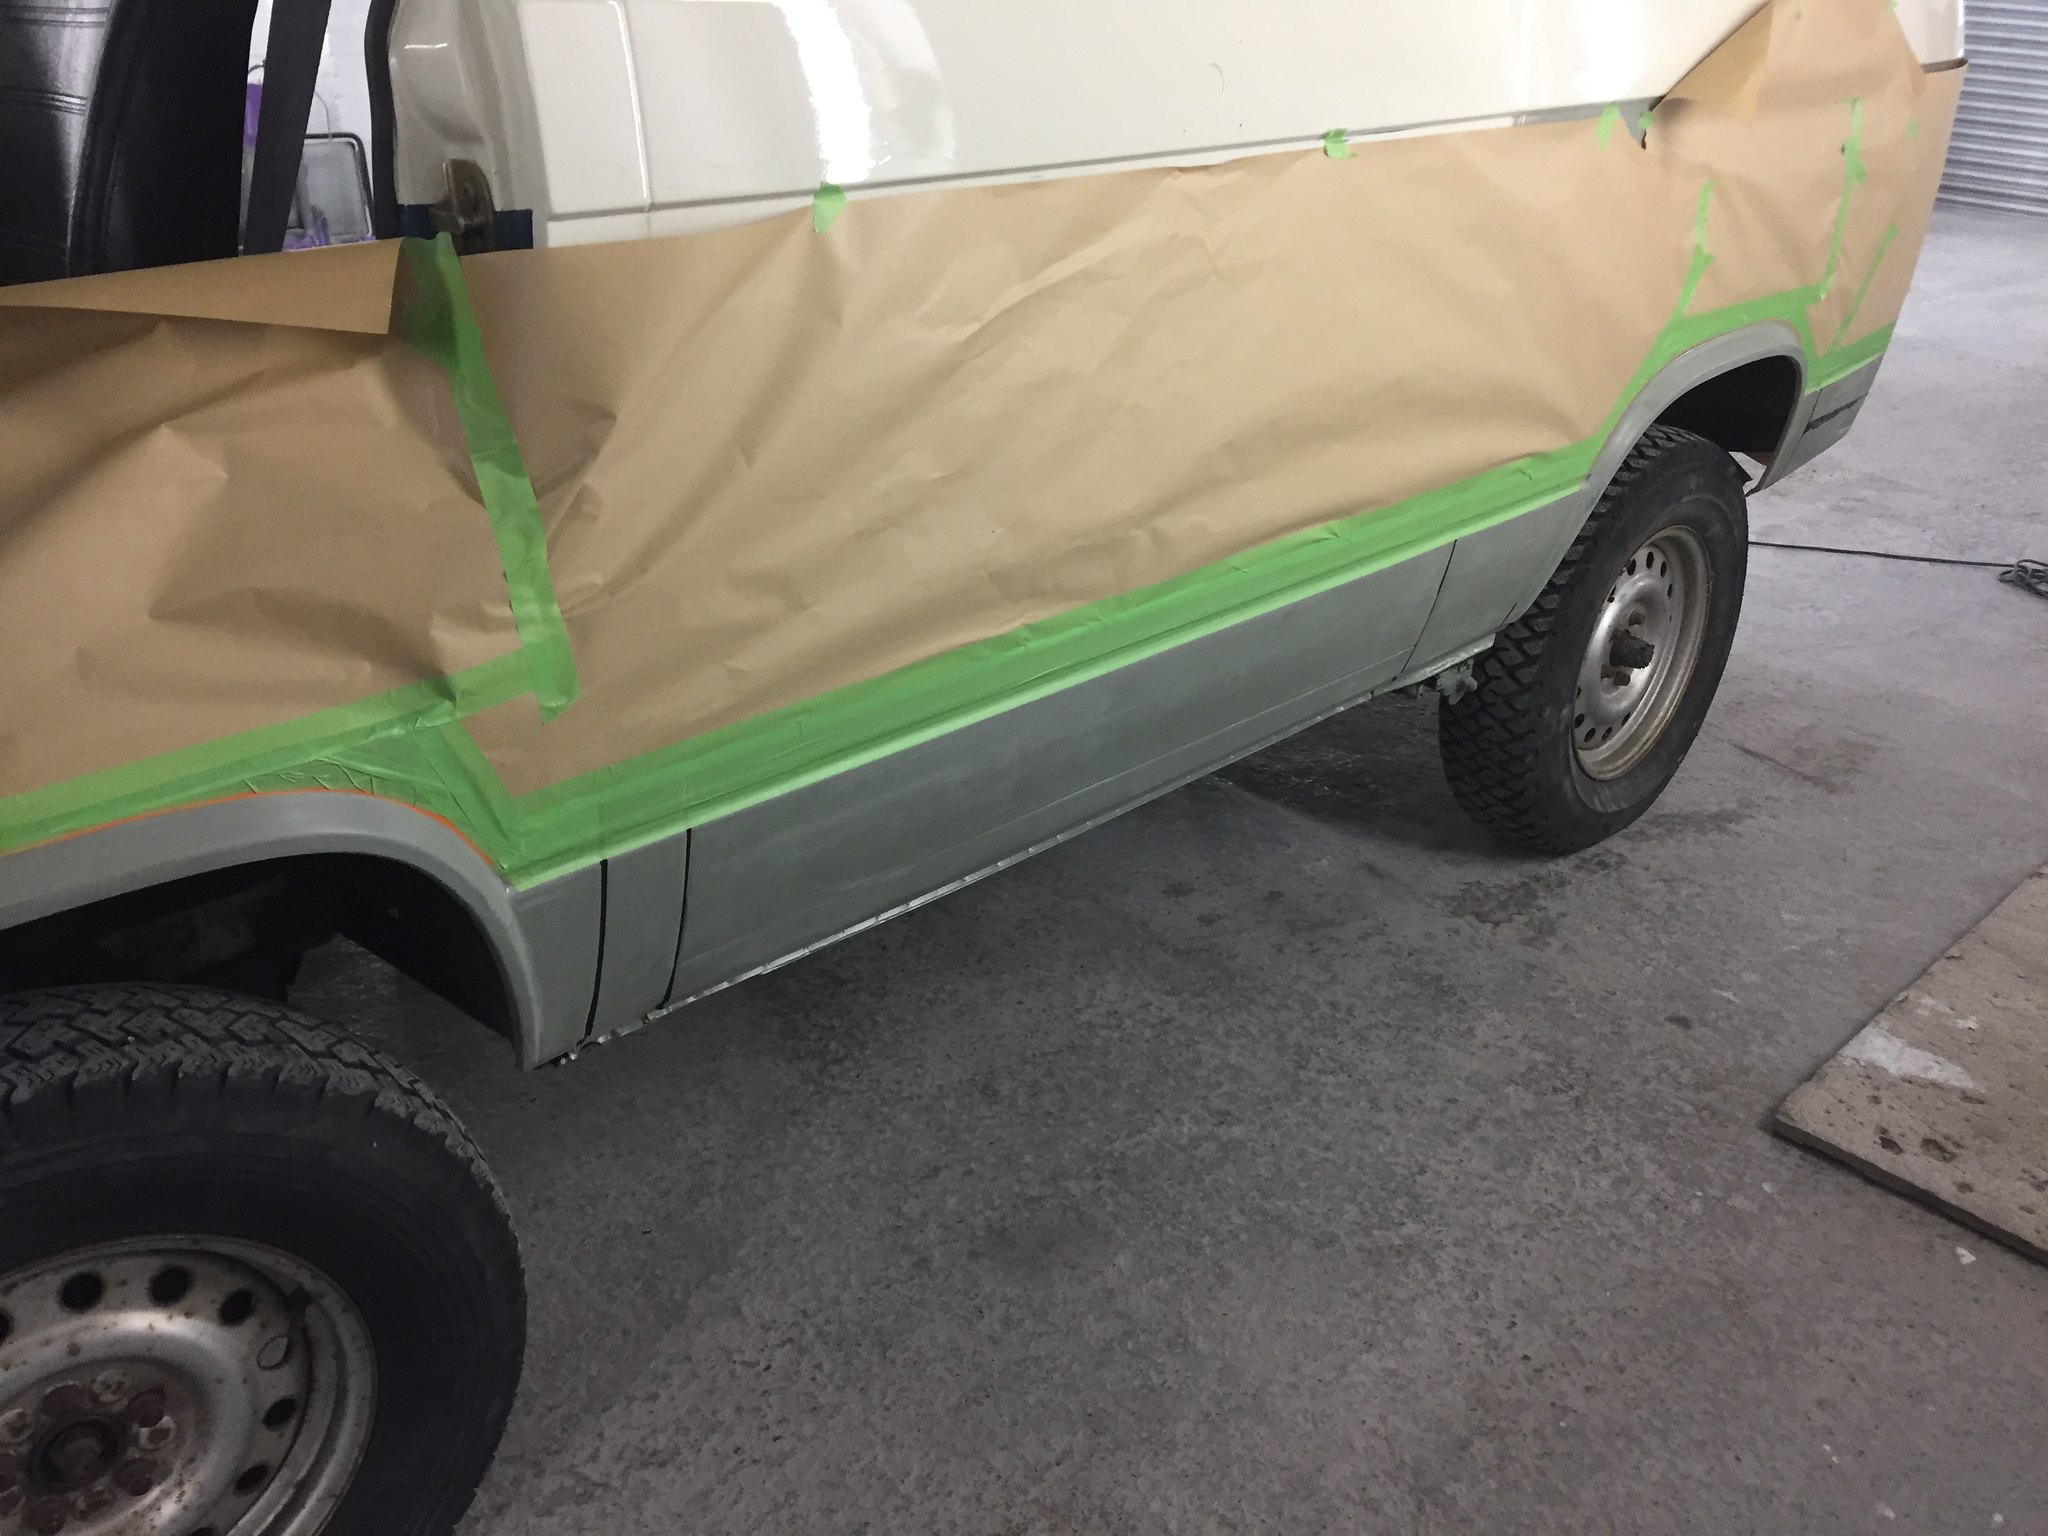
Fully welded up and knocked back. I will use chipguard up to the swage line like Rocky Mountain Westy do I think.
A good example of how you can save a lot if your prepared to make panels, but it will cost time if your not a real whizz at it
Front arch patched ready to go back on

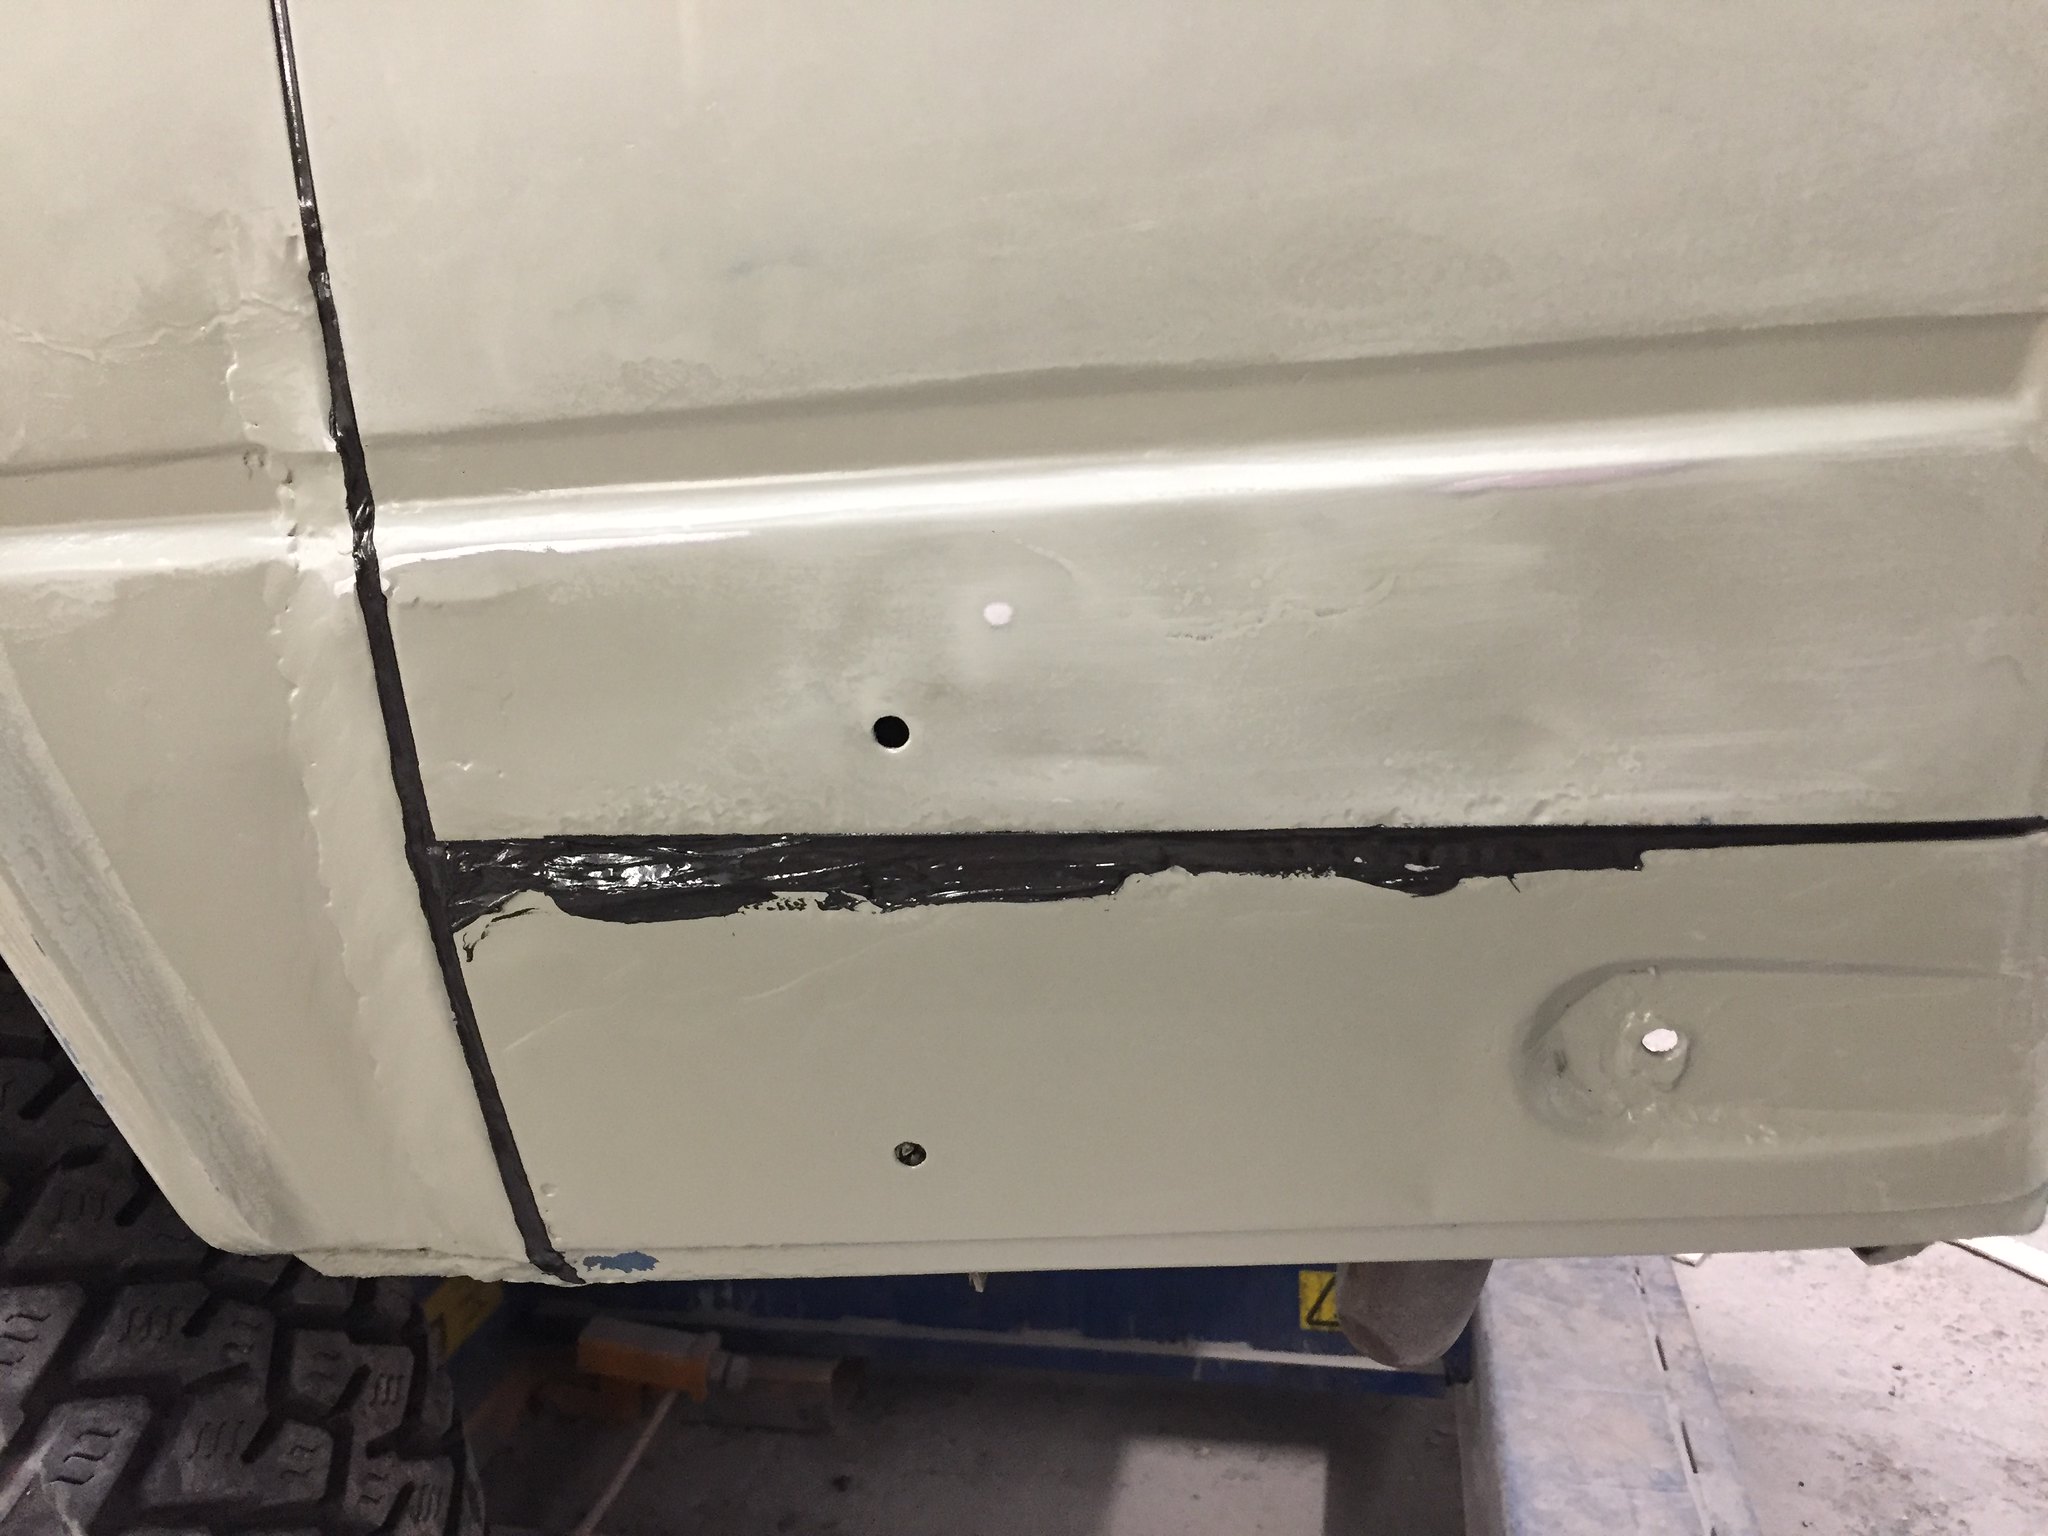
Windows out, cv primered. I then lay a line of masking tape each side of the seams. Polyurethane sealer in, wiped once each way with a wet finger to push in firmly, whip off the tape and voila.
Masked up ready for U pol chipguard. The Kent system is amazing in its variability and gets a factory finish.
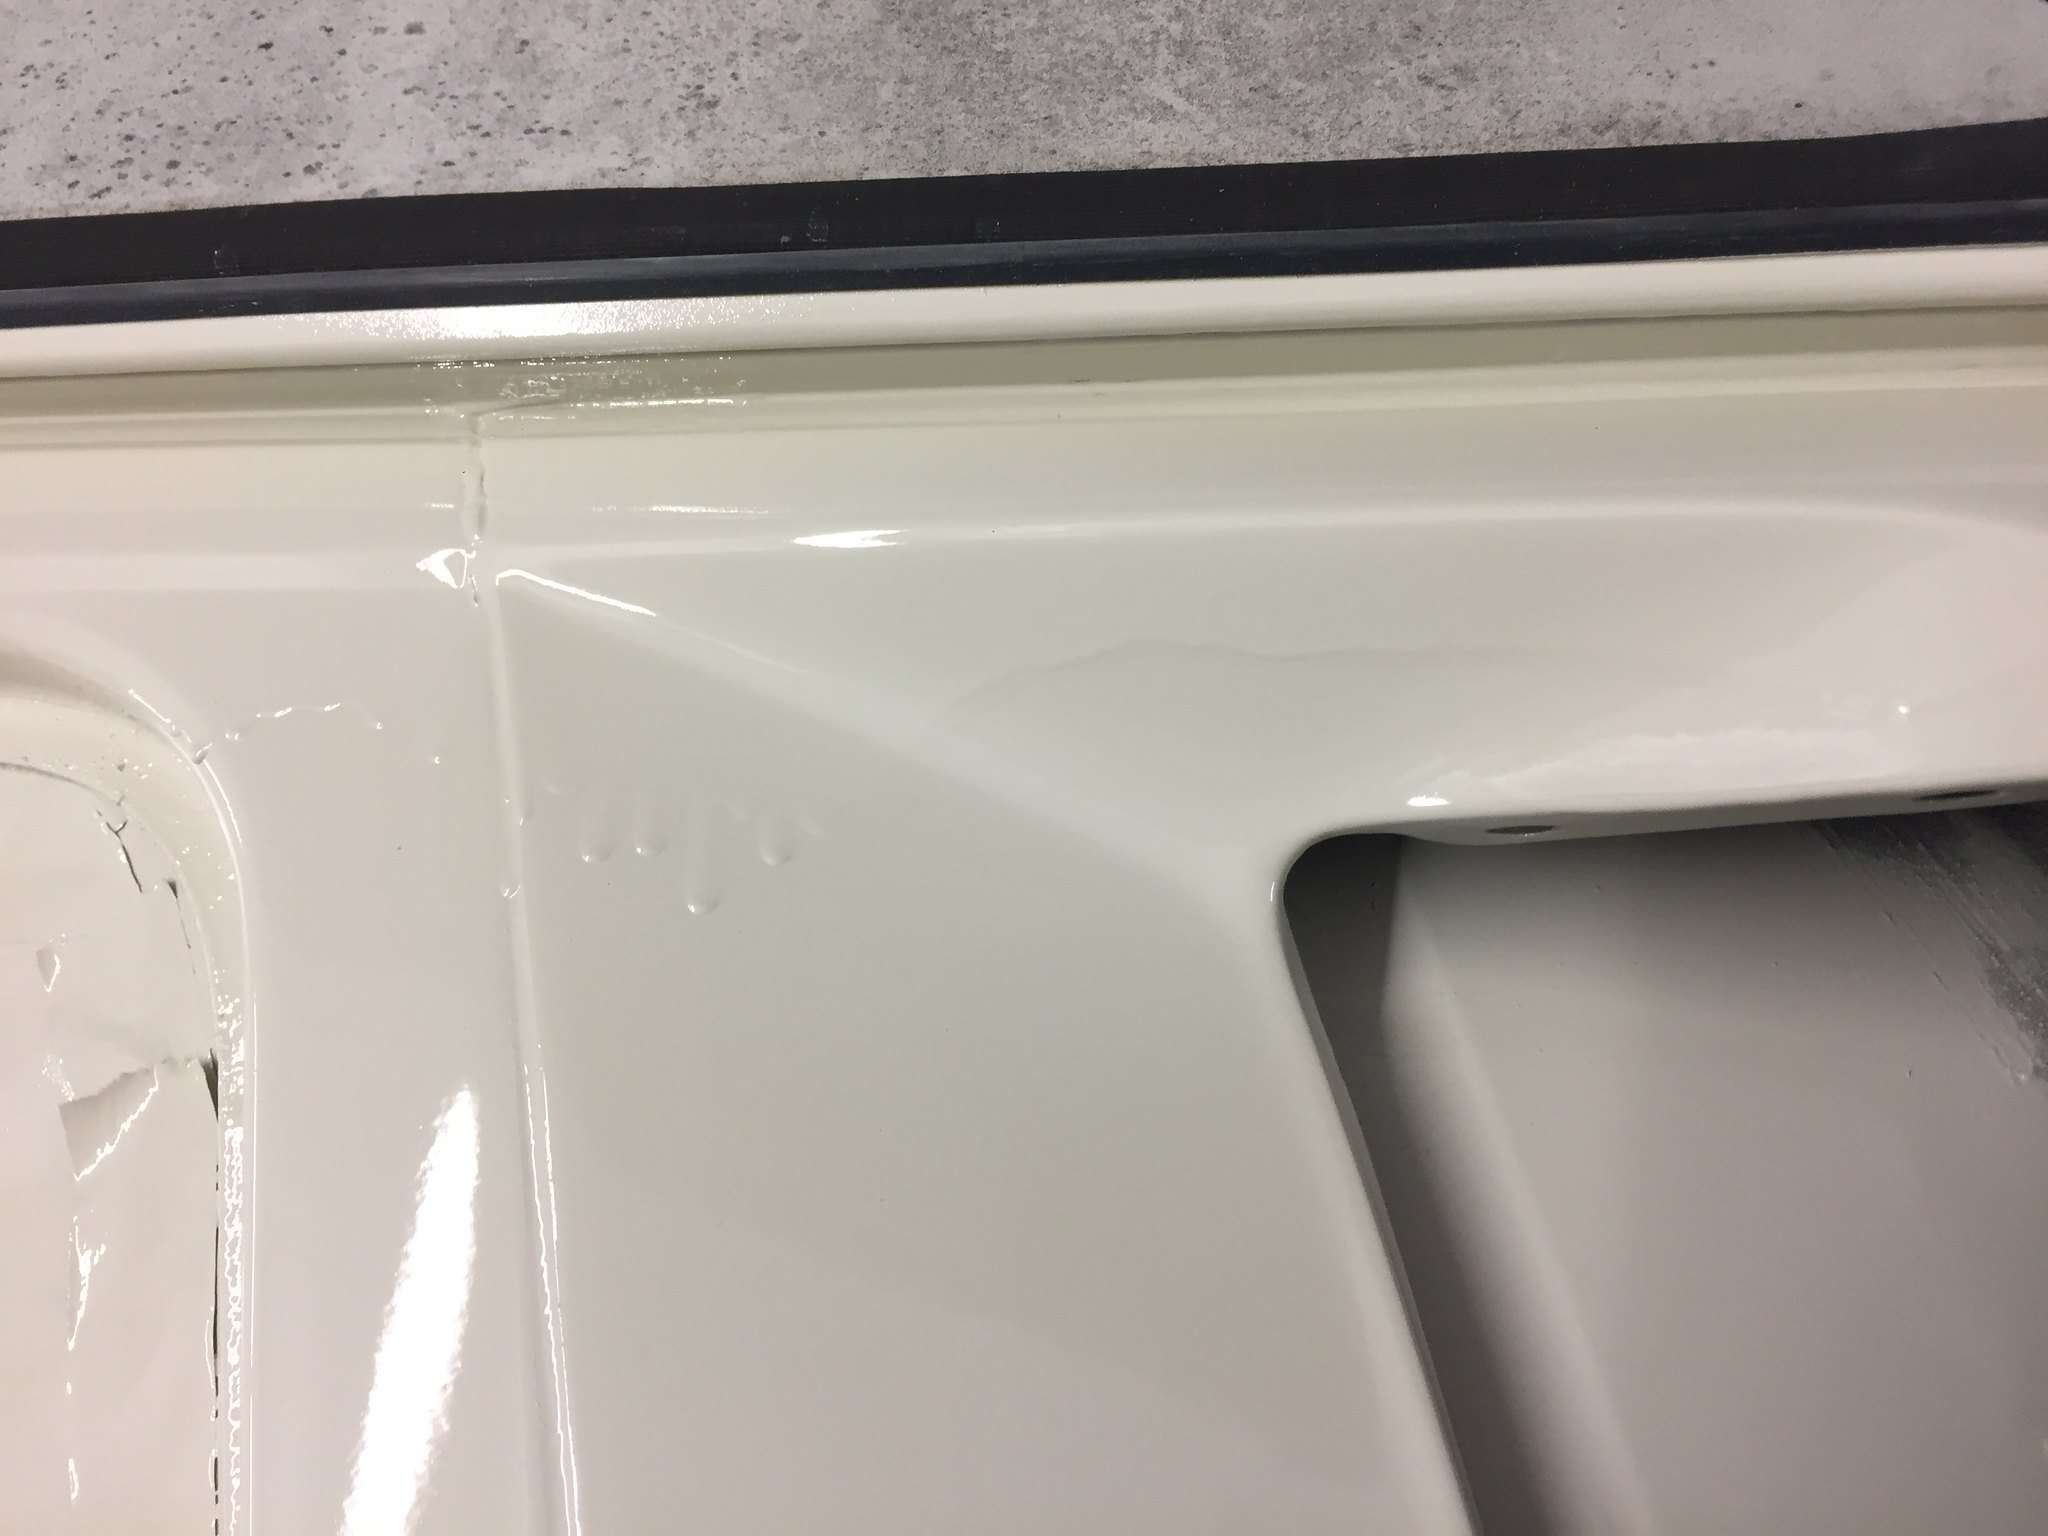
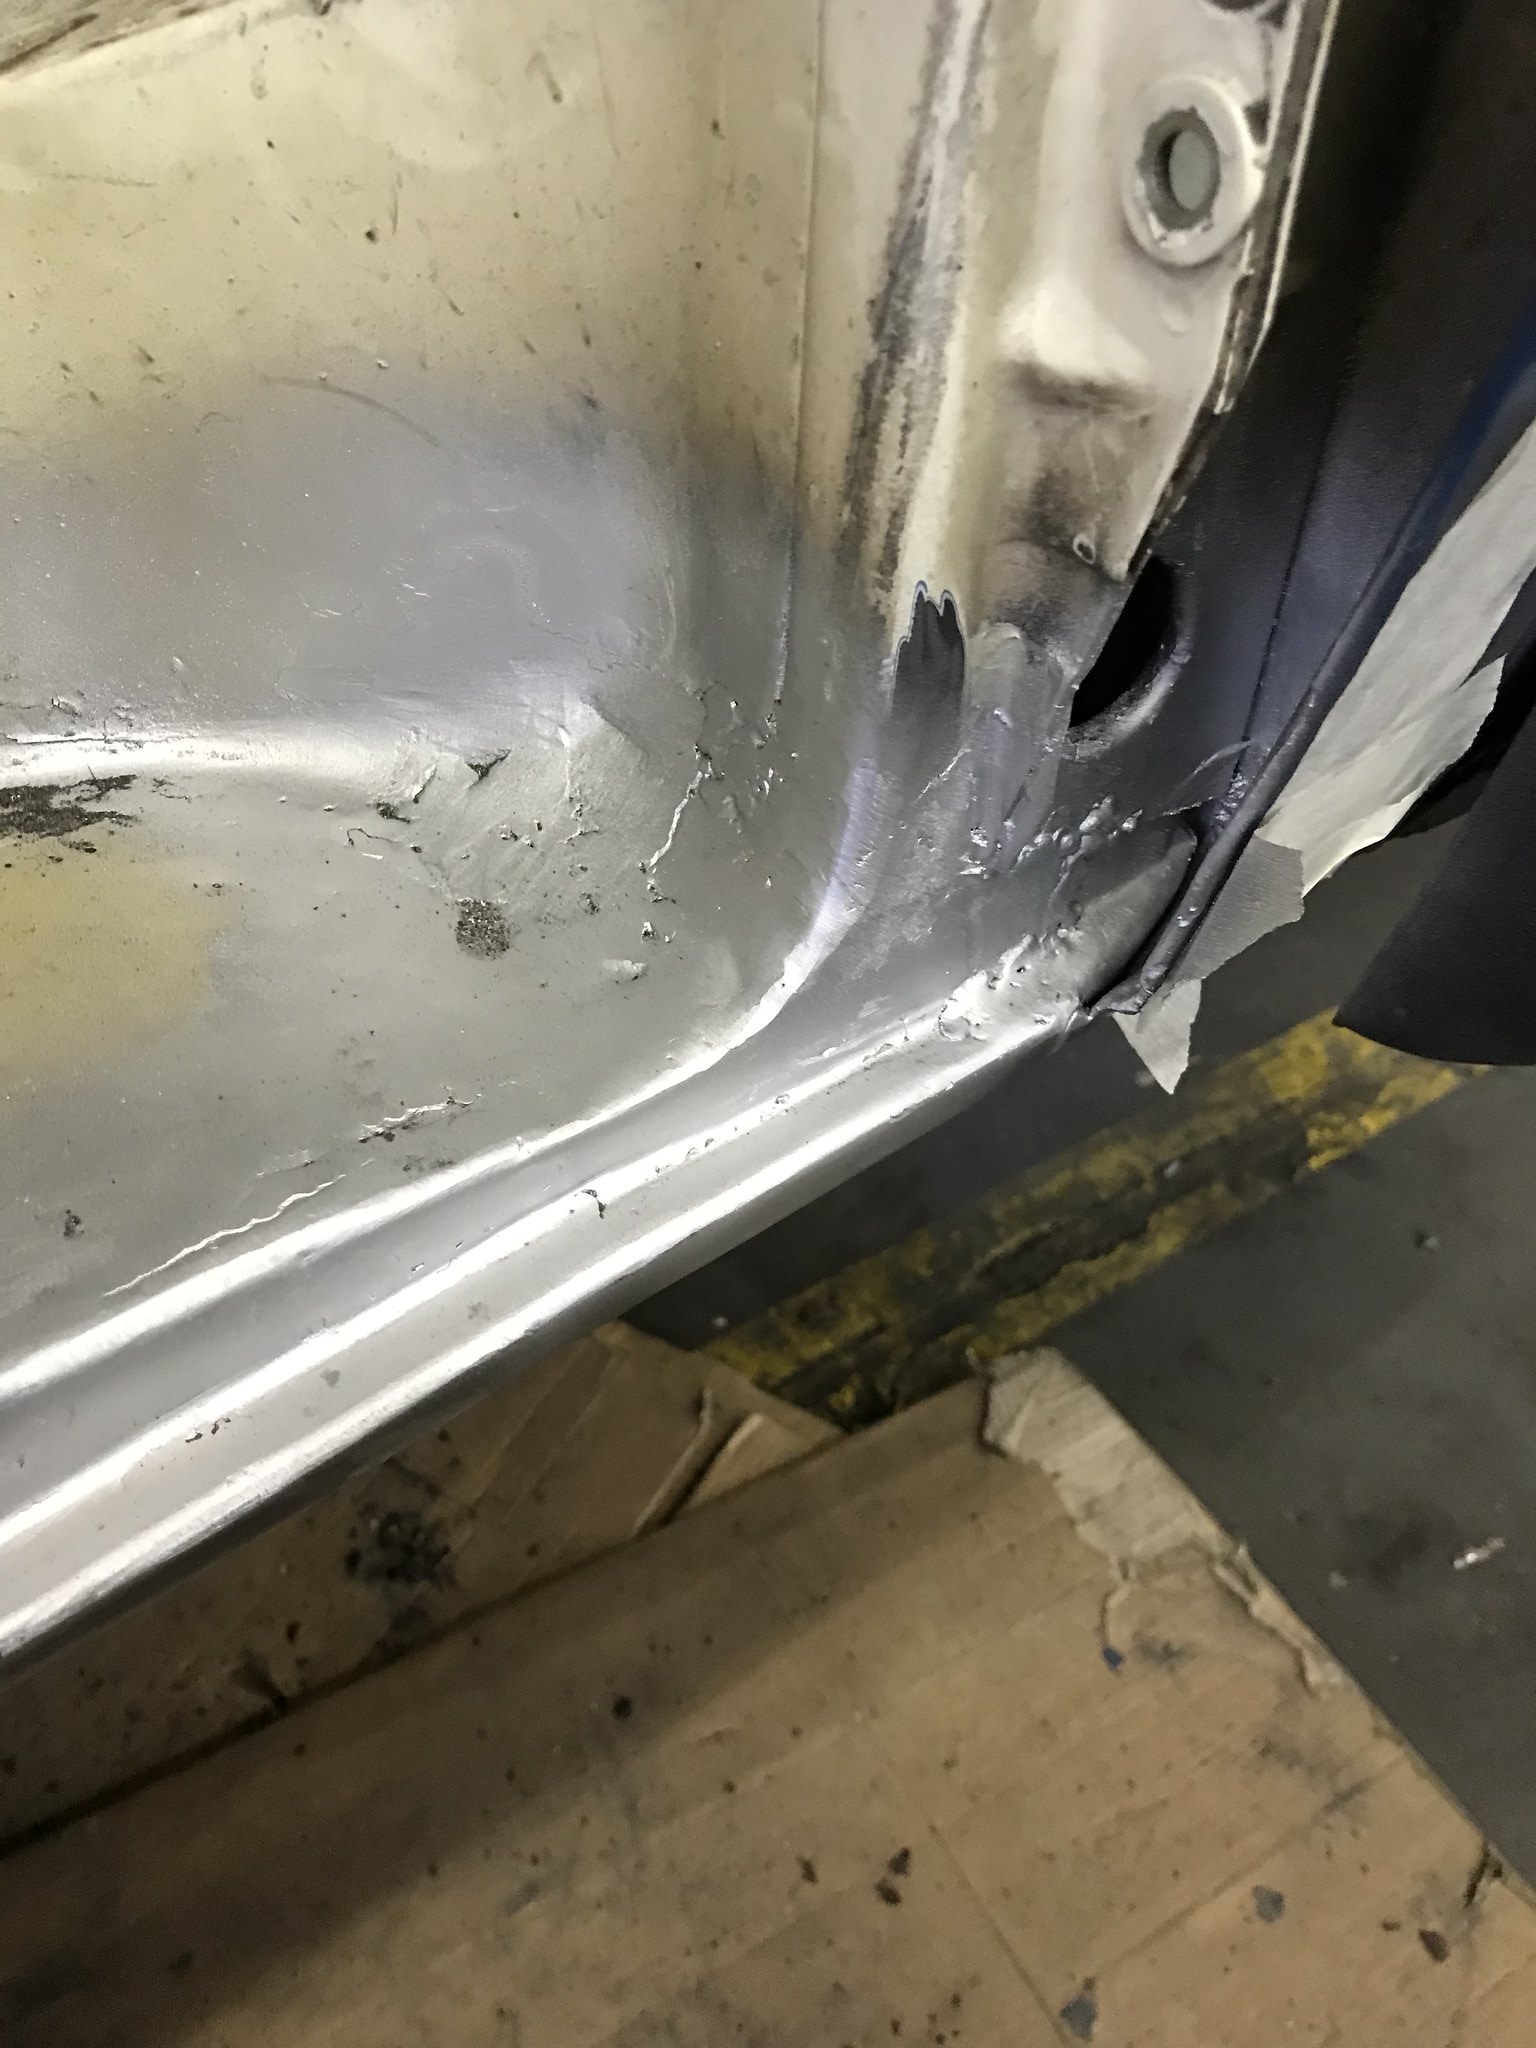
And this is what happens when you paint drunk at 1am, you get sag and runs in the paint, both colours got done because I had an infrared lamp to cure the paint, the van was too tall for the booth. However, I flatted off around the seals and it’ll do the job to protect the paint until I can flat it and probably repaint it.
I’d ran out time to repair the back, so I ground out the filler and painted it over for another day, it was an ugly previous repair but solid. It was a shame really because if the previous repaired had just aimed to get a little straighter instead of throwing it in and relying on filler it wouldn’t have been bad, a little agricultural perhaps.
The c pillar was passable from a previous repair but the b pillar was
Most the sill was fine except for the b pillar and and the edge where a previous repair had been seam welded on.
The jacking point was still thick but the chassis leg needed a patch
So the repairs started with the inner sill which was patch repaired from 1.5mm steel, inner sill is on the floor underneath.
You can better where the patches went in here
Then the inner b pillar was rebuilt in patches, as a beginner this was a PITA and I would have paid for the inner pillar just to save the time, you can see how many patches it took, welded from both sides
The jacking point was repaired with 2mm bar then thickened with weld
Then the outer B went back on with a repair panel. .
Then onto the outer sill, I started with the cheap nasty repair panel that goes from sill to centreline, this was replaced with an original sill in the end, it meant the sills were correct and where the floor had rotted away it was replaced with the original panel it can be seen upside down a few pictures back, the green is the epoxy commercial vehicle primer from glasurit, it’s expensive but incredibly tough, and unlike normal primer, waterproof. Everything got colour coat before final closing in.
The fit of the sill dictated where everything else sat, it was panel bonded then spot welded on the bottom edge, one weld every 30mm or so. The top edge to the floor was plug welded. Sorry no pic of that.
Then I repaired the infill panel that mates outer sill to inner b.
Then I got a machine shop to take my nasty lower side panel (the long grey panel) to fold it up in the correct place for the seam and some edge flaps on, then like the front panel, panel bond the edges plug weld to the outer sill from the inside and use butt weld clamps before butt welding to the side panel.
You can see the spot welds in the pic above. This one shows the same repair before butt welding with the rear quarter closed in too.
Fully welded up and knocked back. I will use chipguard up to the swage line like Rocky Mountain Westy do I think.
A good example of how you can save a lot if your prepared to make panels, but it will cost time if your not a real whizz at it
Front arch patched ready to go back on
Windows out, cv primered. I then lay a line of masking tape each side of the seams. Polyurethane sealer in, wiped once each way with a wet finger to push in firmly, whip off the tape and voila.
Masked up ready for U pol chipguard. The Kent system is amazing in its variability and gets a factory finish.
And this is what happens when you paint drunk at 1am, you get sag and runs in the paint, both colours got done because I had an infrared lamp to cure the paint, the van was too tall for the booth. However, I flatted off around the seals and it’ll do the job to protect the paint until I can flat it and probably repaint it.
I’d ran out time to repair the back, so I ground out the filler and painted it over for another day, it was an ugly previous repair but solid. It was a shame really because if the previous repaired had just aimed to get a little straighter instead of throwing it in and relying on filler it wouldn’t have been bad, a little agricultural perhaps.
Greta: 85’ LHD 2.5L Subaru 14in Syncro
http://forum.club8090.co.uk/viewtopic.php?t=165773
http://forum.club8090.co.uk/viewtopic.php?t=165773
-
adie89
- Registered user
- Posts: 293
- Joined: 04 Sep 2012, 21:25
- 80-90 Mem No: 11532
- Location: Wiltshire
Re: Procrastinating never got anyone anywhere
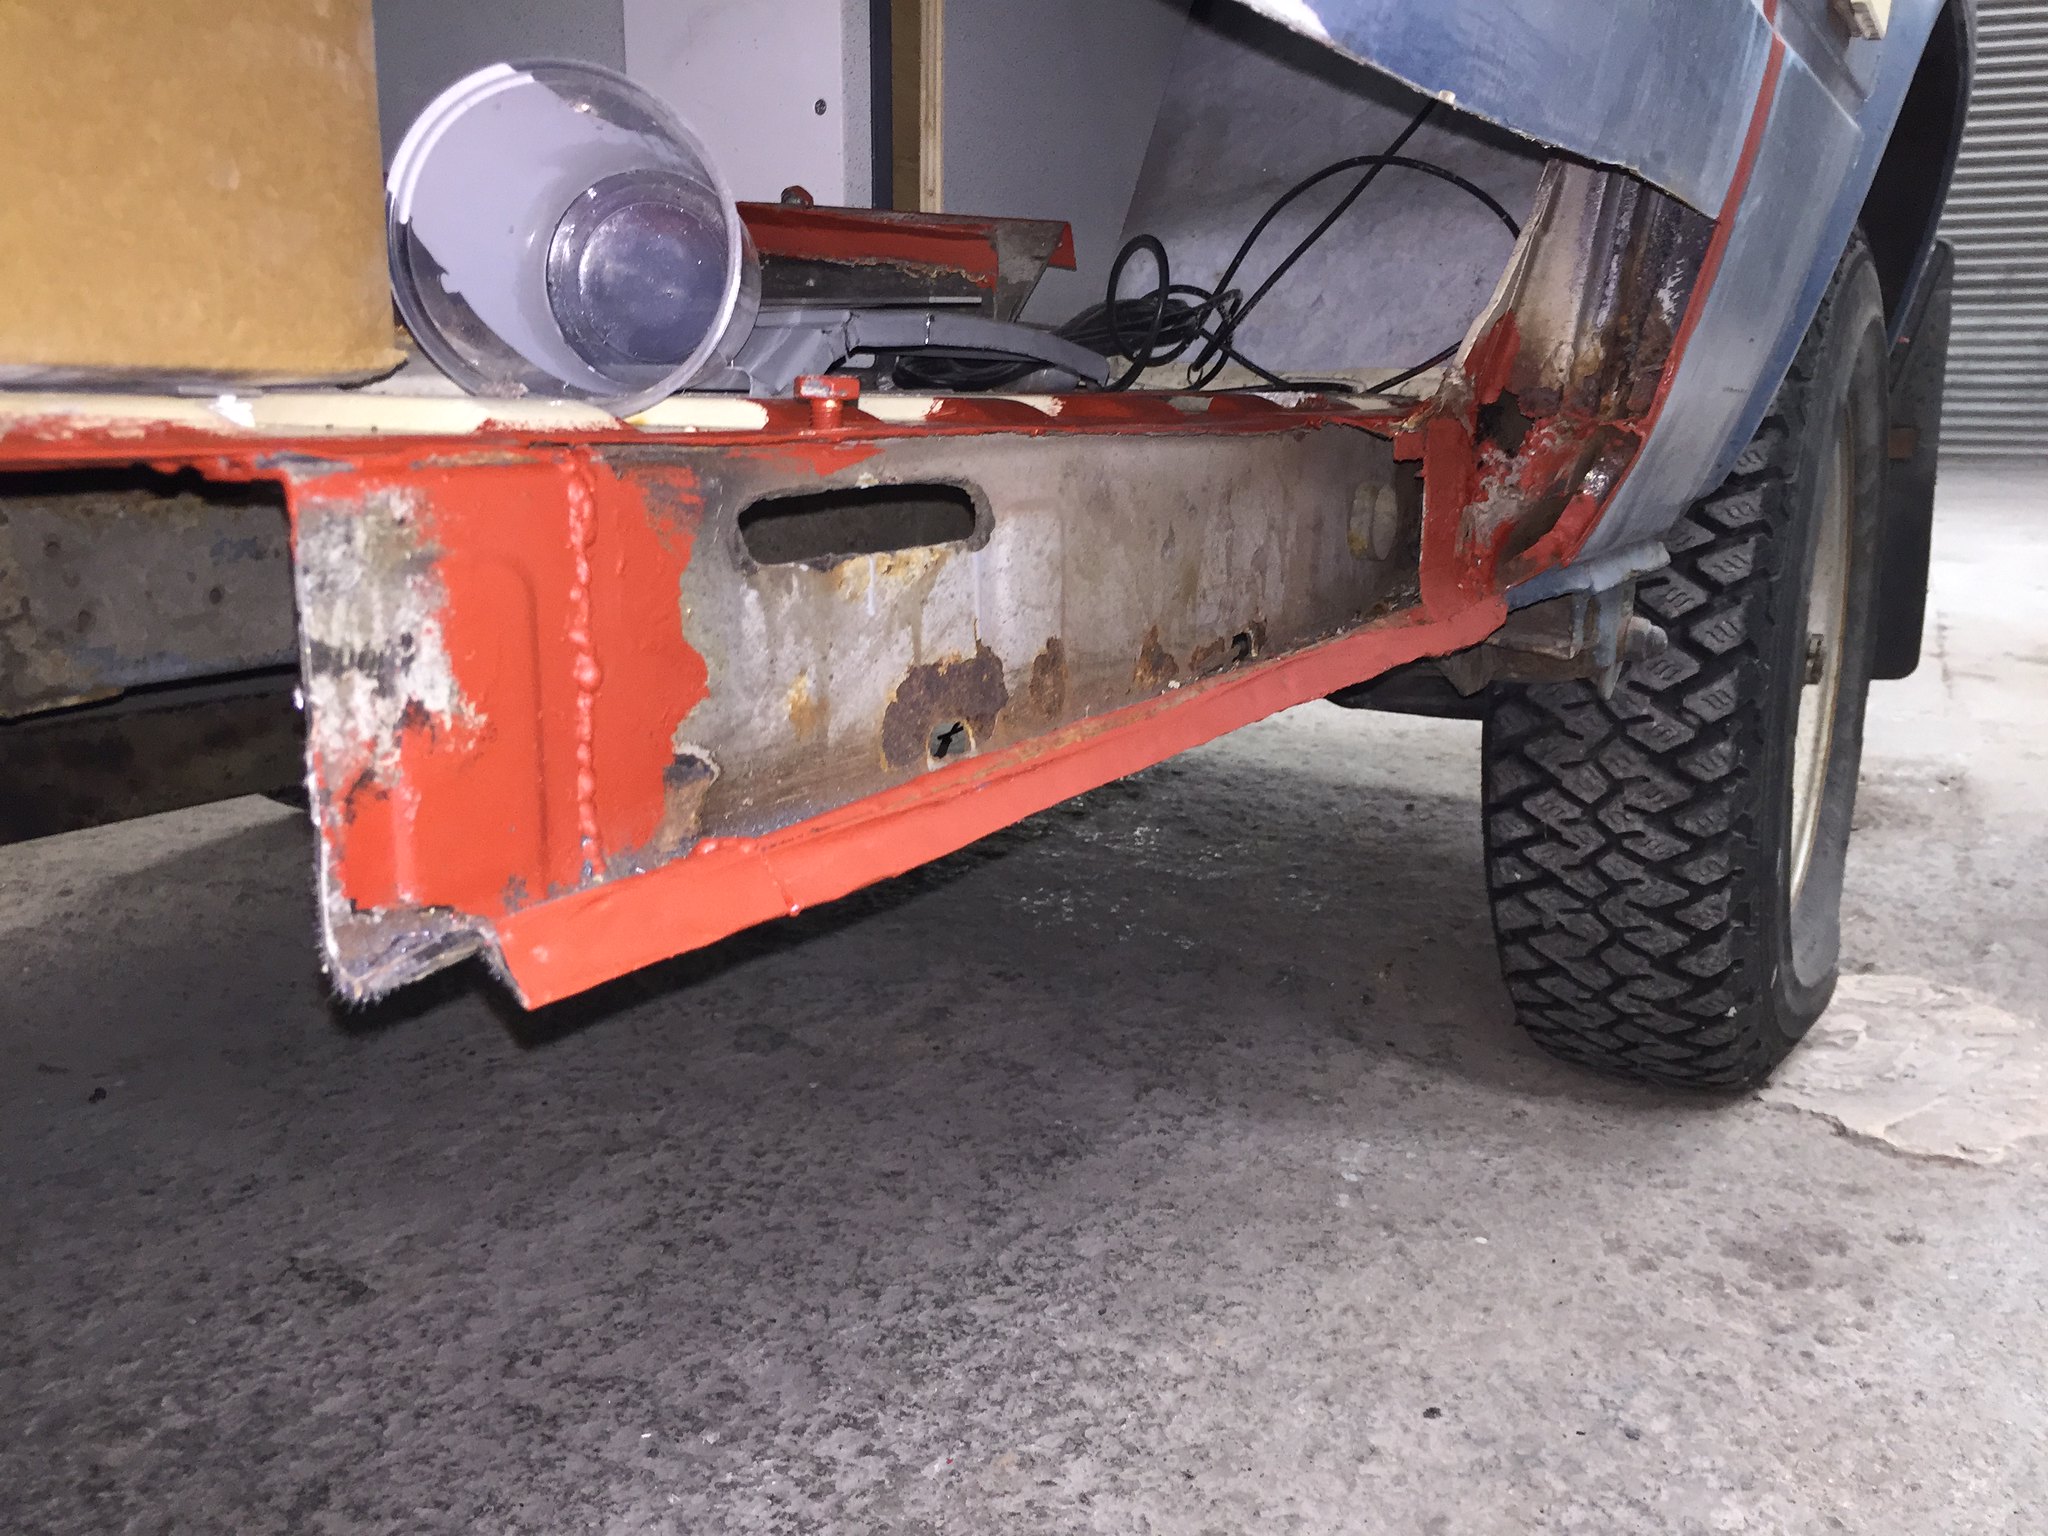
So while I hunt for a rear right genuine panel to go with my genuine wheel arch, and I’m looking for a C pillar. It’s just too complex for me. Terrible grammar - while I hunt for... I’ve been looking at repairing the floor. Lots of holes and rust patches mean there’s probably 10 or 12 patches needed.
This

Led to several failed attempts to shape the panel, with inspiration from Binky (you tube if you have no idea what I’m on about, you’ll end up watching the lot) and I’ve seen someone else do it, meant I made this
To use in a hydraulic press (took about 3 hours) made these in 1.5mm

And in 1.2mm
These were test pieces and were close enough for government work. I’m using 1.5mm because there are a load of bolt holes I want to reinforce and for the multivan flip seat mounts. The floor had begun to buckle and I wasn’t happy to put anyone, especially my little one in it.
And in other news I upgraded the ground clamp on my new welder. Not bad for a fiver
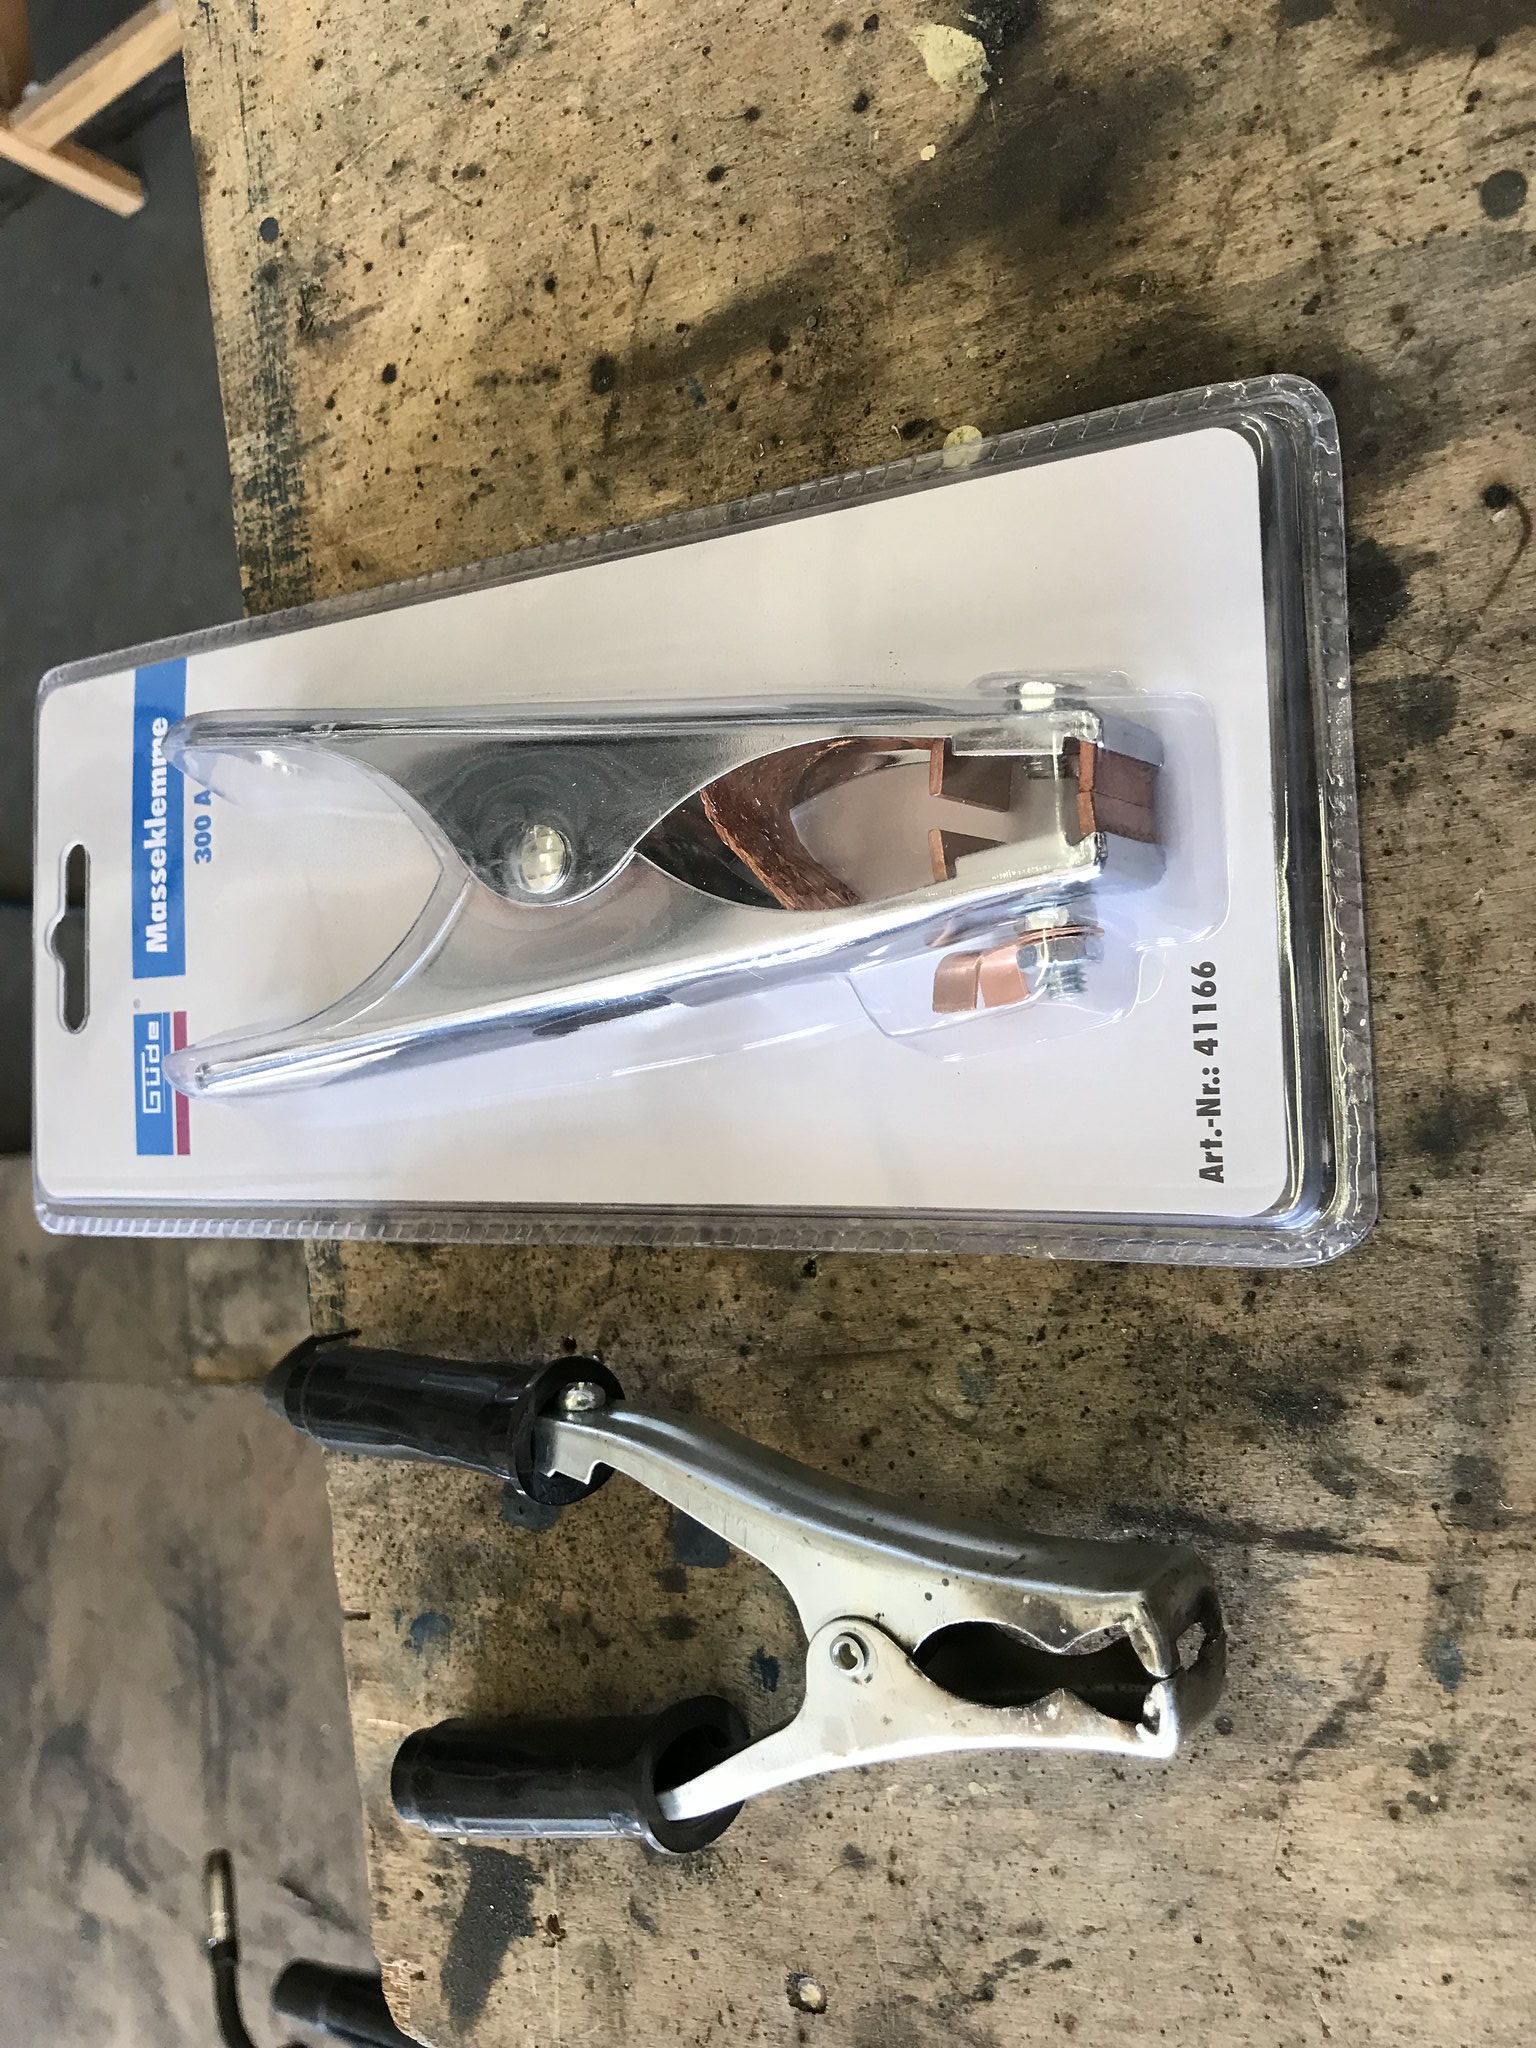
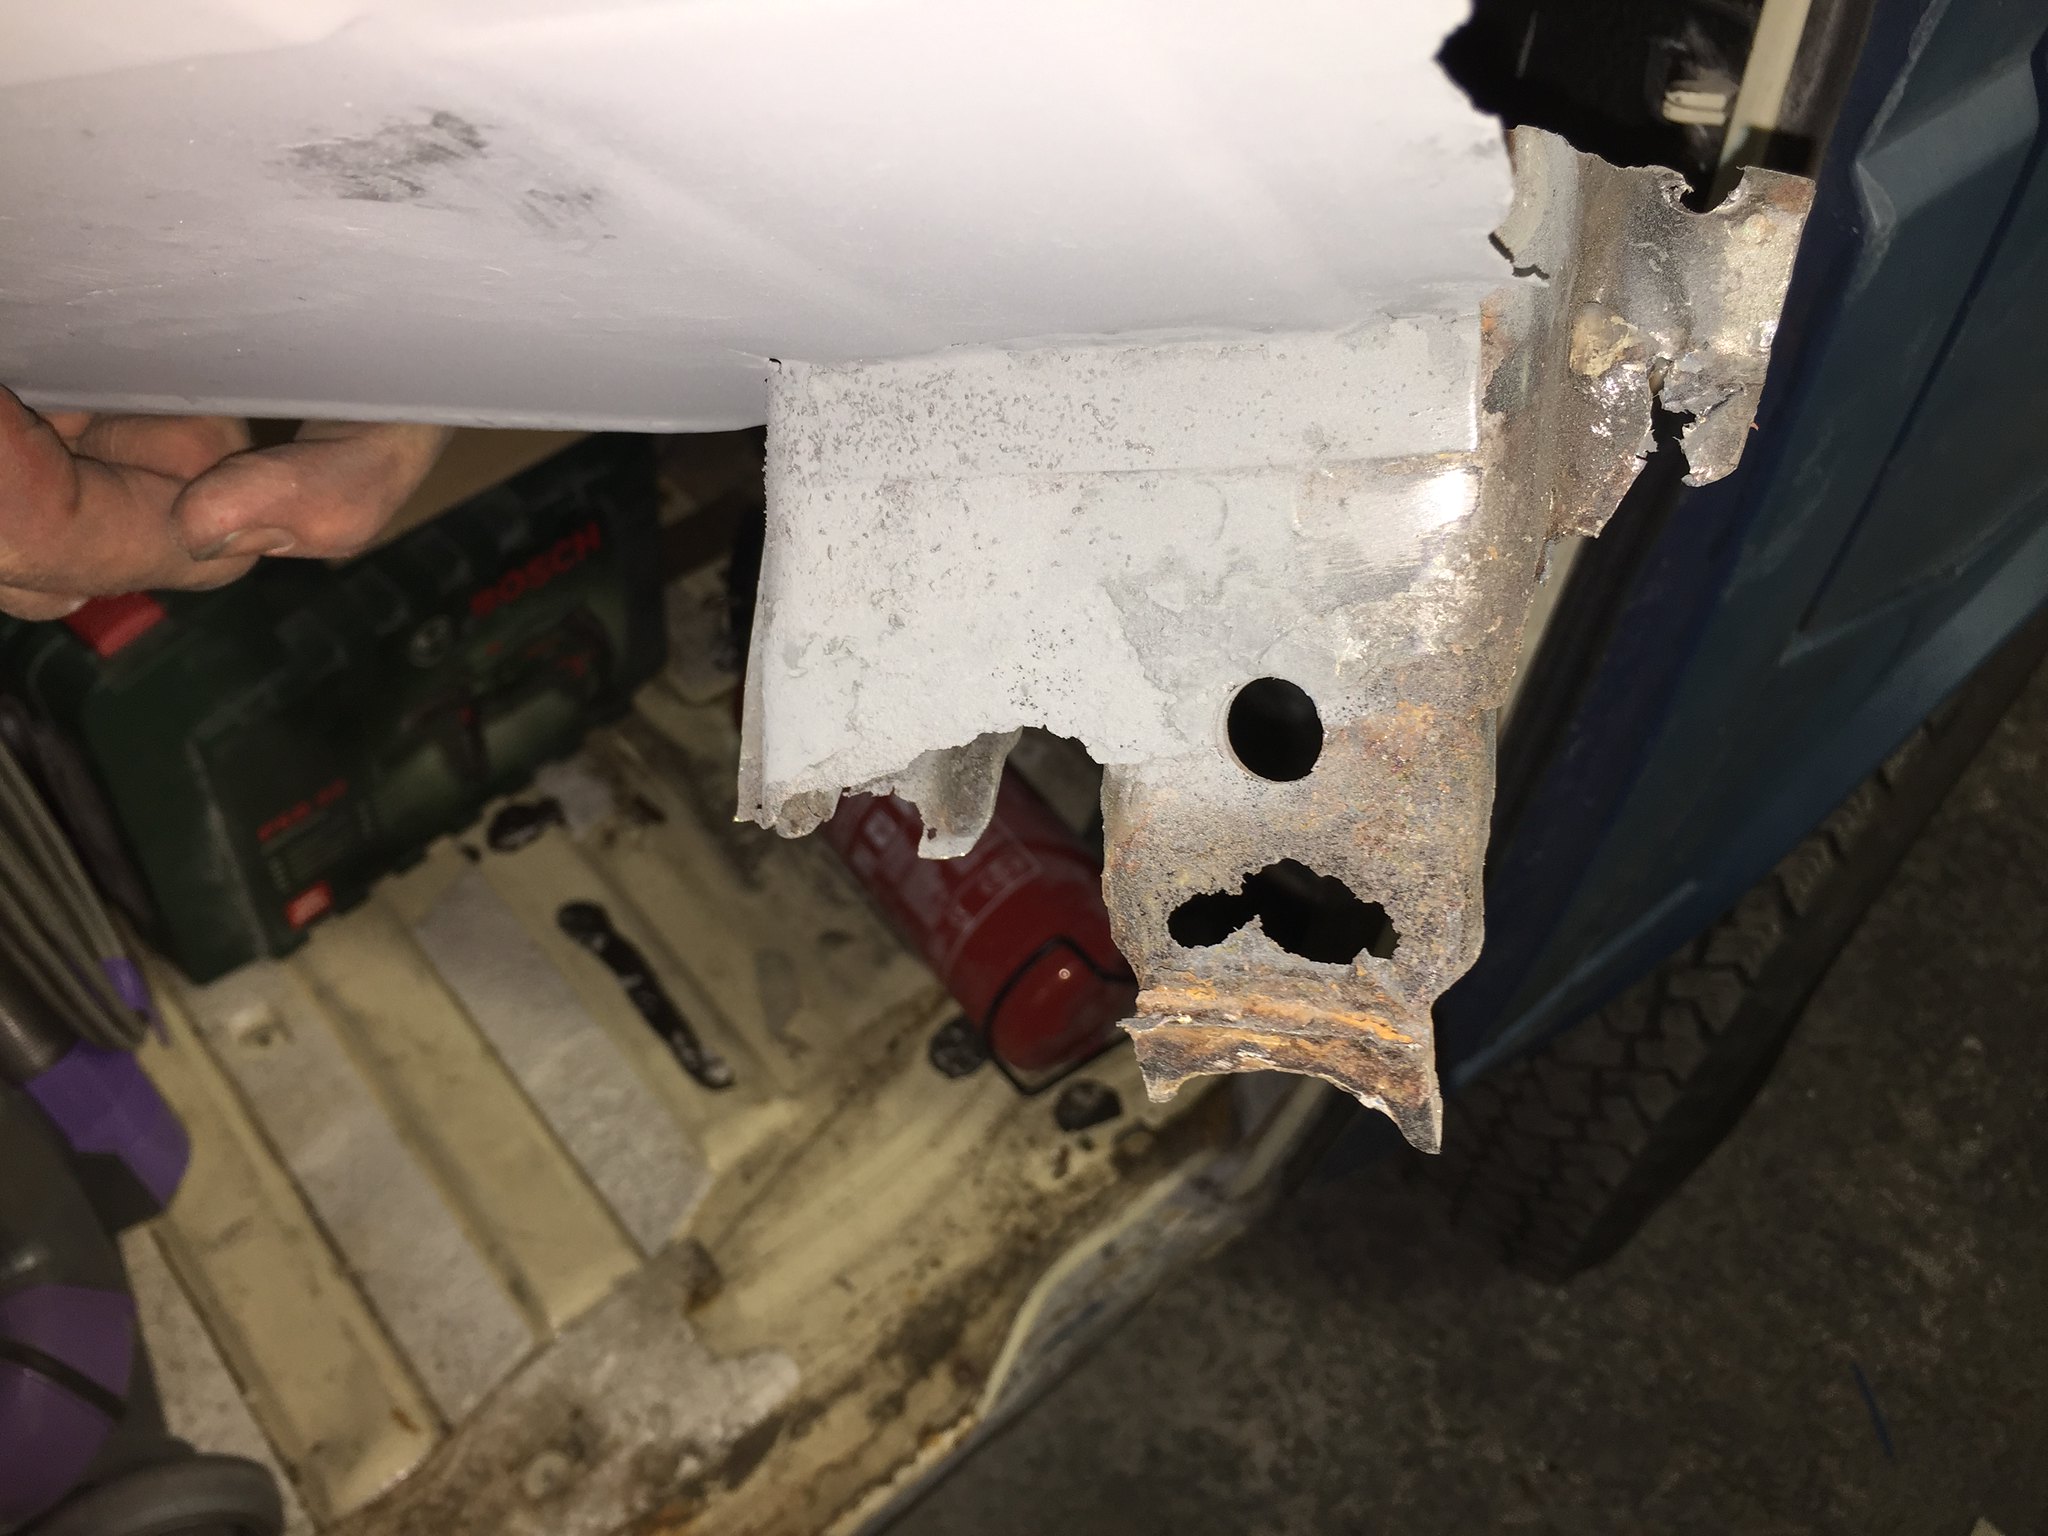
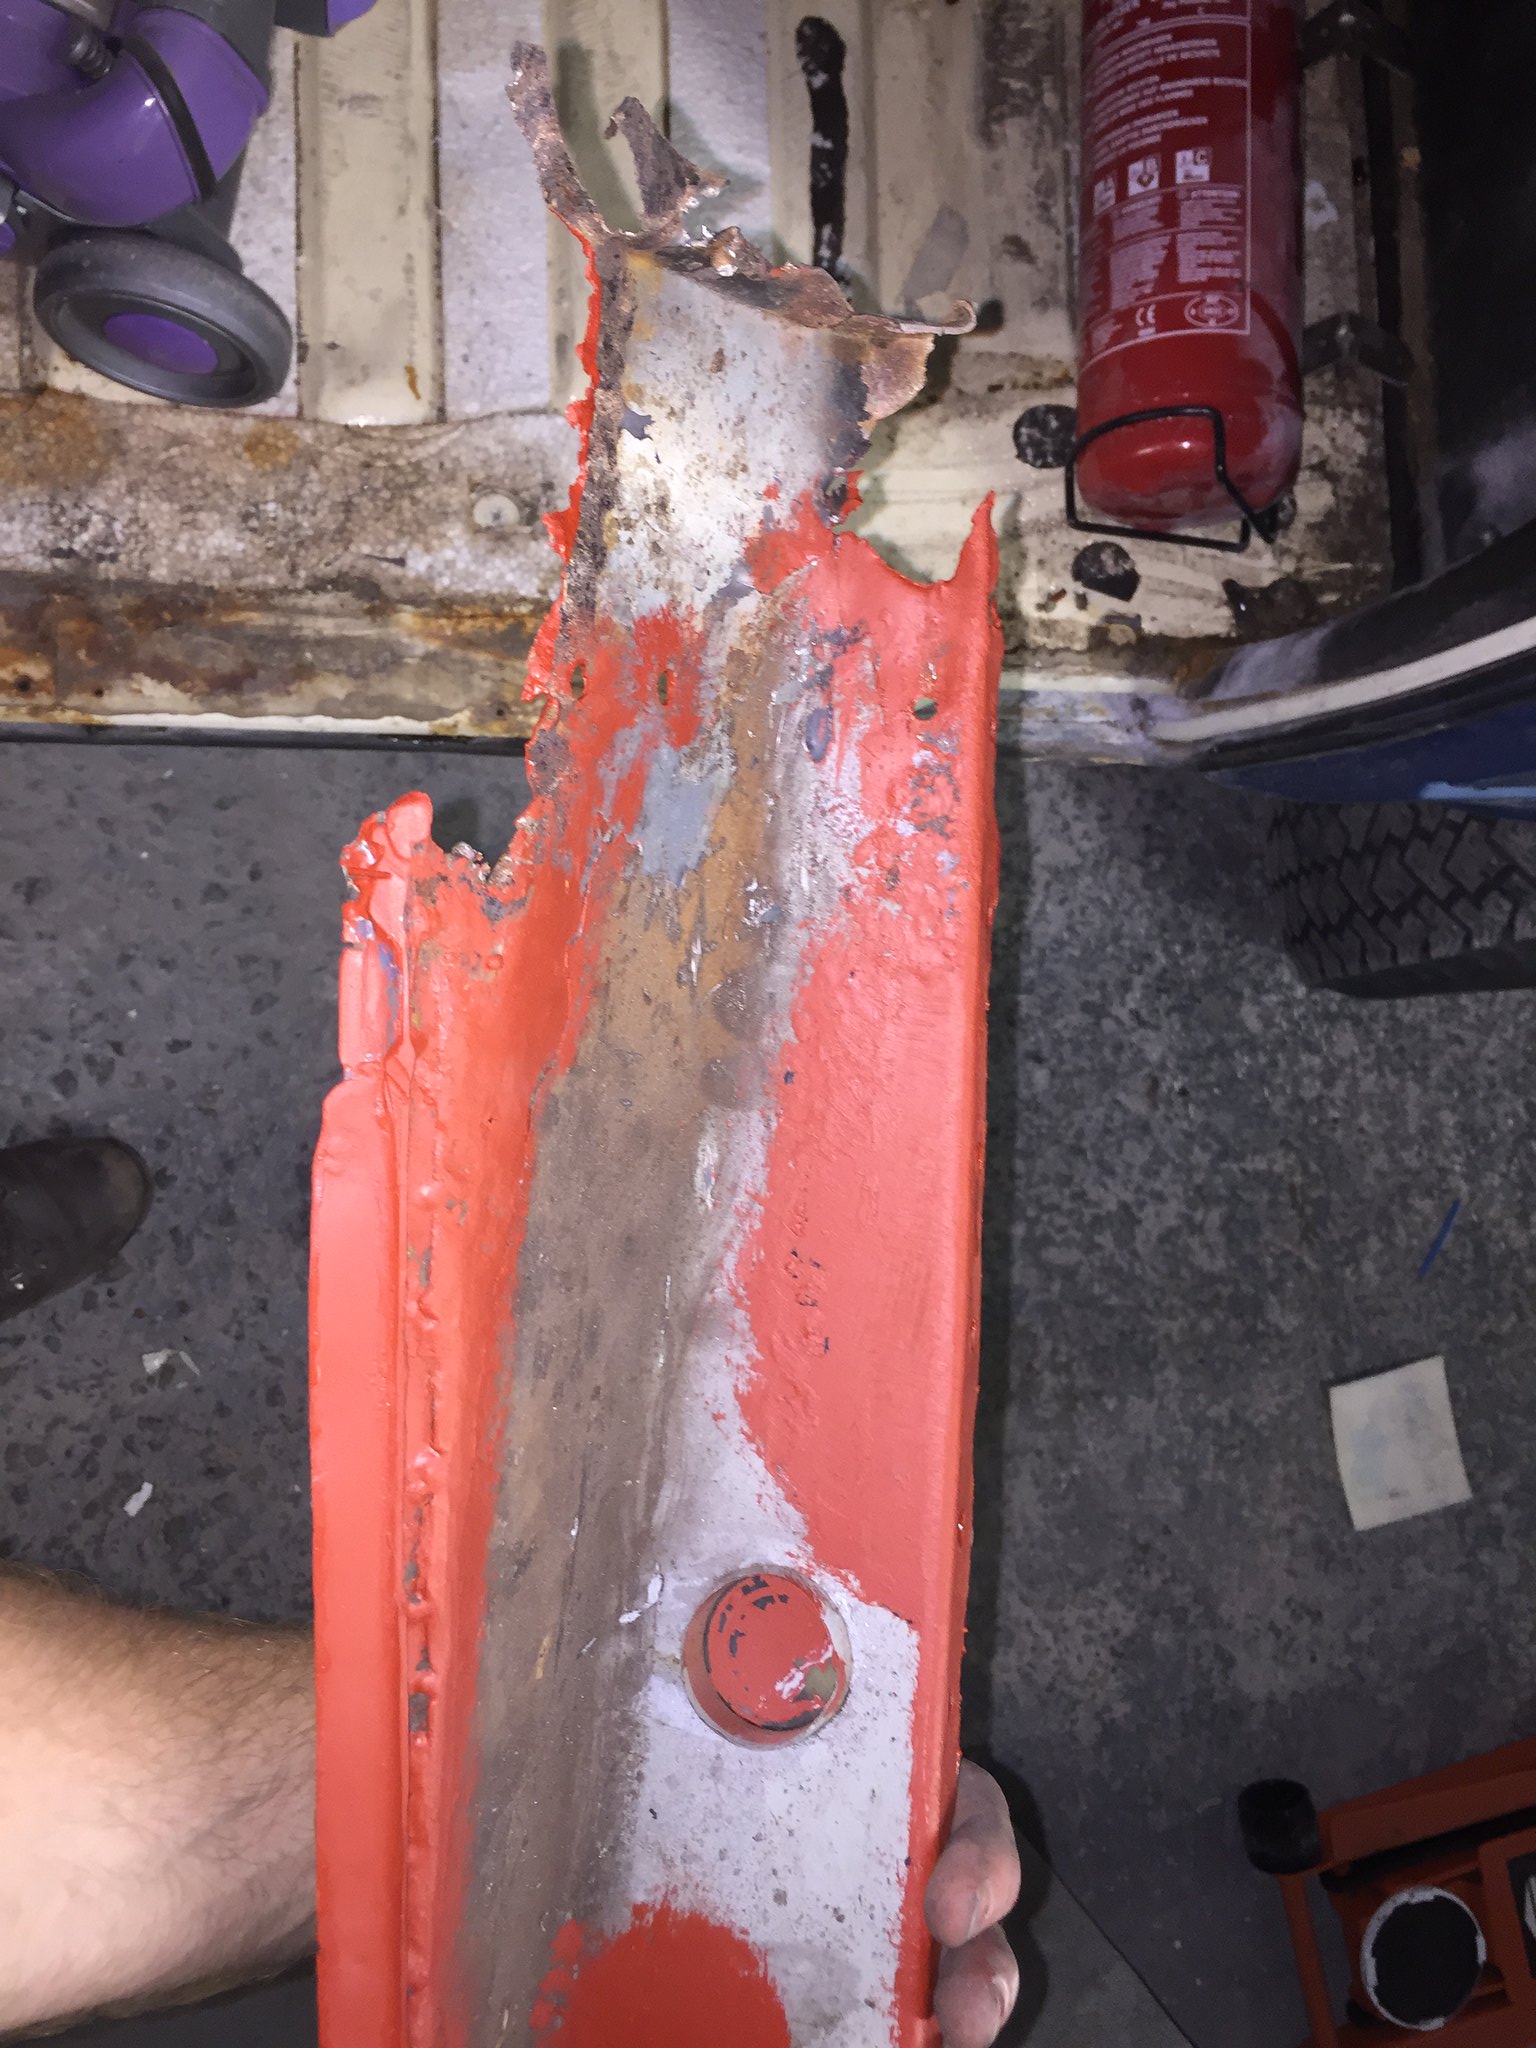
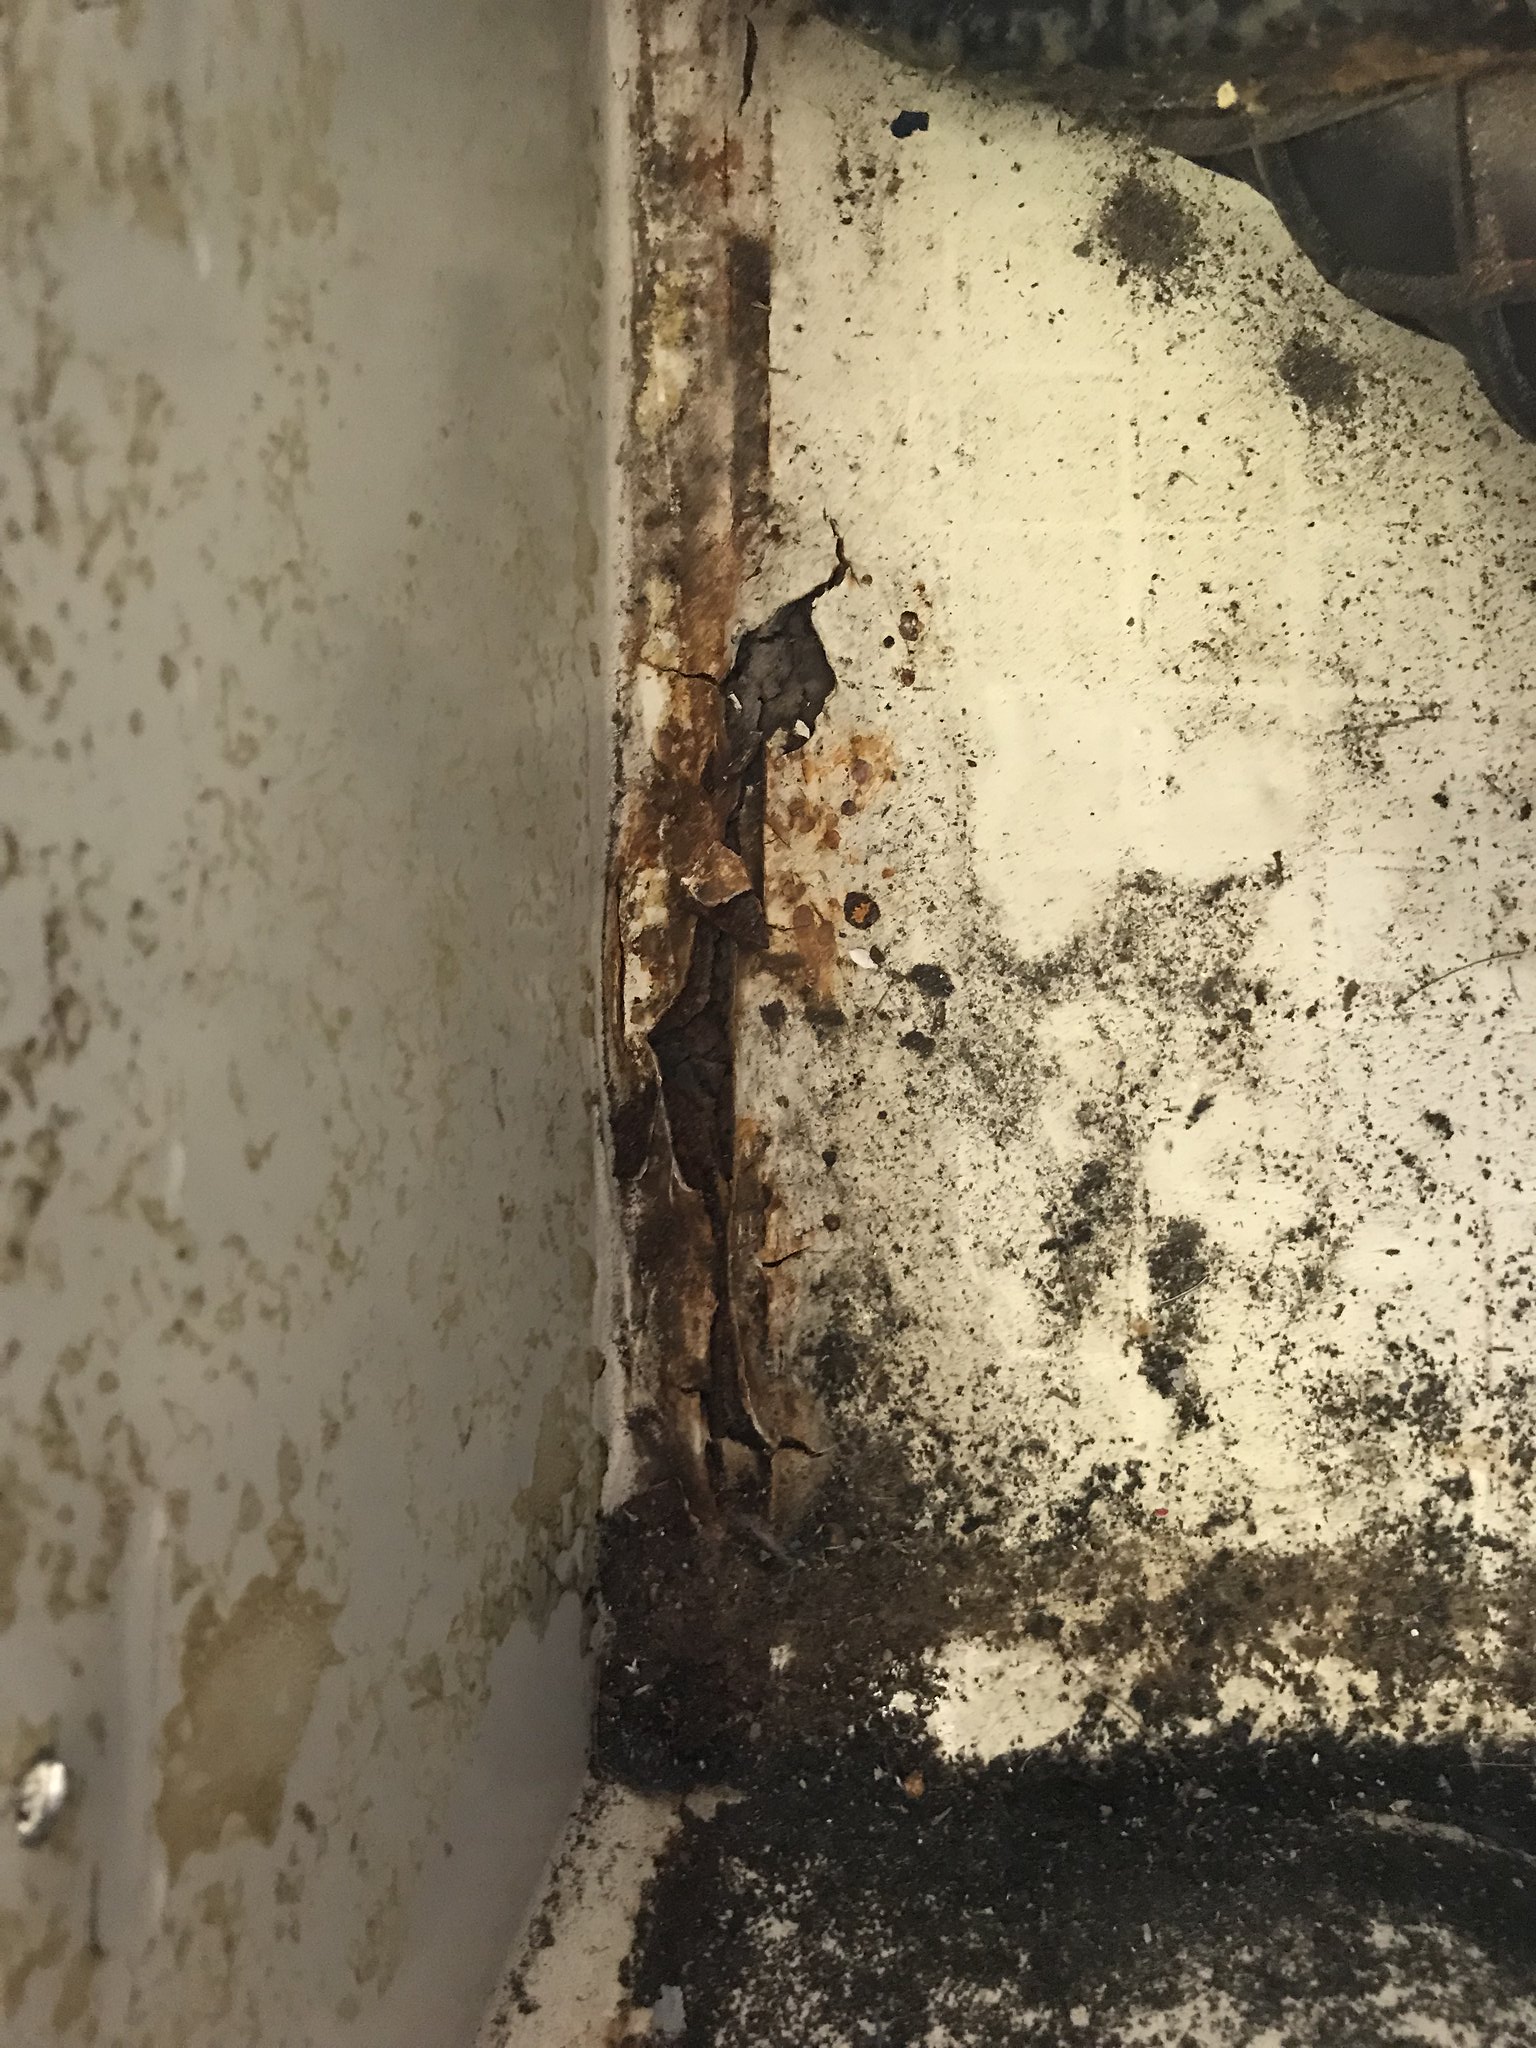
I also discovered this at the base of the seat box under the floor mat. Great...
This
Led to several failed attempts to shape the panel, with inspiration from Binky (you tube if you have no idea what I’m on about, you’ll end up watching the lot) and I’ve seen someone else do it, meant I made this
To use in a hydraulic press (took about 3 hours) made these in 1.5mm
And in 1.2mm
These were test pieces and were close enough for government work. I’m using 1.5mm because there are a load of bolt holes I want to reinforce and for the multivan flip seat mounts. The floor had begun to buckle and I wasn’t happy to put anyone, especially my little one in it.
And in other news I upgraded the ground clamp on my new welder. Not bad for a fiver
I also discovered this at the base of the seat box under the floor mat. Great...
Greta: 85’ LHD 2.5L Subaru 14in Syncro
http://forum.club8090.co.uk/viewtopic.php?t=165773
http://forum.club8090.co.uk/viewtopic.php?t=165773
-
RogerT
- Registered user
- Posts: 1819
- Joined: 10 May 2013, 11:59
- 80-90 Mem No: 13706
- Location: Central Scotland
Re: Procrastinating never got anyone anywhere
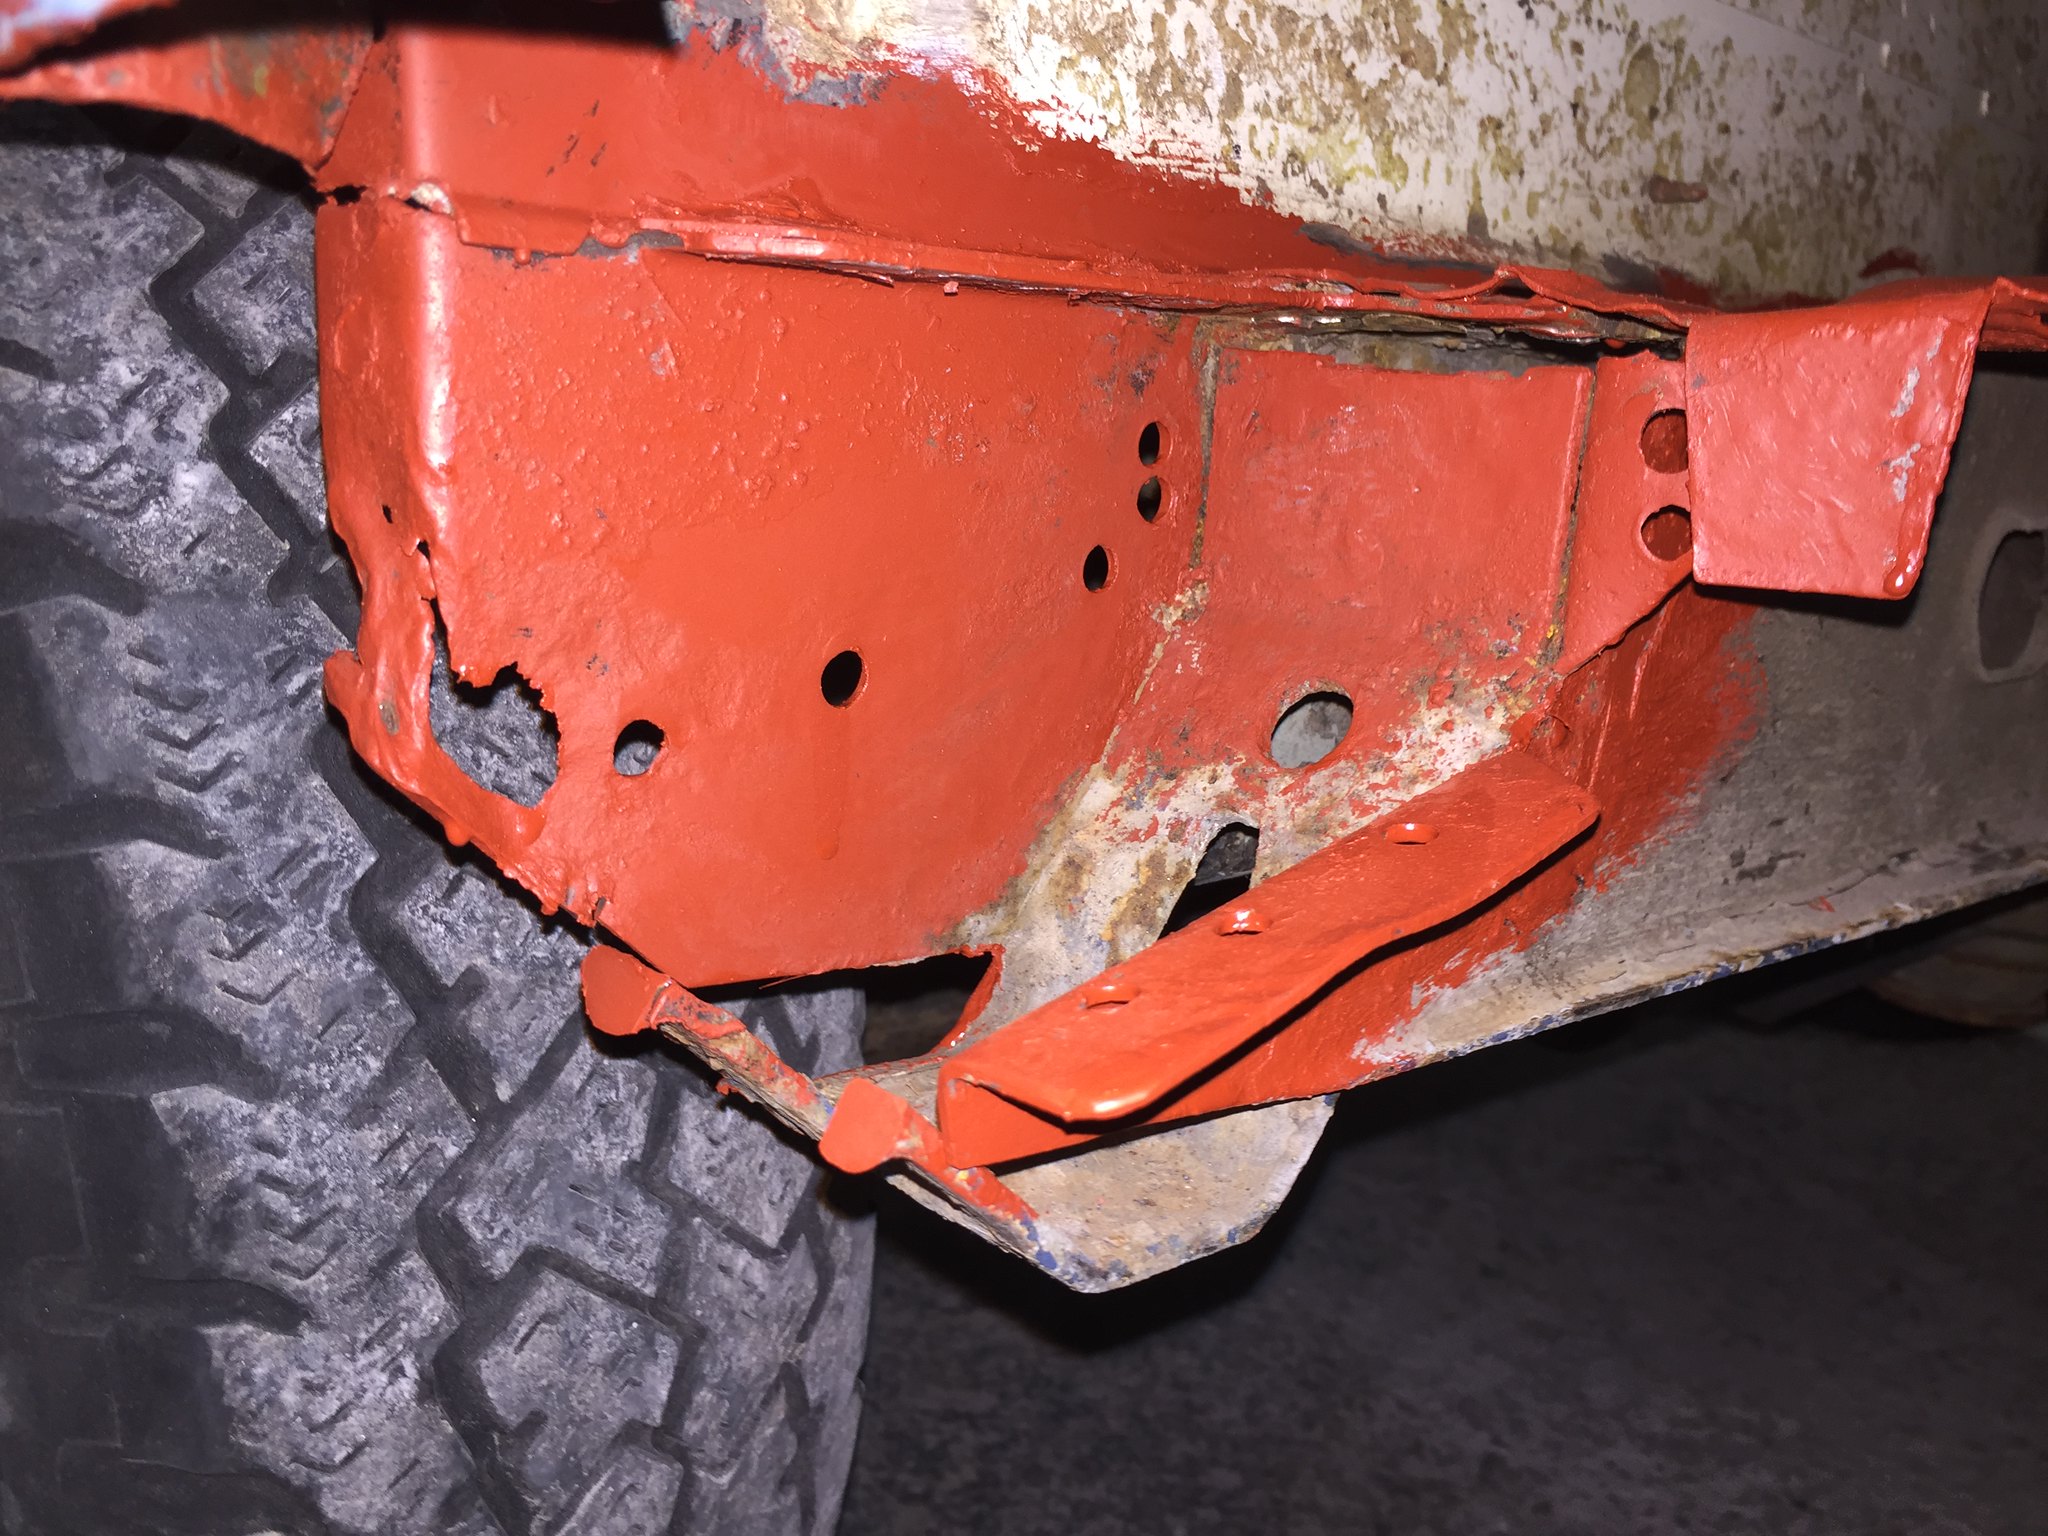
Is that the front edge of the seat box?
Have you ever seen an unhappy fool?
88 Transporter with hitop camper conversion, 1.6td.
88 Transporter with hitop camper conversion, 1.6td.
-
adie89
- Registered user
- Posts: 293
- Joined: 04 Sep 2012, 21:25
- 80-90 Mem No: 11532
- Location: Wiltshire
Re: Procrastinating never got anyone anywhere
RogerT wrote:Is that the front edge of the seat box?
Yes. Pretty much where the passengers heels would be
Greta: 85’ LHD 2.5L Subaru 14in Syncro
http://forum.club8090.co.uk/viewtopic.php?t=165773
http://forum.club8090.co.uk/viewtopic.php?t=165773
-
937carrera

- Registered user
- Posts: 3599
- Joined: 05 Apr 2015, 19:29
- 80-90 Mem No: 16333
- Location: N Yorks.
Re: Procrastinating never got anyone anywhere
You are demonstrating a worryingly high degree of competence now 
1981 RHD 2.0 Aircooled Leisuredrive project, CU engine
1990 RHD 1.9 Auto Sleeper with DF/DG engine
1990 RHD 1.9 Auto Sleeper with DF/DG engine
-
adie89
- Registered user
- Posts: 293
- Joined: 04 Sep 2012, 21:25
- 80-90 Mem No: 11532
- Location: Wiltshire
Re: Procrastinating never got anyone anywhere
937carrera wrote:You are demonstrating a worryingly high degree of competence now
That’s because like tv, I E D I T the bad bits like porous welds ground out and redone, mangled metal and holes!
But thank you, it’s reassuring and encouraging to have a general impression that people don’t think I’m a crazed lunatic metal gluer
Greta: 85’ LHD 2.5L Subaru 14in Syncro
http://forum.club8090.co.uk/viewtopic.php?t=165773
http://forum.club8090.co.uk/viewtopic.php?t=165773
-
RogerT
- Registered user
- Posts: 1819
- Joined: 10 May 2013, 11:59
- 80-90 Mem No: 13706
- Location: Central Scotland
Re: Procrastinating never got anyone anywhere
Have you ever seen an unhappy fool?
88 Transporter with hitop camper conversion, 1.6td.
88 Transporter with hitop camper conversion, 1.6td.
-
adie89
- Registered user
- Posts: 293
- Joined: 04 Sep 2012, 21:25
- 80-90 Mem No: 11532
- Location: Wiltshire
Re: Procrastinating never got anyone anywhere
Well it’s been a long time, I’ve been away with work and then pretty poorly for a good while, then I found I’d lost my mojo to work on Greta. So I did something else! Returning to van work was difficult while I recovered from
illness so decided to build a welding trolley. My new welder had two wheels, one leg at the fron, wobbled and the crappy ledge at the back was too small for a big bottle so I had to drag around the bottle separately and hope it didn’t fall over, and I hated it.
So I gave myself the following design parameters:
Must be euro box footprint - so 60 x 40. I move a lot and use these boxes for standard storage to make life easier.
Must have wheels - These were recovered from a delivery Unitainer.
The gas bottle rack must be removable for longer storage, and subsequently storable on the trolley.
Must have holders for power cables, torch etc
Must allow top access for changing wire spools.
Must fit a euro box on top for storage space
So a heavy duty shelving unit got rescued from a scrap pile
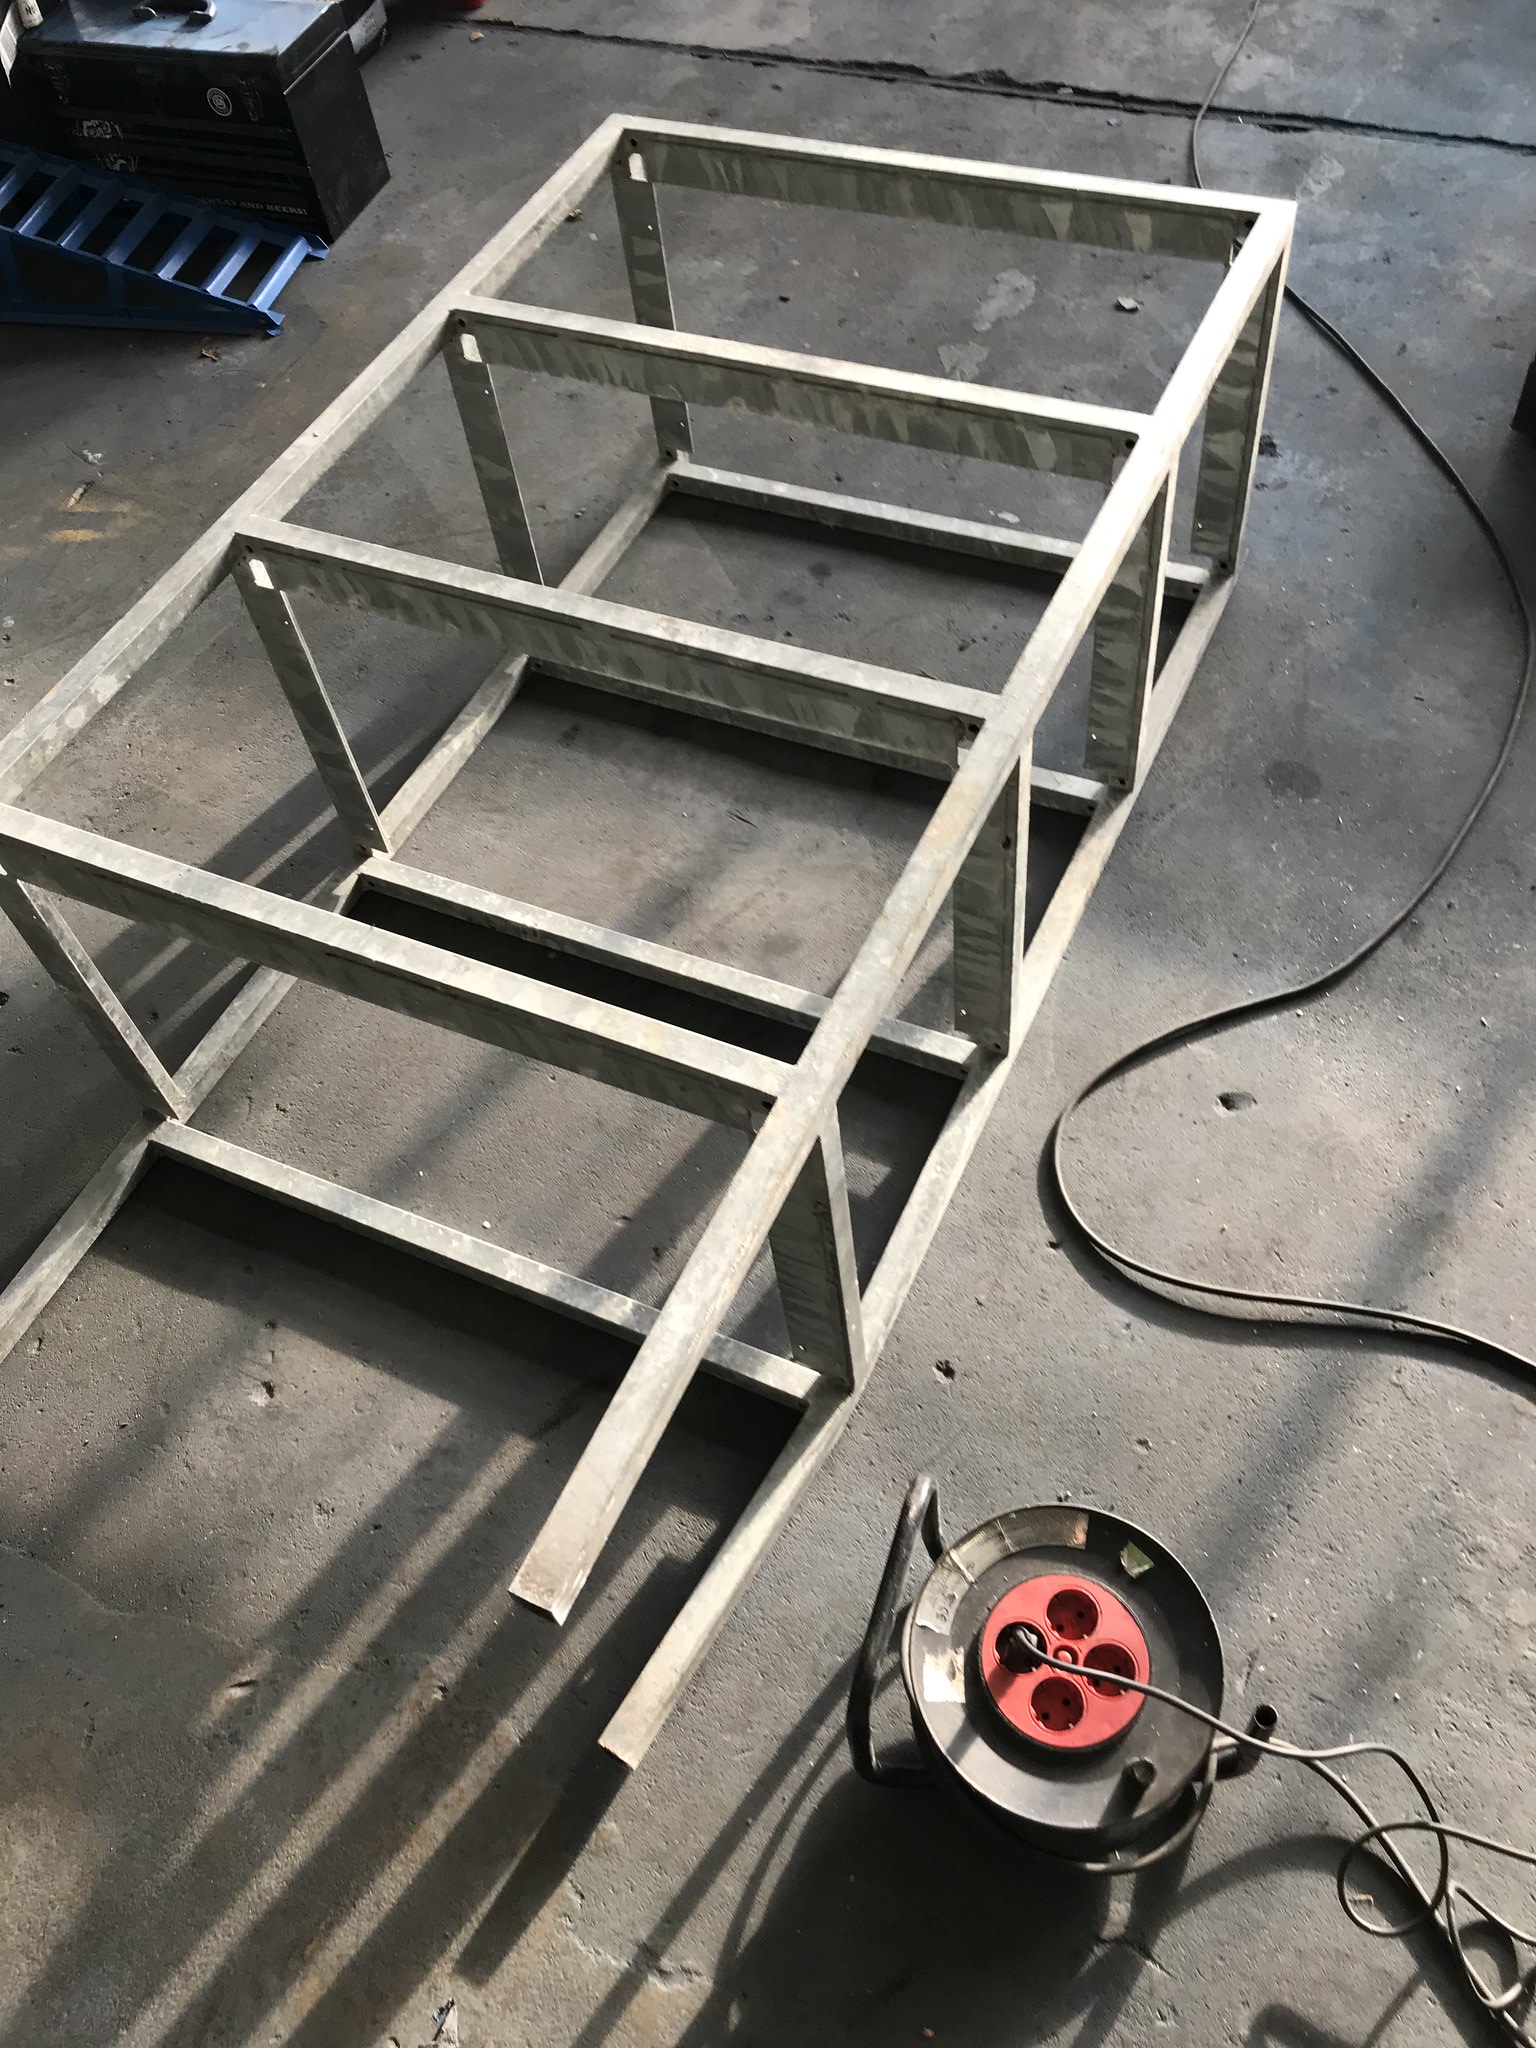
Cutting and welding this resulted in a bout of zinc oxide poisoning, so another few days off and more careful control of the dust. I’d worn a mask for cutting and welding but kept taking it off between work. After my sickness I just kept a rebreather on all the time while working.
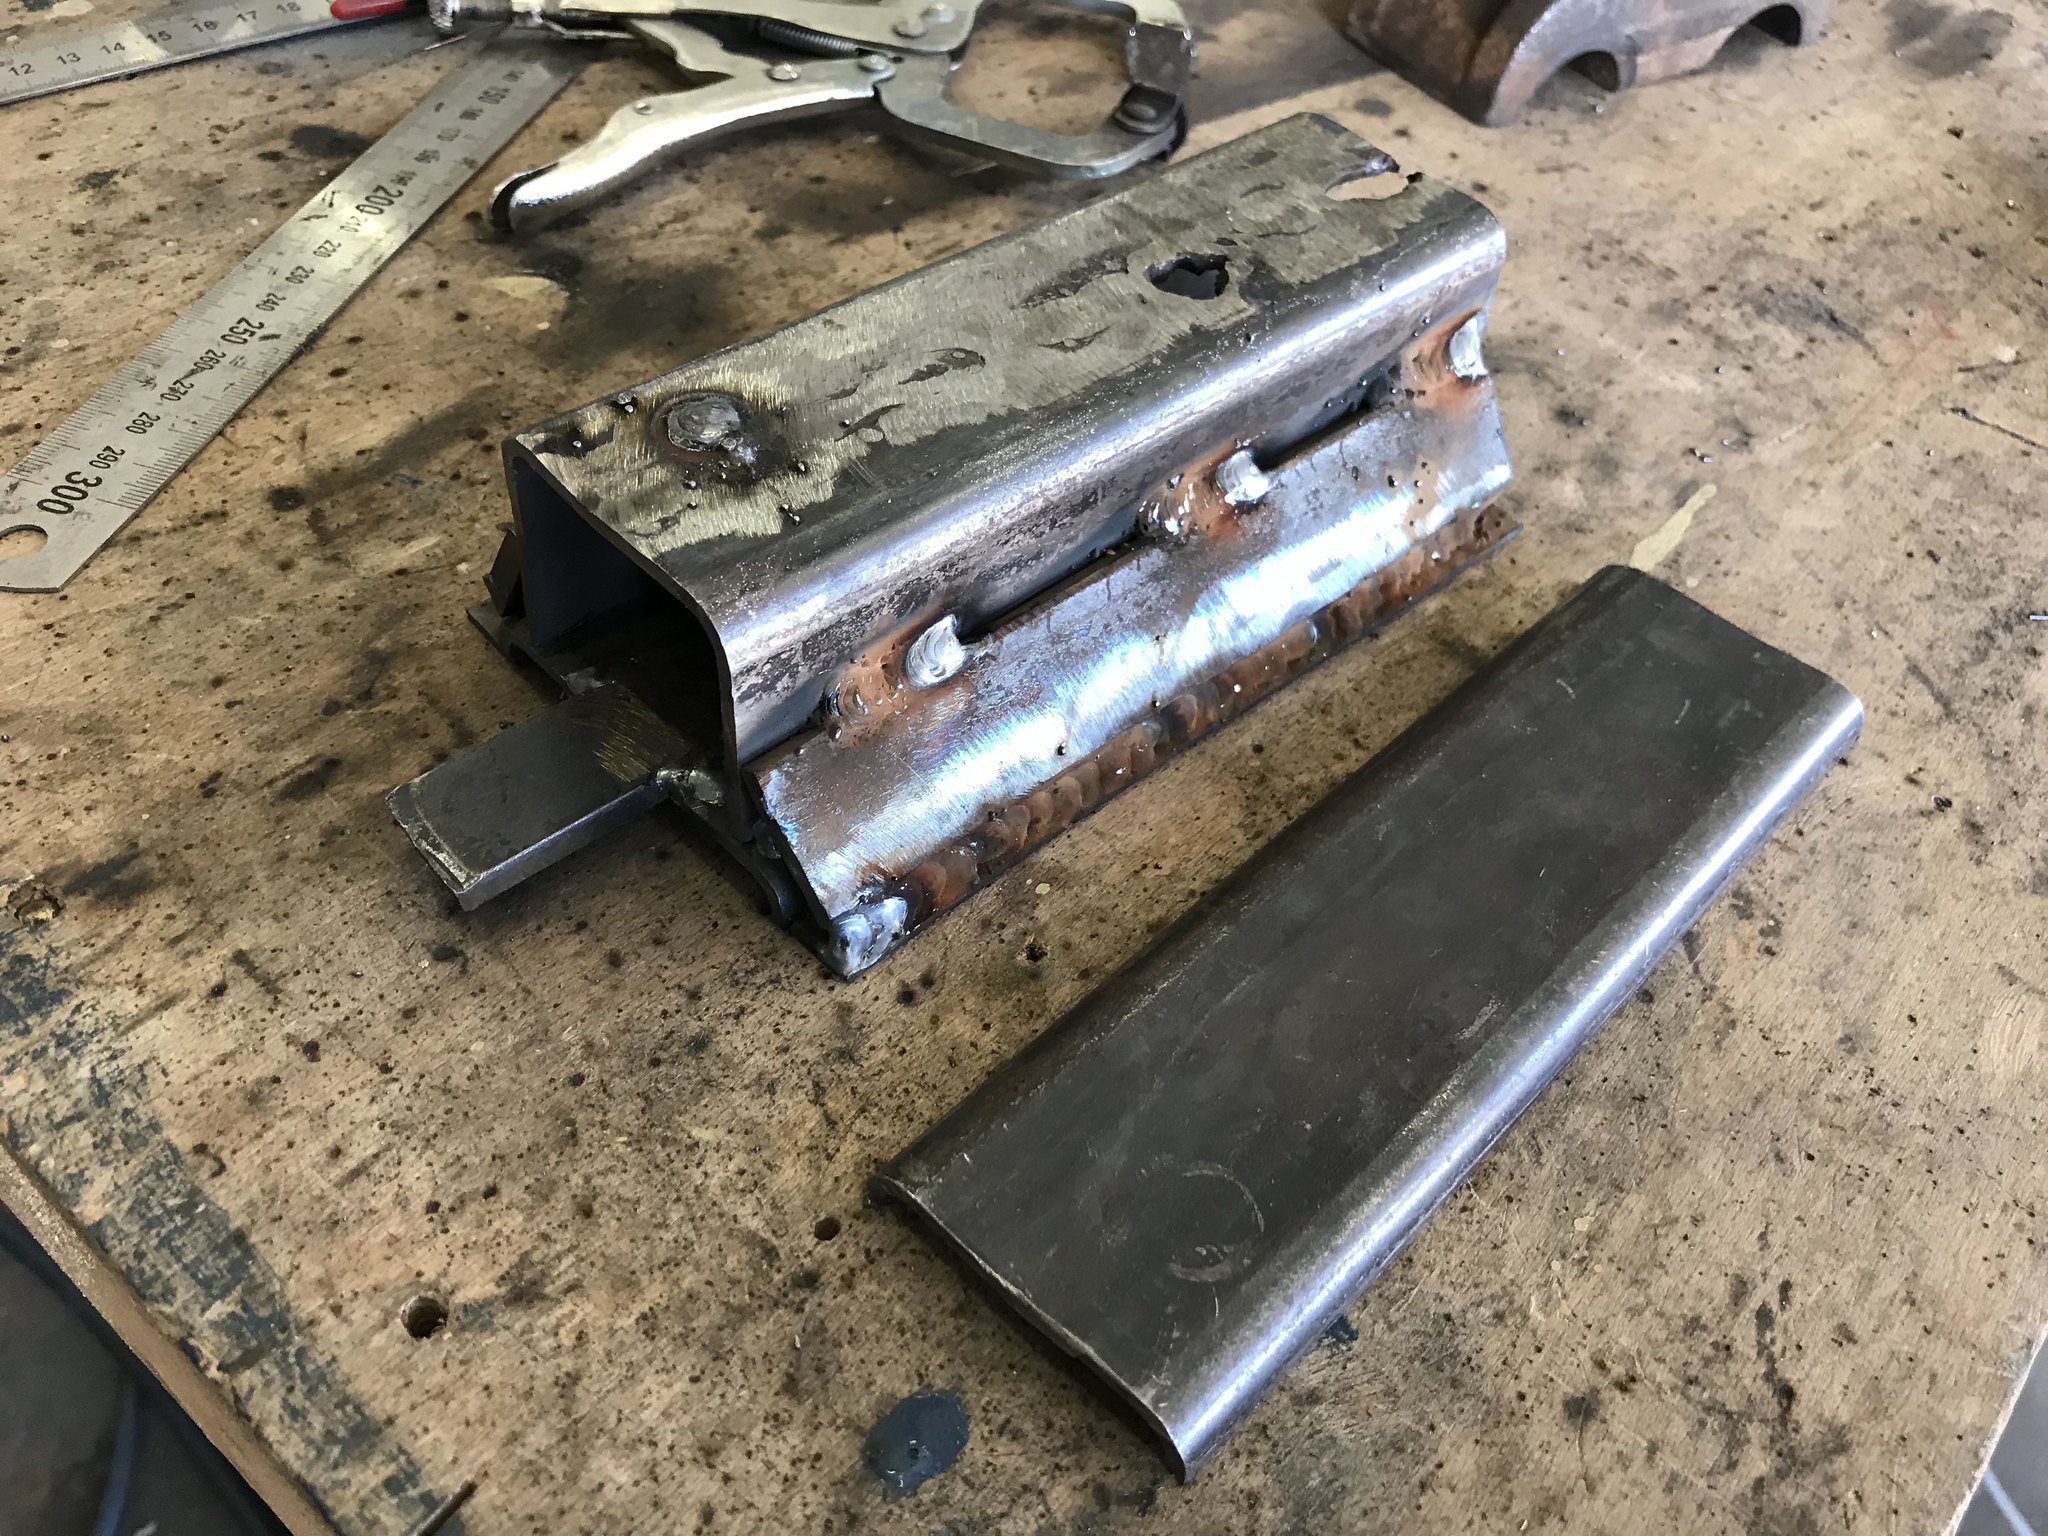
Led to this
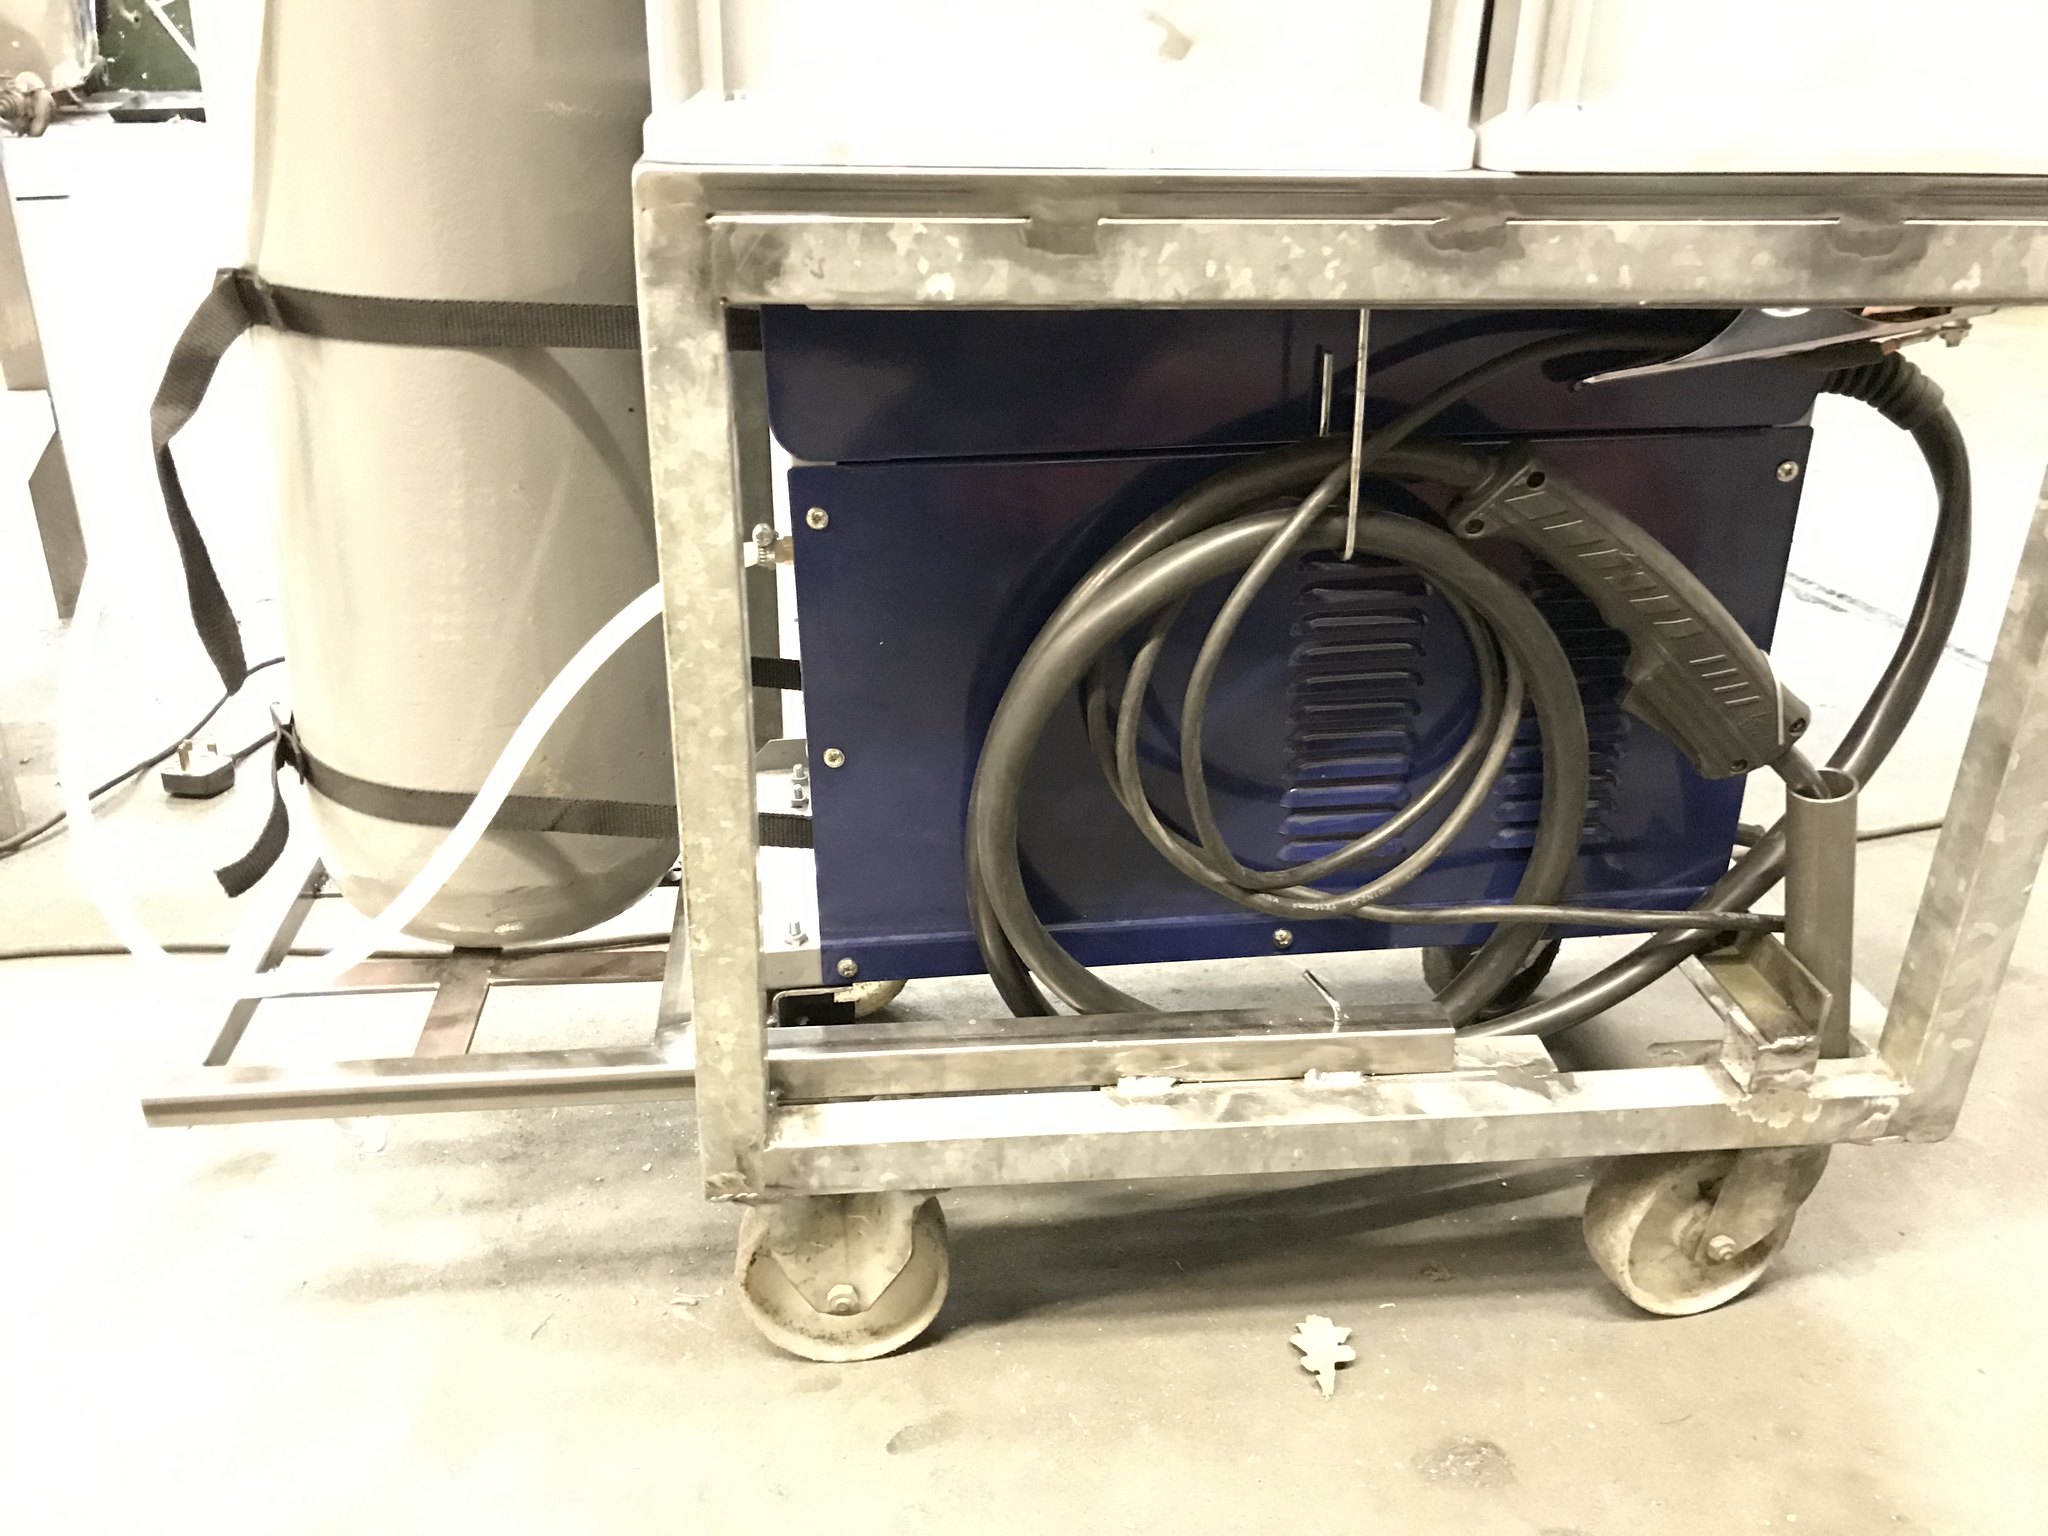
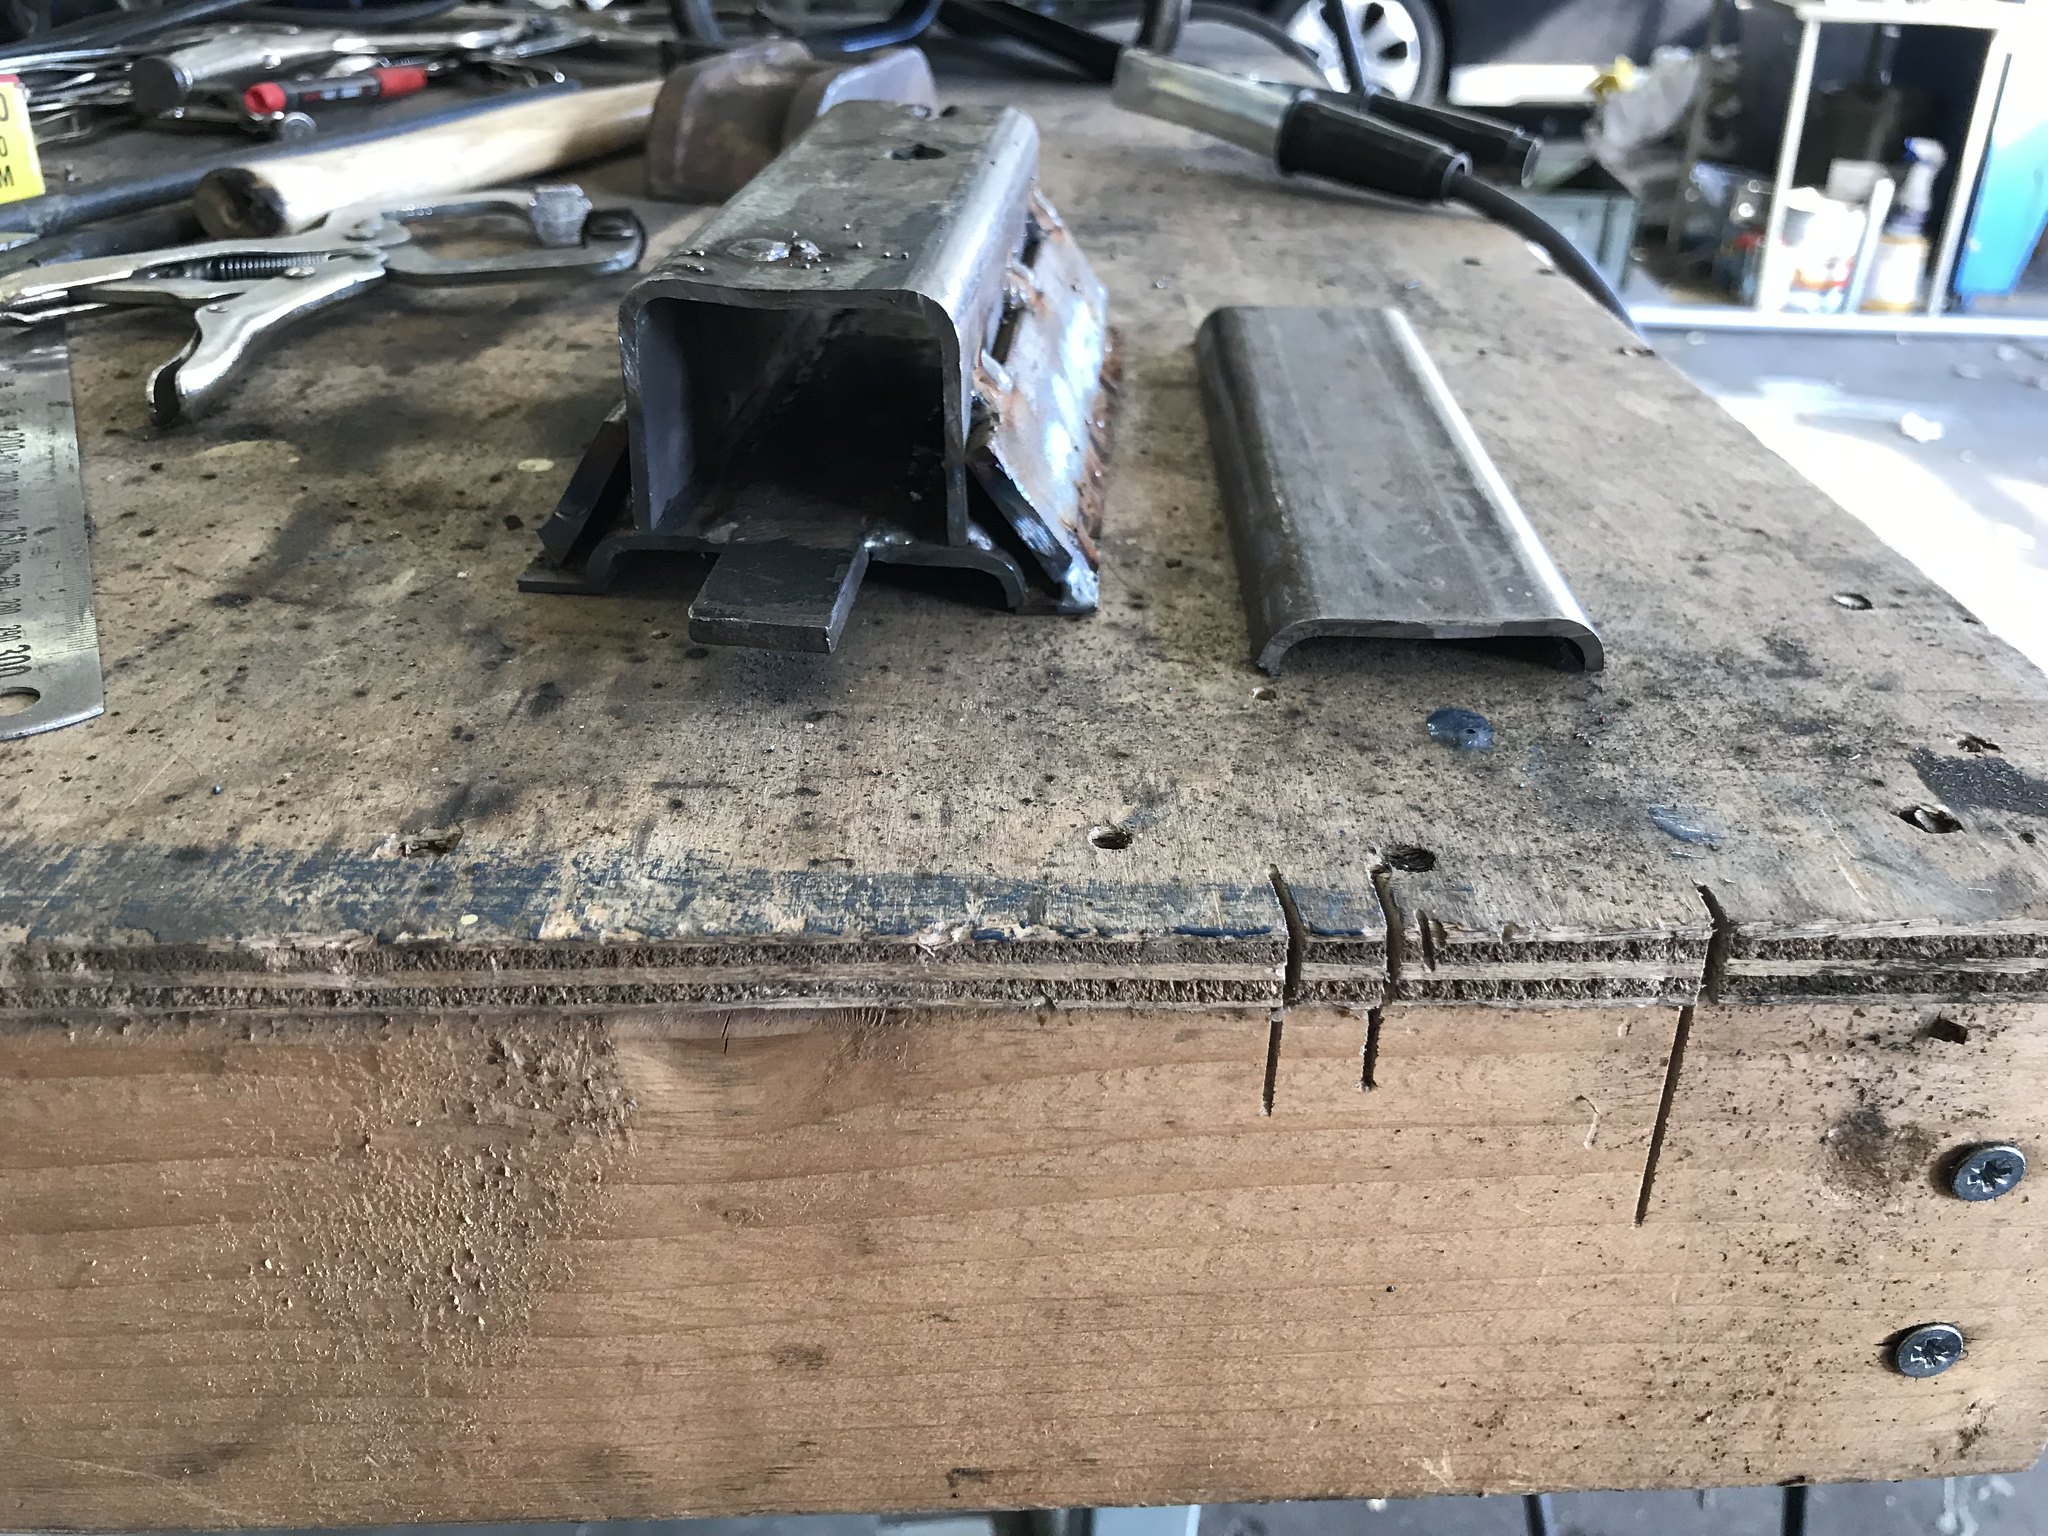
The bottle mount slides out and goes back in from the front in the same sliders and sits completely flush under he welder.
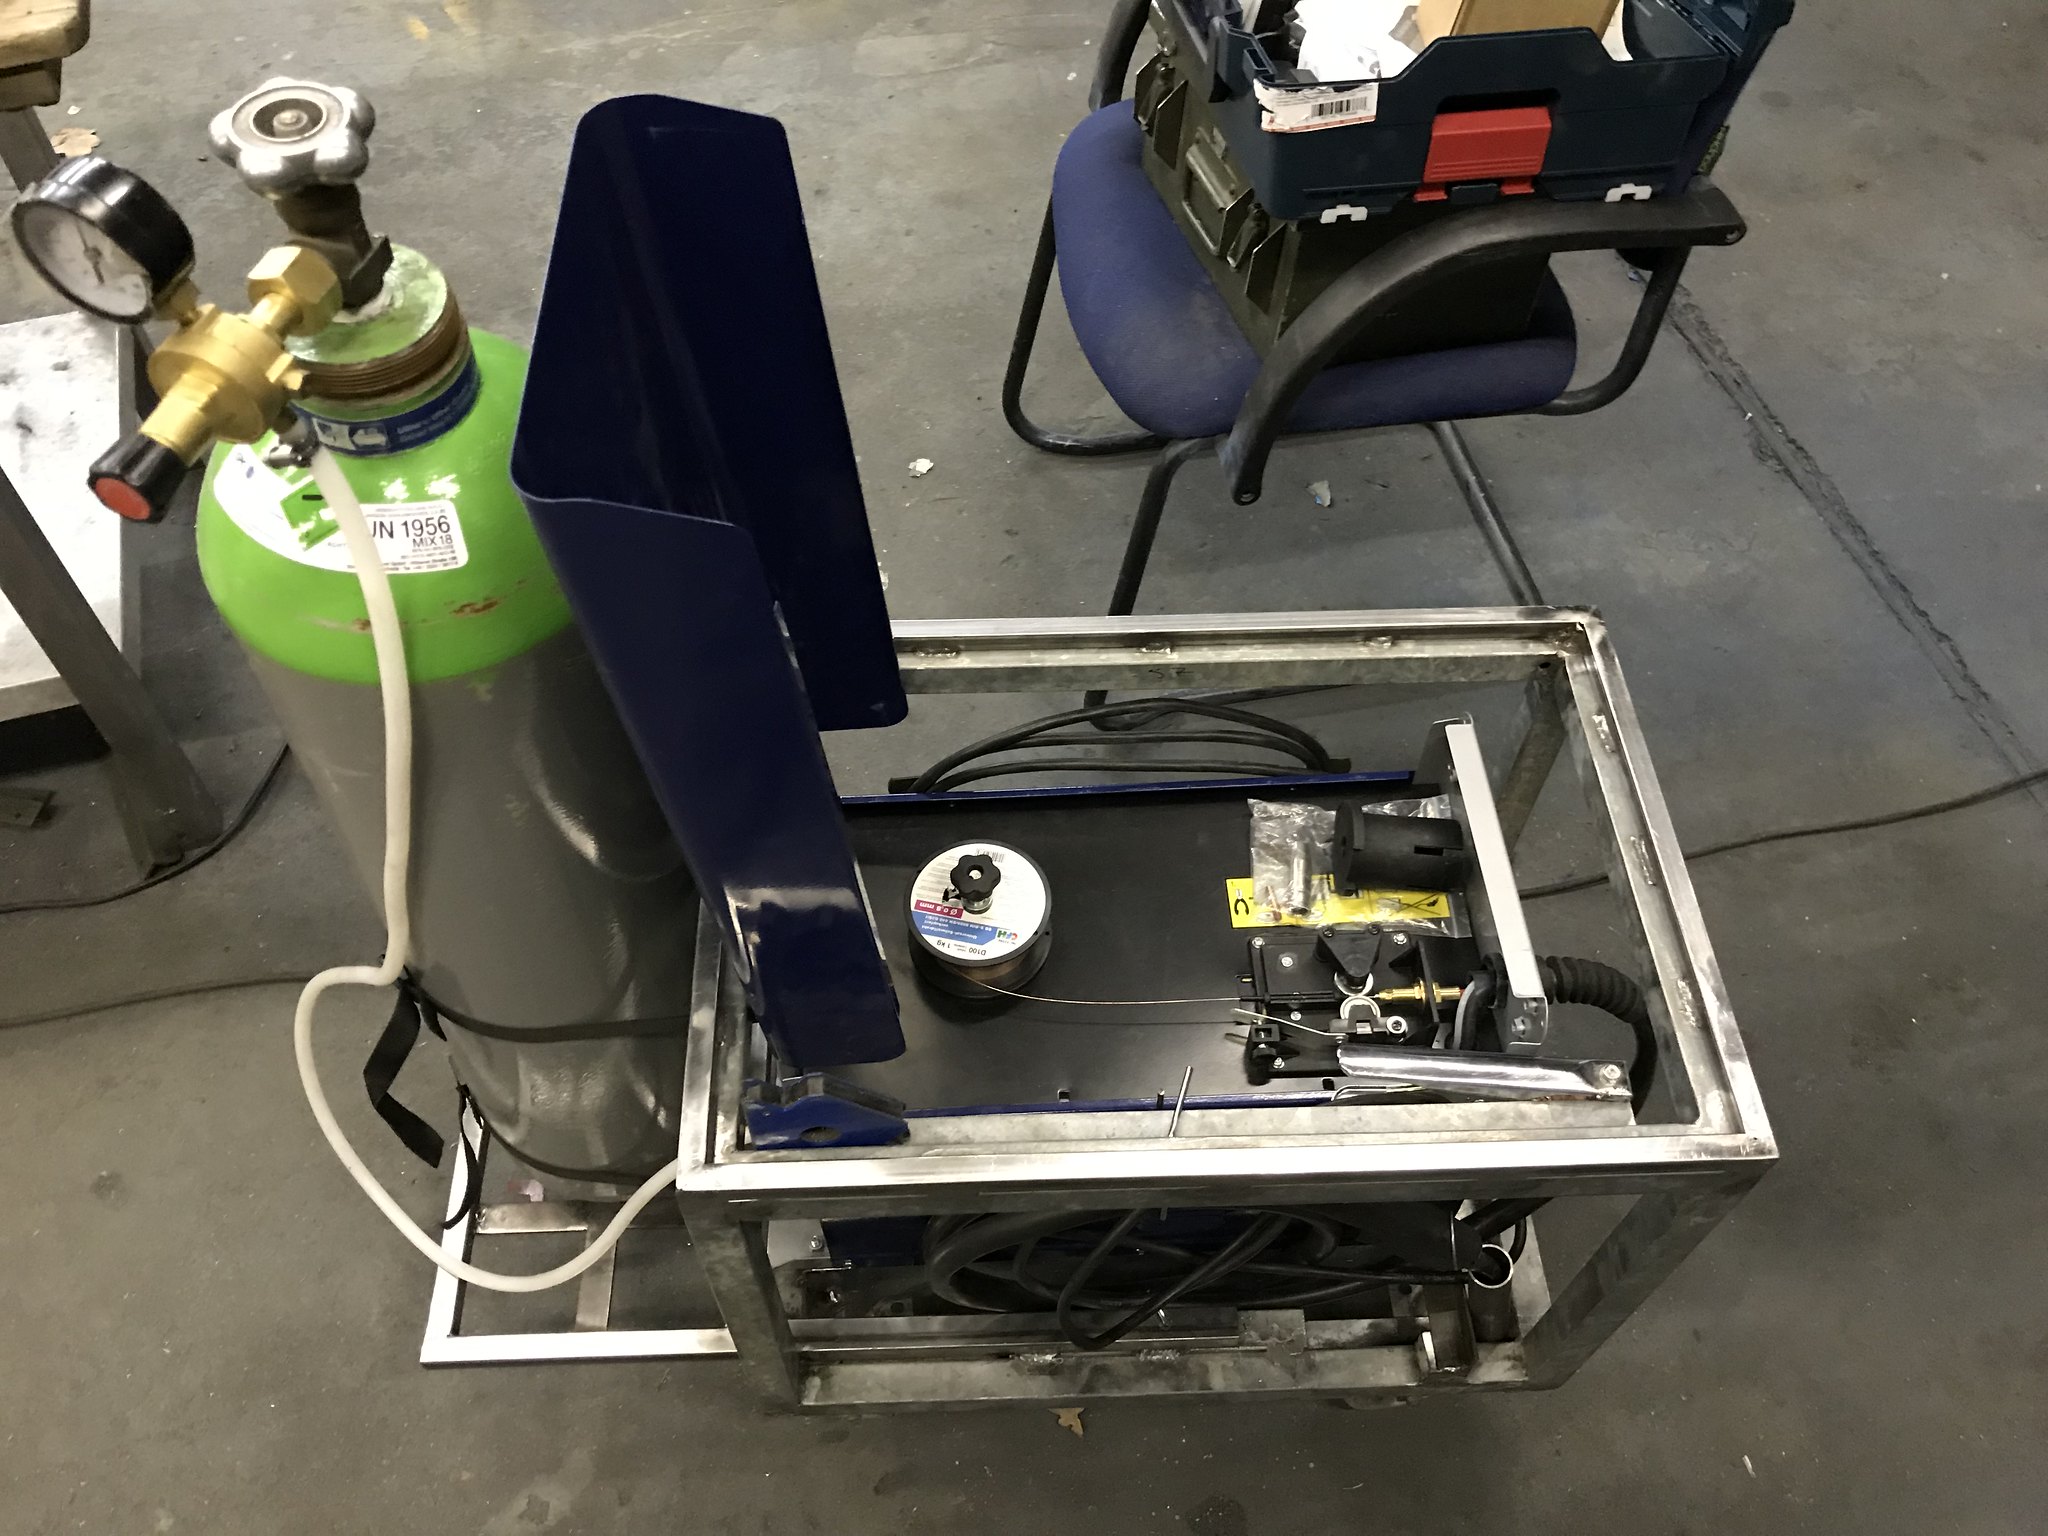
Top access and the square tube I welded on the top run to form the mounting lip for euro boxes
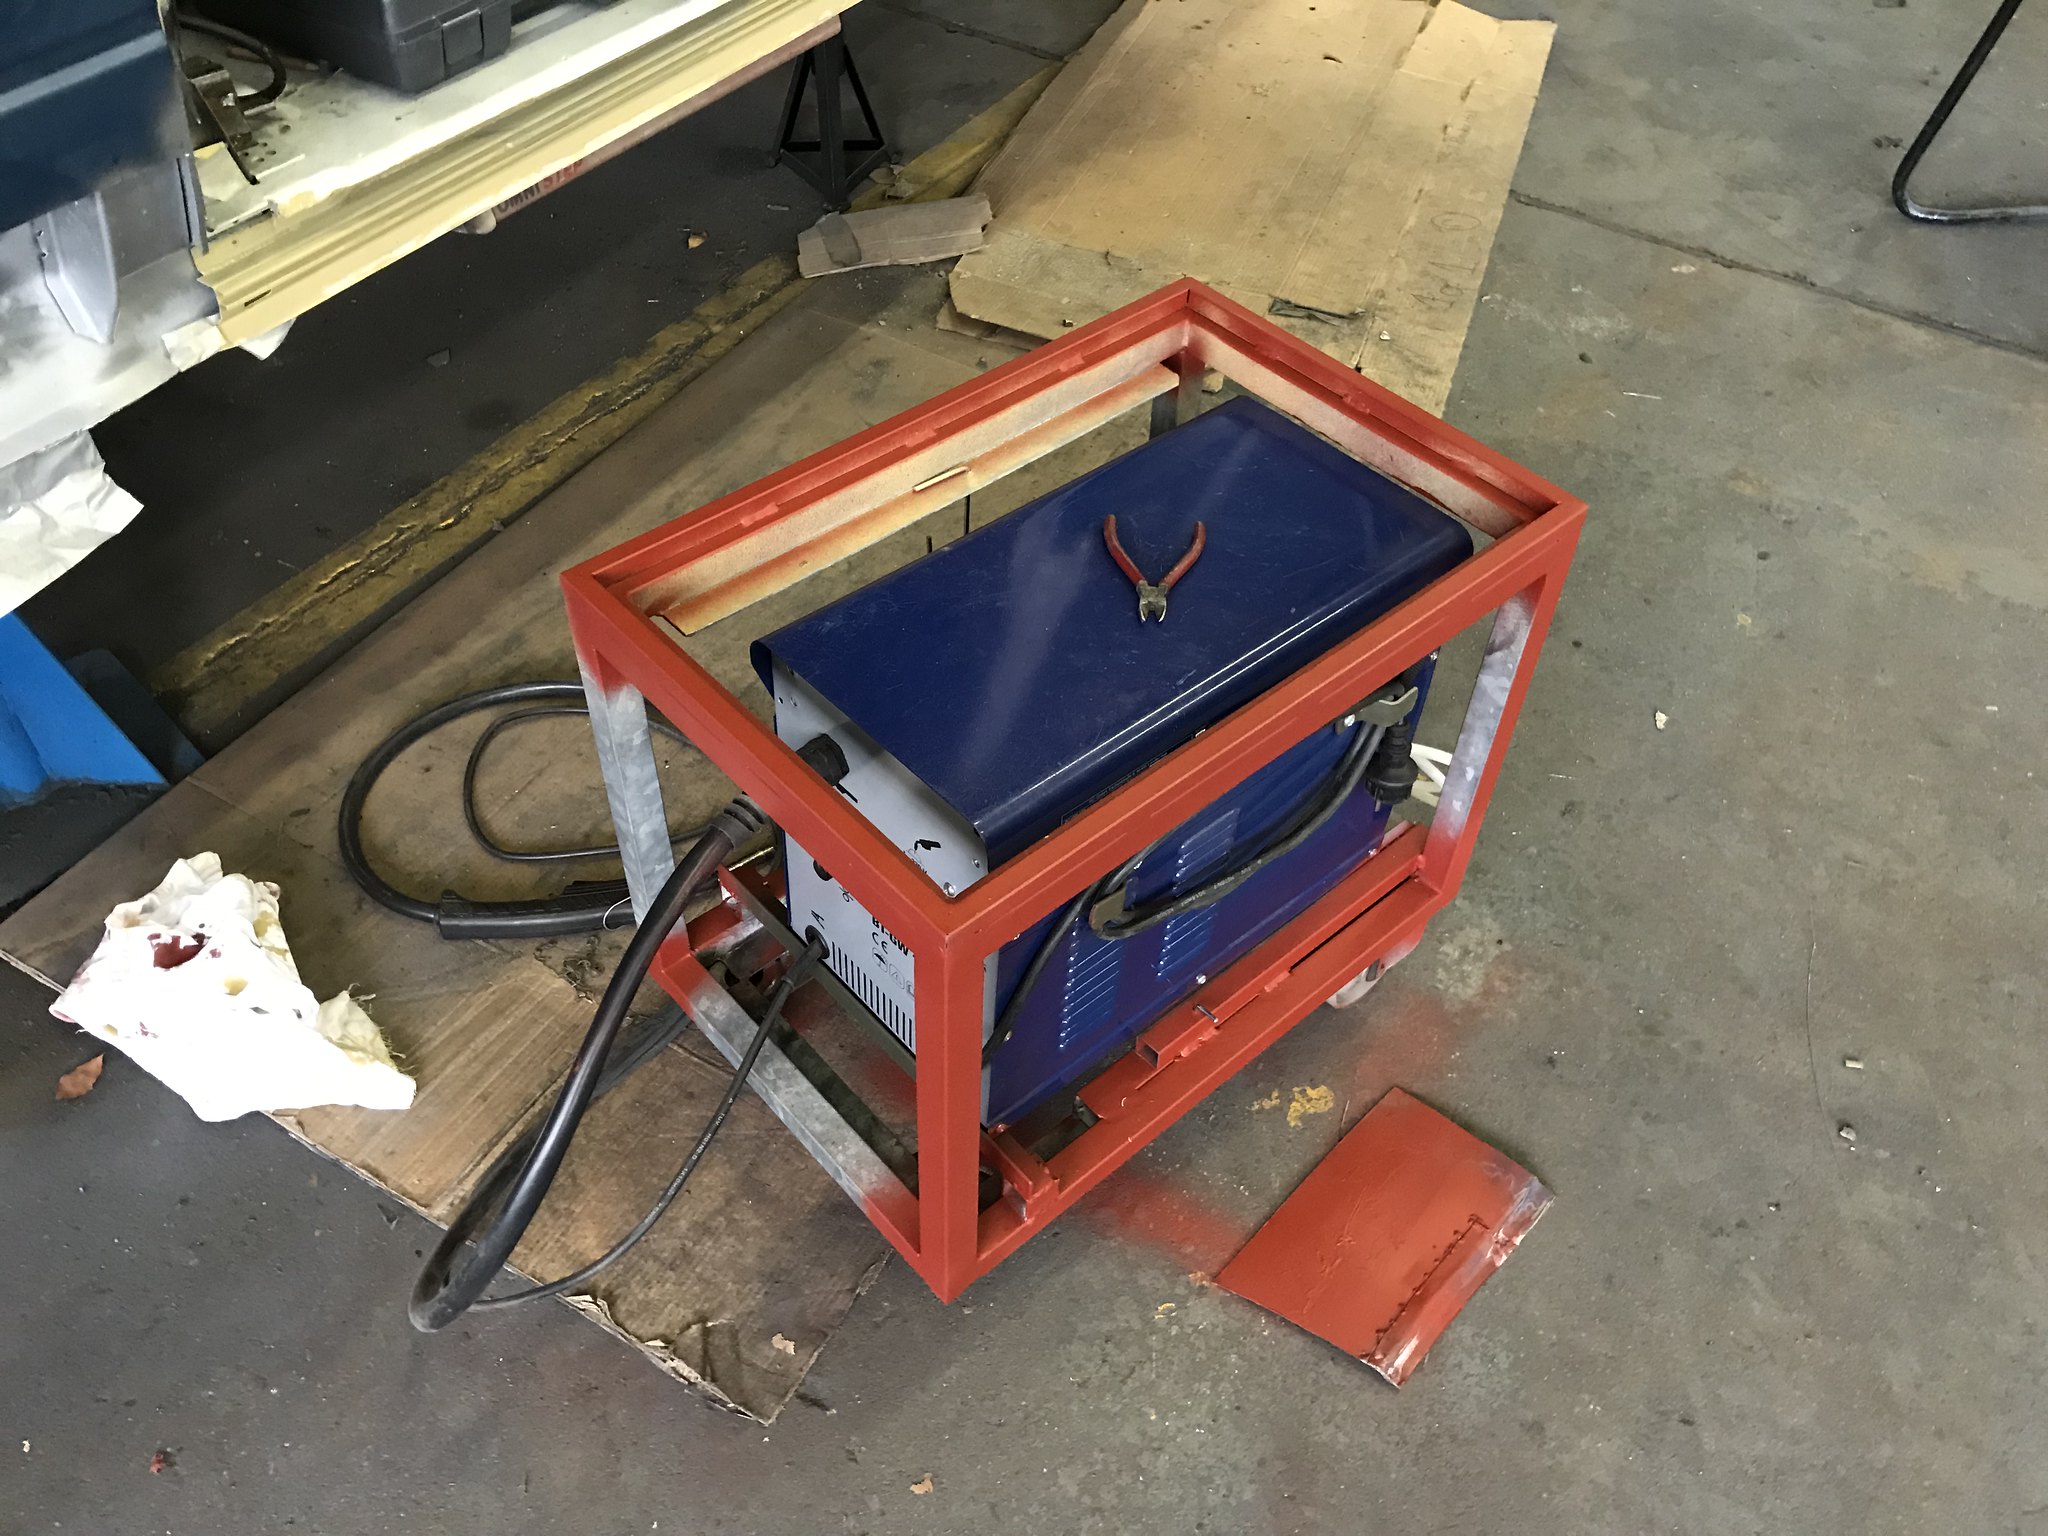
Quick lick of red oxide for the bare metal.
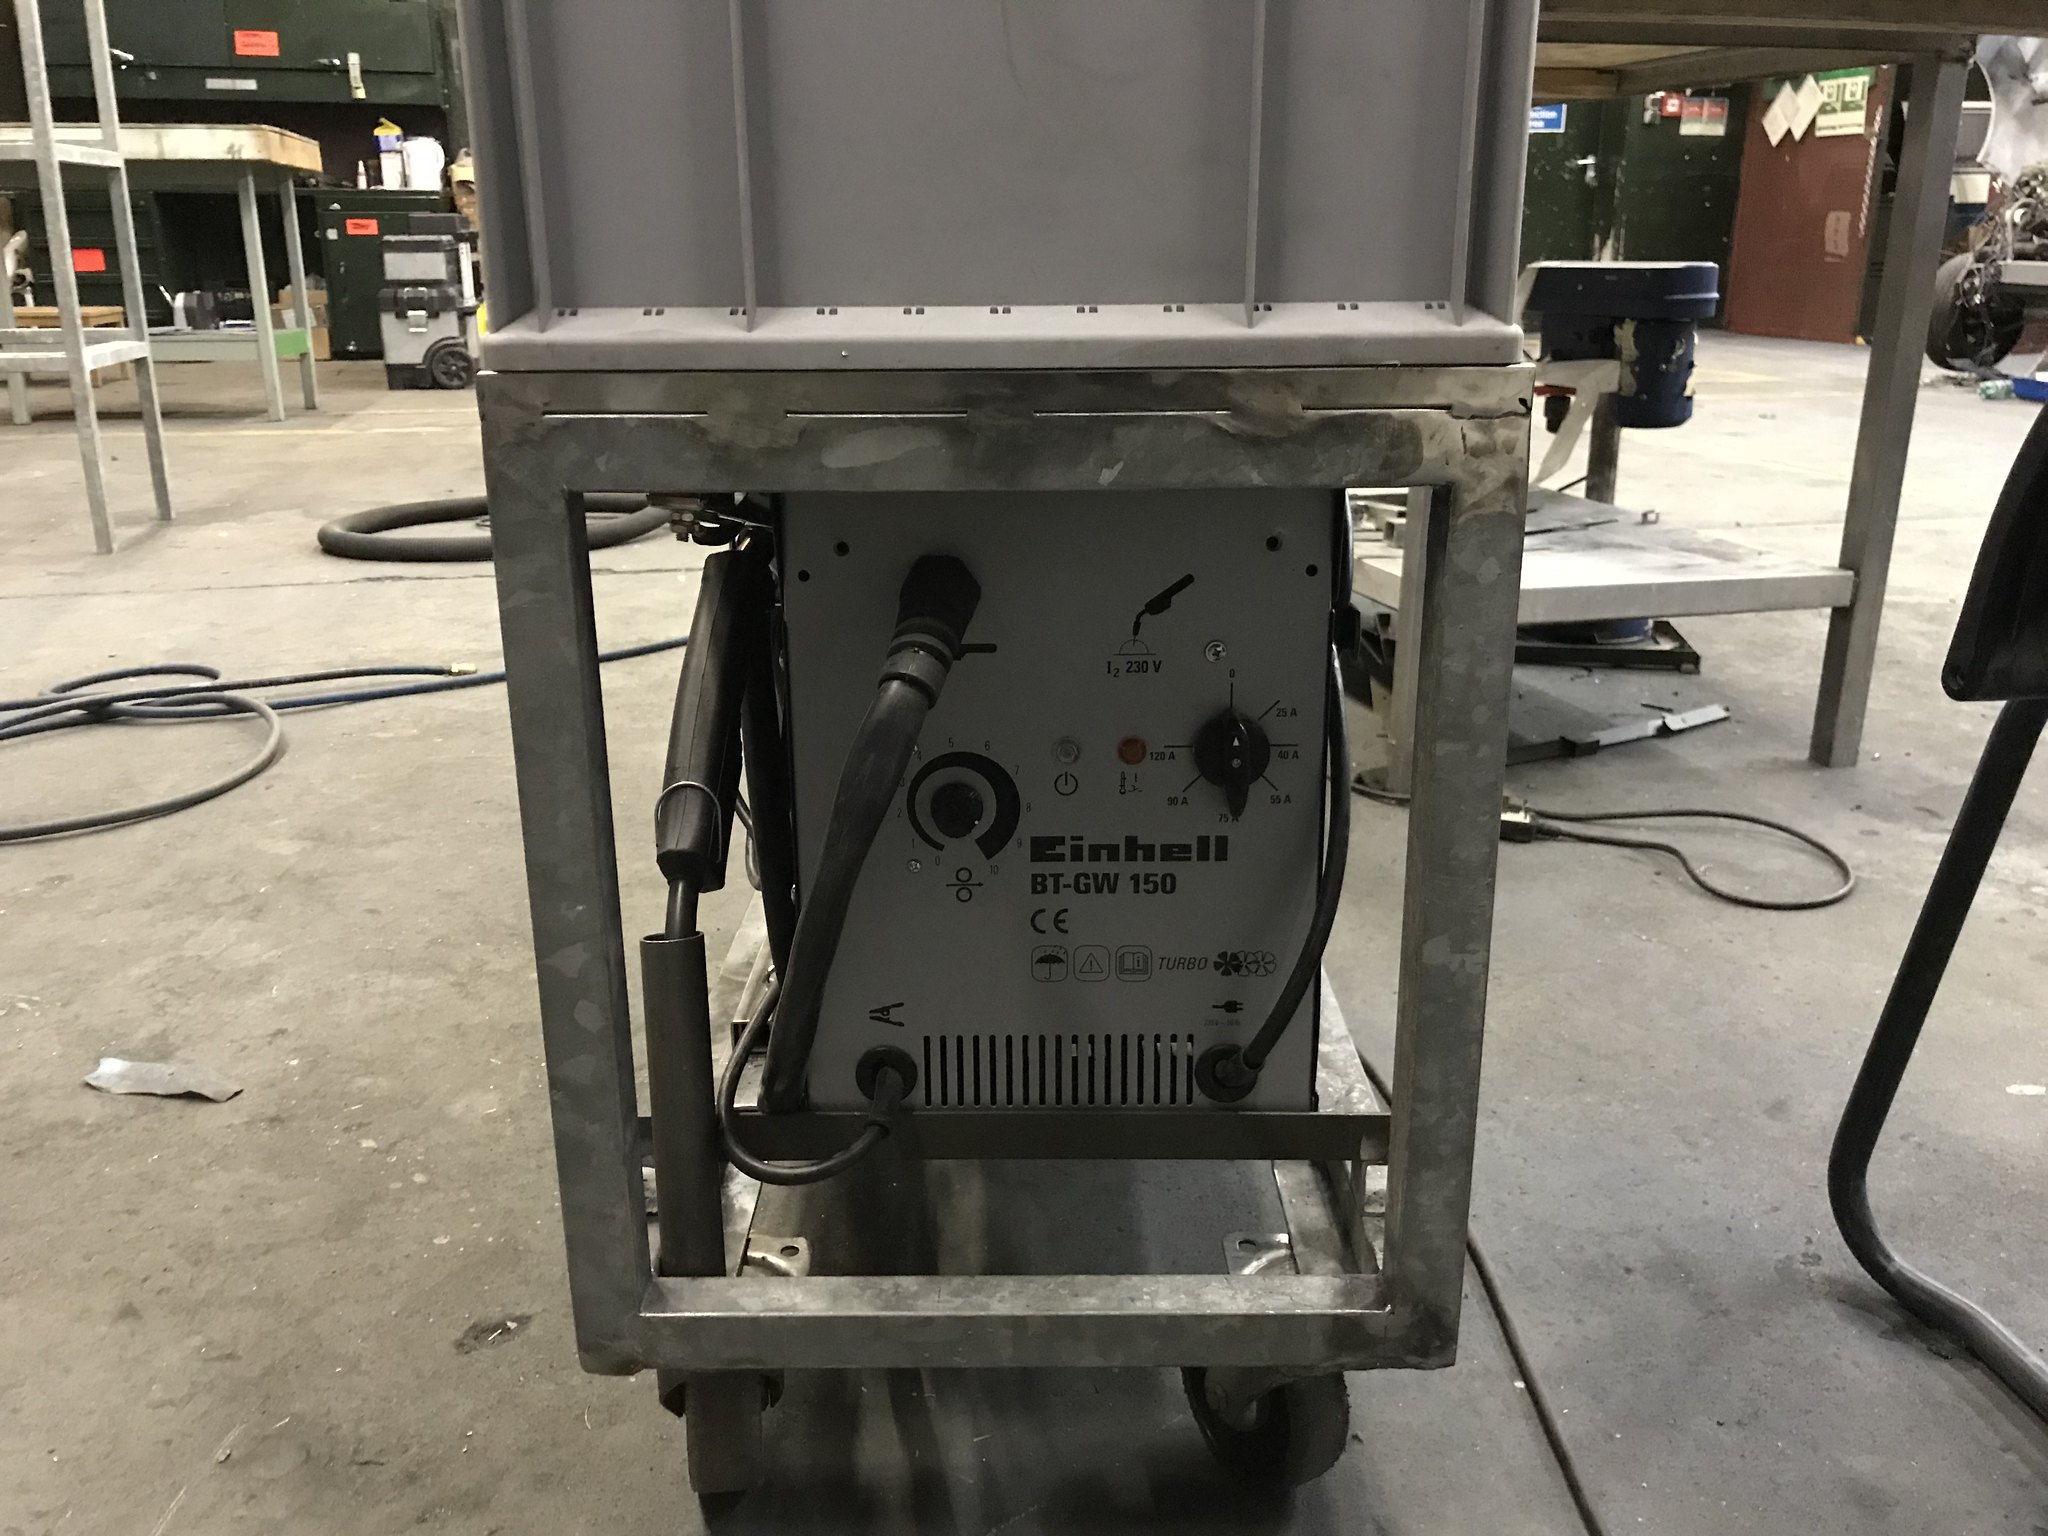
The welder is secured using its original bolt holes through the frame of the trolley with various spacers welded on.

Why I want euro boxes on top. One for welding mask and the other for my rebreather.
It actually made a huge difference to my pace of work, less time carrying stuff, it’s on top of the welder. And less time repositioning the welder and bottle separately whilst trying not to trip over the cable and torch.
I was worried the bottle would make it tip back but the weight of the welder and trolley is more than enough to keep it down.
illness so decided to build a welding trolley. My new welder had two wheels, one leg at the fron, wobbled and the crappy ledge at the back was too small for a big bottle so I had to drag around the bottle separately and hope it didn’t fall over, and I hated it.
So I gave myself the following design parameters:
Must be euro box footprint - so 60 x 40. I move a lot and use these boxes for standard storage to make life easier.
Must have wheels - These were recovered from a delivery Unitainer.
The gas bottle rack must be removable for longer storage, and subsequently storable on the trolley.
Must have holders for power cables, torch etc
Must allow top access for changing wire spools.
Must fit a euro box on top for storage space
So a heavy duty shelving unit got rescued from a scrap pile
Cutting and welding this resulted in a bout of zinc oxide poisoning, so another few days off and more careful control of the dust. I’d worn a mask for cutting and welding but kept taking it off between work. After my sickness I just kept a rebreather on all the time while working.
Led to this
The bottle mount slides out and goes back in from the front in the same sliders and sits completely flush under he welder.
Top access and the square tube I welded on the top run to form the mounting lip for euro boxes
Quick lick of red oxide for the bare metal.
The welder is secured using its original bolt holes through the frame of the trolley with various spacers welded on.
Why I want euro boxes on top. One for welding mask and the other for my rebreather.
It actually made a huge difference to my pace of work, less time carrying stuff, it’s on top of the welder. And less time repositioning the welder and bottle separately whilst trying not to trip over the cable and torch.
I was worried the bottle would make it tip back but the weight of the welder and trolley is more than enough to keep it down.
Greta: 85’ LHD 2.5L Subaru 14in Syncro
http://forum.club8090.co.uk/viewtopic.php?t=165773
http://forum.club8090.co.uk/viewtopic.php?t=165773
-
adie89
- Registered user
- Posts: 293
- Joined: 04 Sep 2012, 21:25
- 80-90 Mem No: 11532
- Location: Wiltshire
Re: Procrastinating never got anyone anywhere
So that was last week.
Yesterday and today mojo restored!
Arch/step hole was closed over with 1.5mm steel. I can’t get 1.2mm here so I’d rather go thicker. Inside looking down to the step, it was made in two pieces like the original

Unlike the original, I completely welded the seam to reduce the likely hood of the same rust recurring between the spot welded panels.

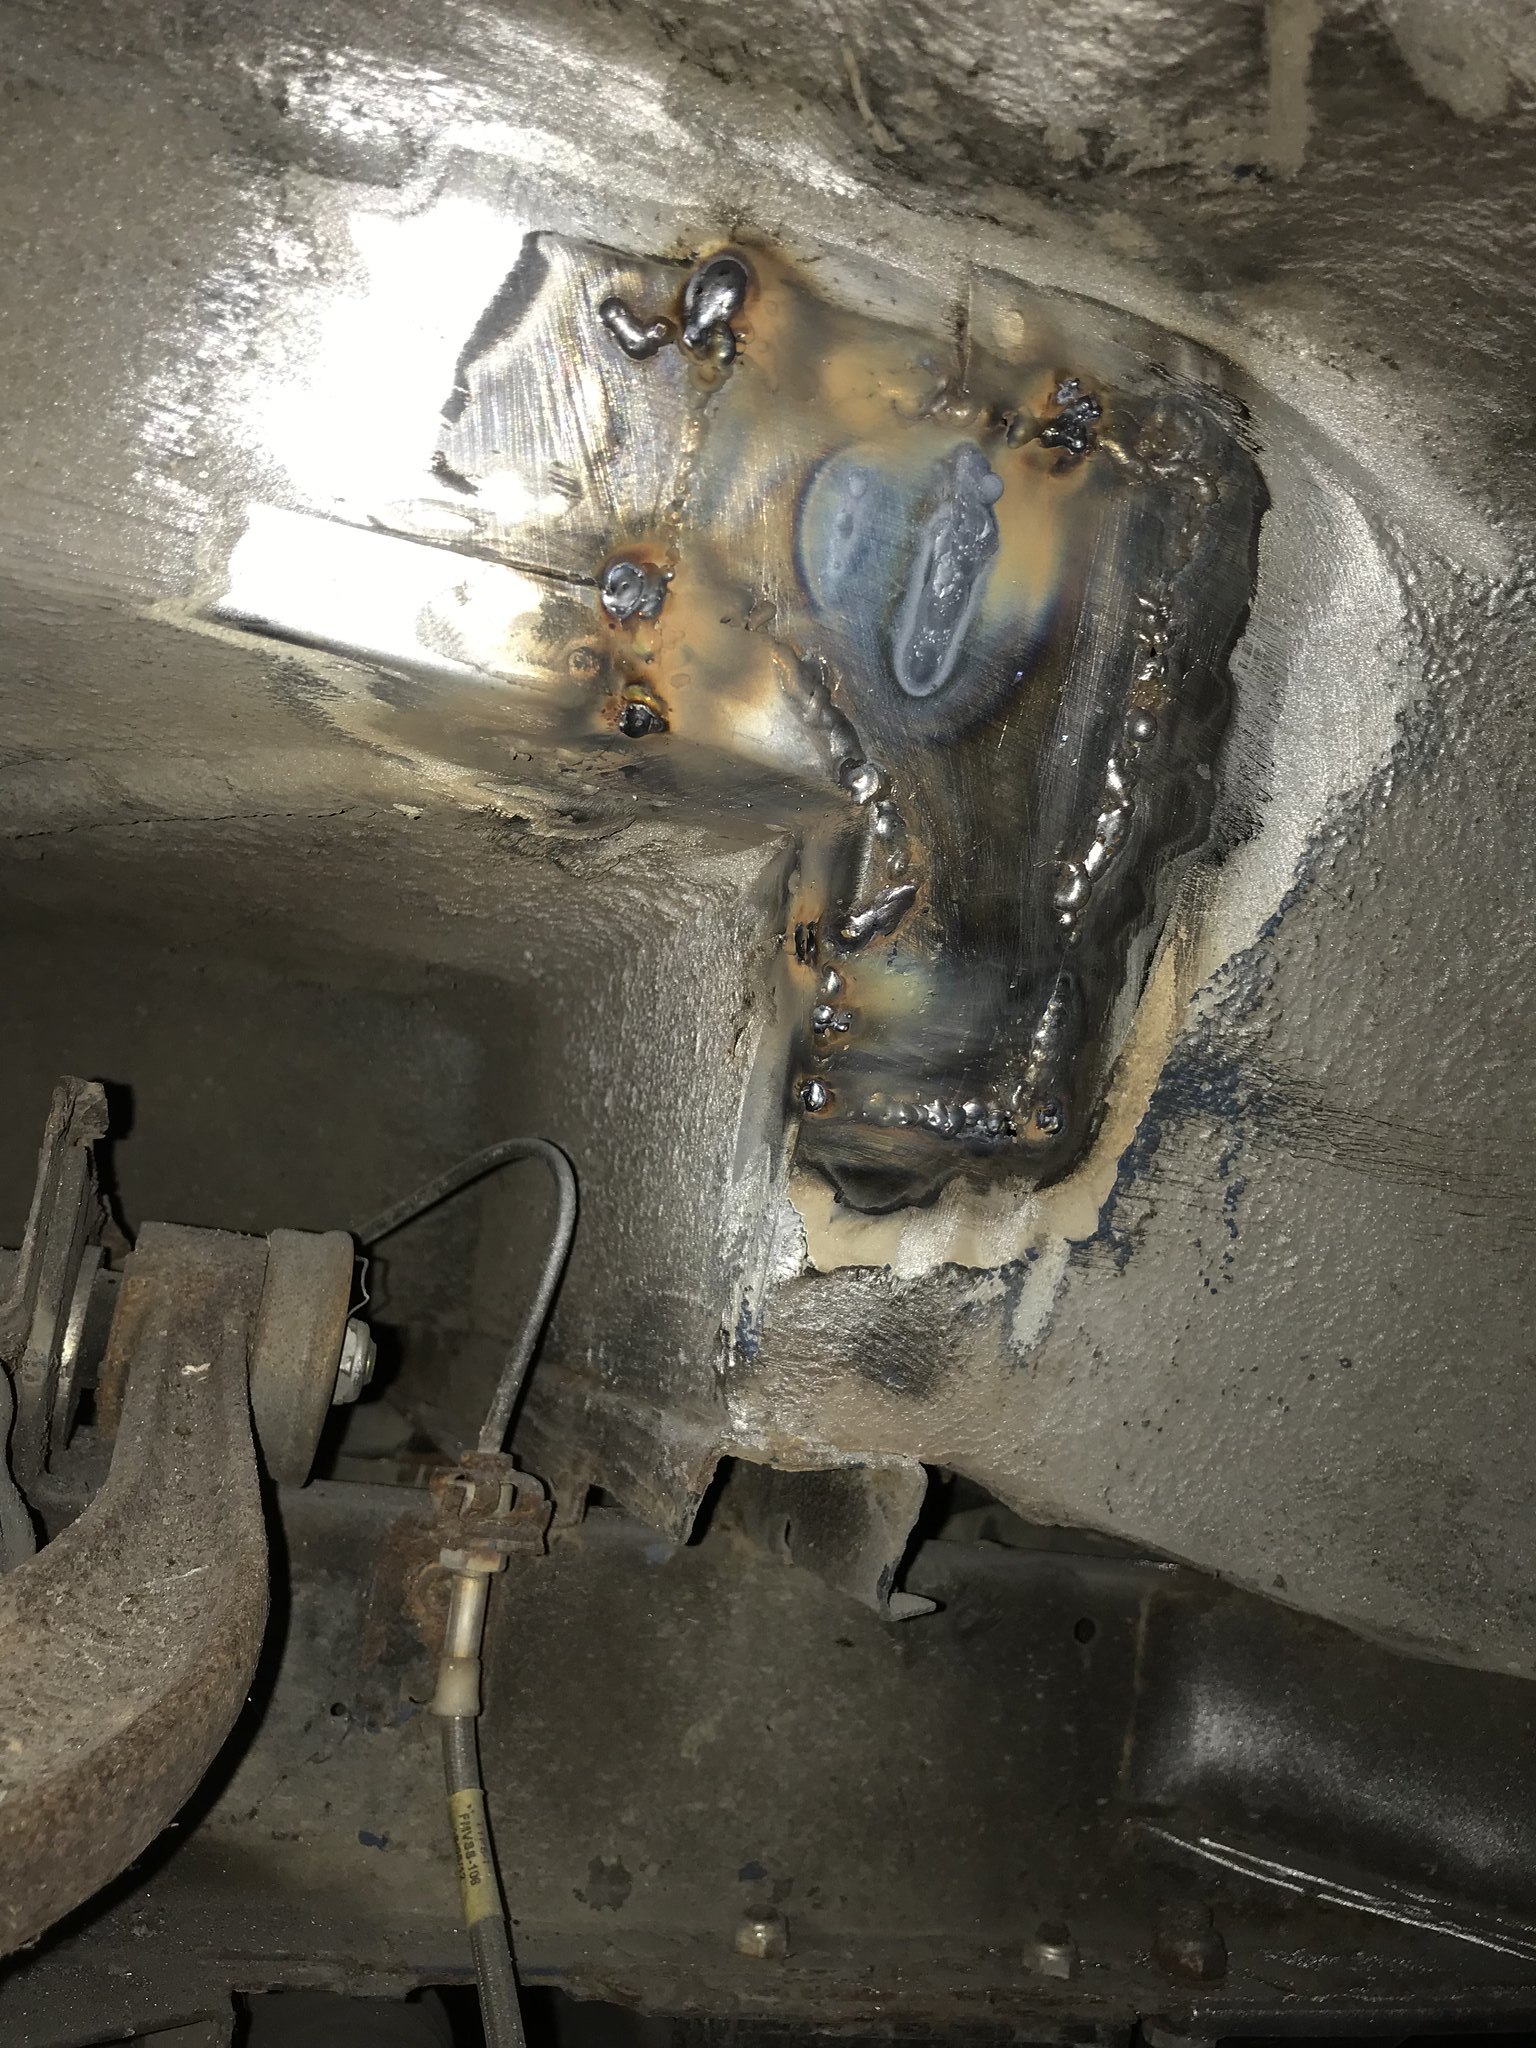
From underneath this hole corresponded the where the front of the seat box meets the arch.
This I made in one plate instead of two overlapped because it was easier and eliminated another exposed seam. The floor piece I welded in before shaping the outer tab upwards. The 1.5mm was more than strong enough to put up with the shaping. I also seam welded the rest of that edge as it seemed very vulnerable from the rust that was there.
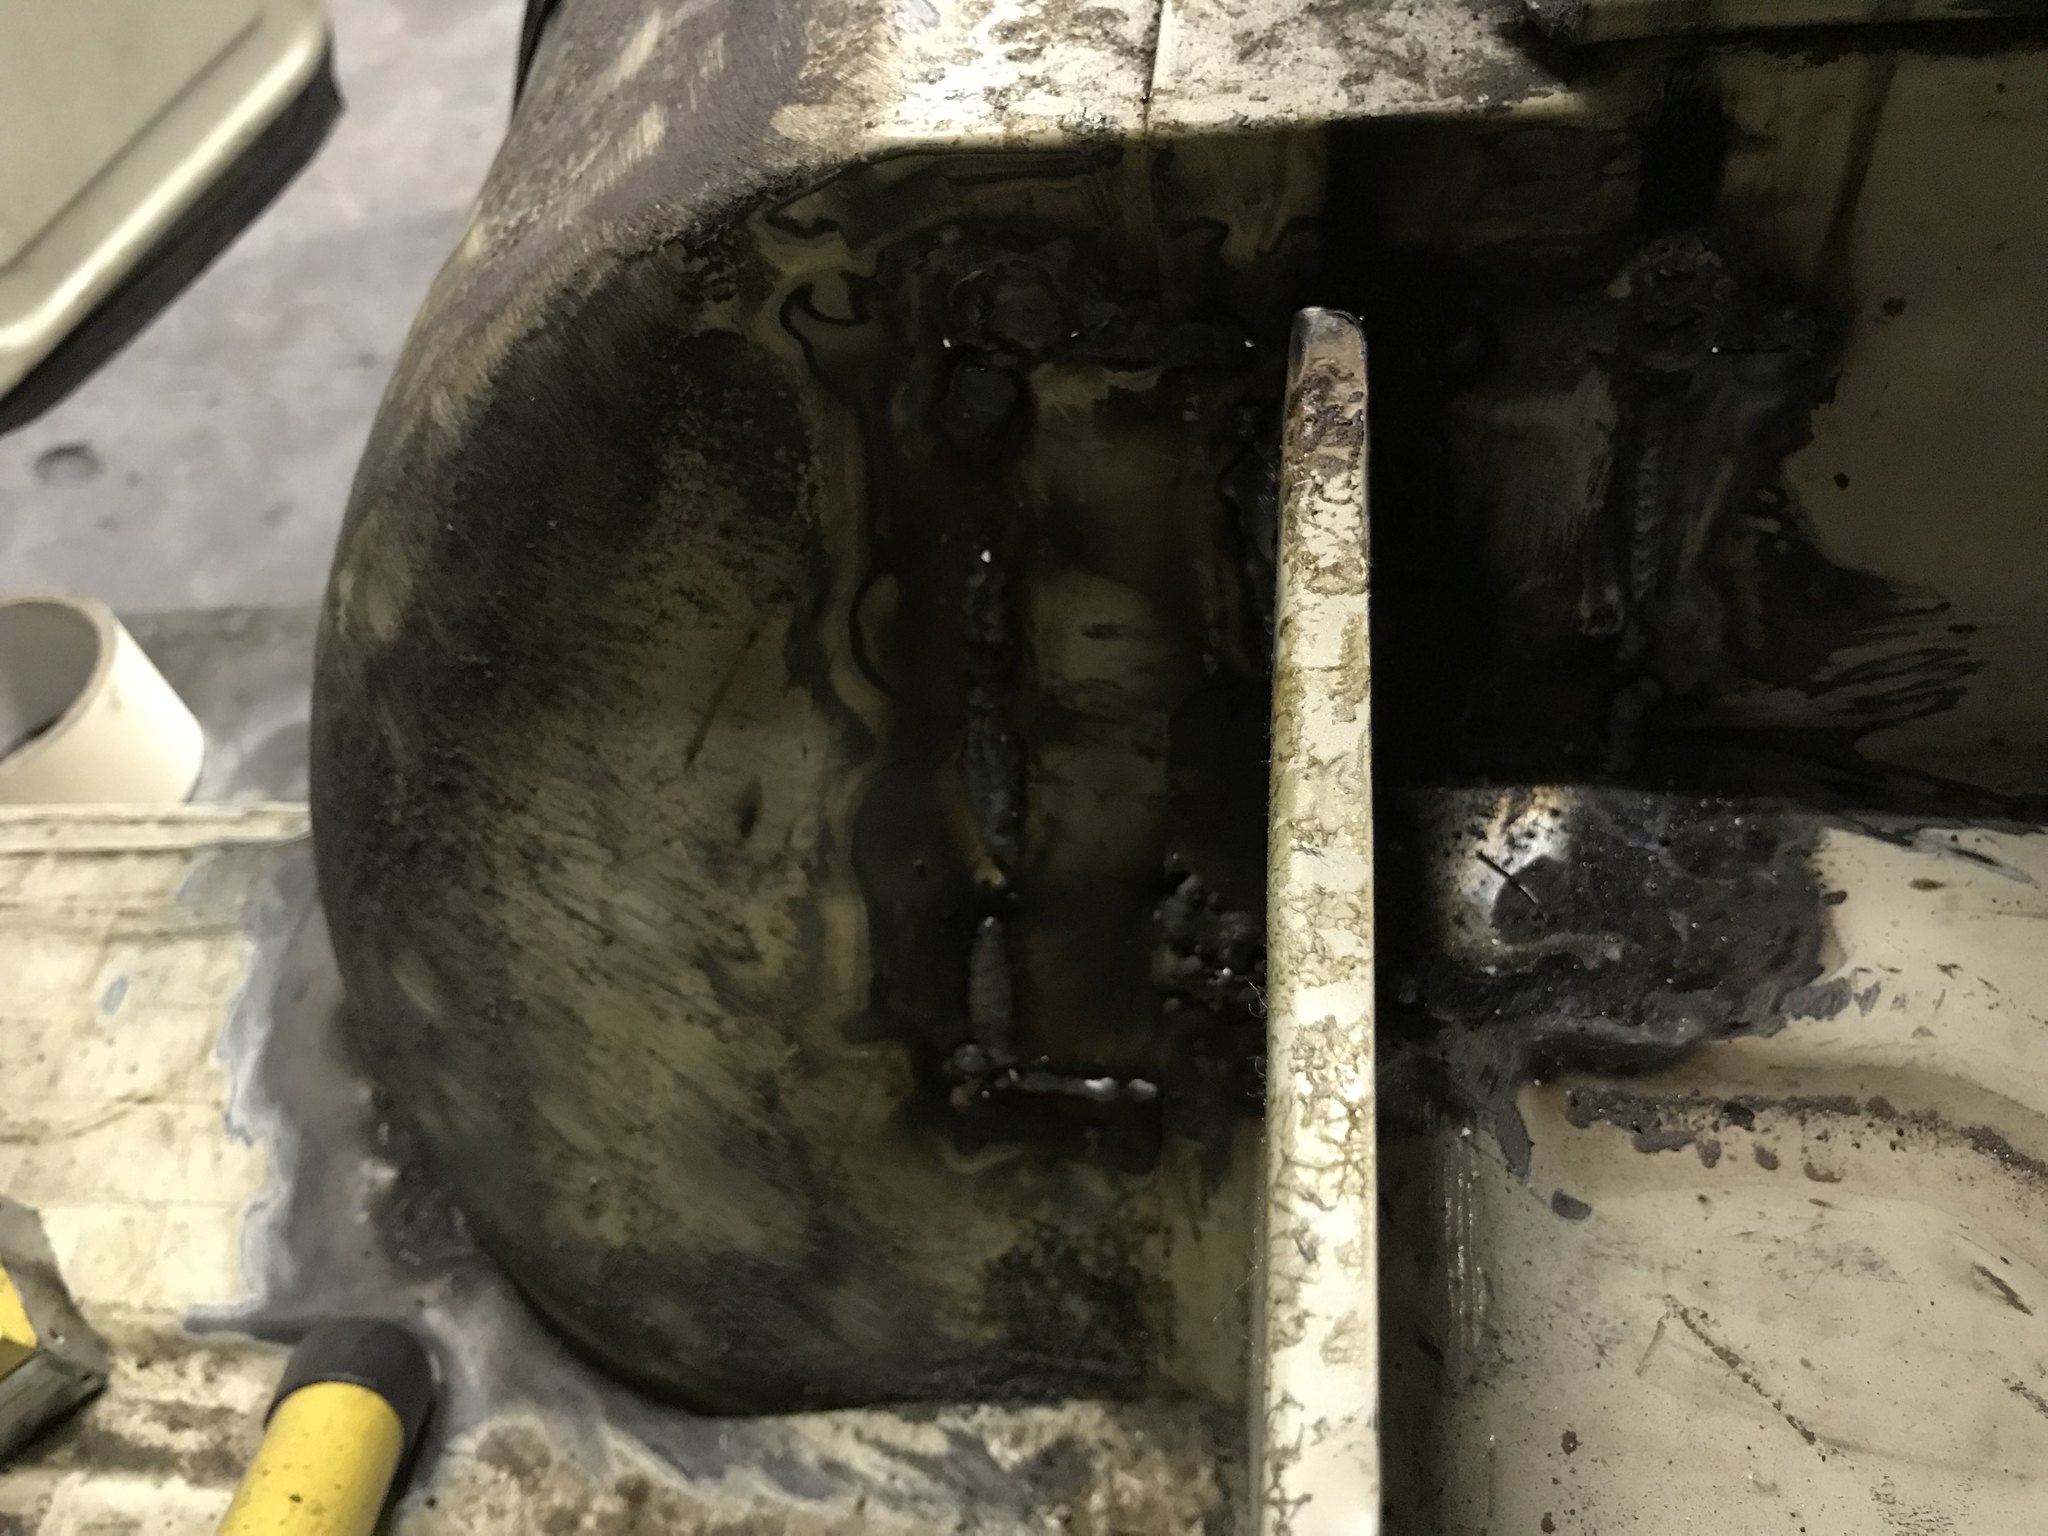
From inside, looking from inside the van to out the door. It’s dark but you get the idea of what was replaced.
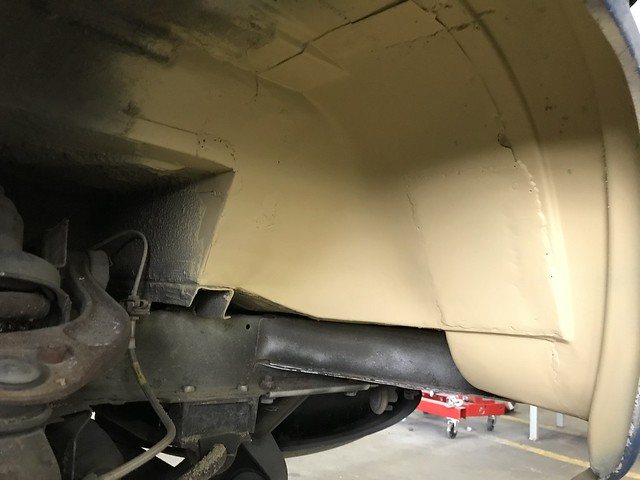
Etch primer after a lot of grinding back, for some reason welding this underneath was a PITA.
Just two more holes to go in the front, one by the step and door hinge area and one at the base of the seat box which is a bit nasty looking before moving onto the rear quarter. I finally tracked down a c pillar so that job will be much easier.
Yesterday and today mojo restored!
Arch/step hole was closed over with 1.5mm steel. I can’t get 1.2mm here so I’d rather go thicker. Inside looking down to the step, it was made in two pieces like the original
Unlike the original, I completely welded the seam to reduce the likely hood of the same rust recurring between the spot welded panels.
From underneath this hole corresponded the where the front of the seat box meets the arch.
This I made in one plate instead of two overlapped because it was easier and eliminated another exposed seam. The floor piece I welded in before shaping the outer tab upwards. The 1.5mm was more than strong enough to put up with the shaping. I also seam welded the rest of that edge as it seemed very vulnerable from the rust that was there.
From inside, looking from inside the van to out the door. It’s dark but you get the idea of what was replaced.
Etch primer after a lot of grinding back, for some reason welding this underneath was a PITA.
Just two more holes to go in the front, one by the step and door hinge area and one at the base of the seat box which is a bit nasty looking before moving onto the rear quarter. I finally tracked down a c pillar so that job will be much easier.
Greta: 85’ LHD 2.5L Subaru 14in Syncro
http://forum.club8090.co.uk/viewtopic.php?t=165773
http://forum.club8090.co.uk/viewtopic.php?t=165773
-
RogerT
- Registered user
- Posts: 1819
- Joined: 10 May 2013, 11:59
- 80-90 Mem No: 13706
- Location: Central Scotland
Re: Procrastinating never got anyone anywhere
Have you ever seen an unhappy fool?
88 Transporter with hitop camper conversion, 1.6td.
88 Transporter with hitop camper conversion, 1.6td.
-
bigbadbob76

- Registered user
- Posts: 1733
- Joined: 07 Nov 2016, 14:41
- 80-90 Mem No: 15707
- Location: Isle of Skye
Re: Procrastinating never got anyone anywhere
Great to see it coming together Adie. 
Reading your posts takes me back to when I did mine.
I learned a lot along the way and will go back and re-do some of mine at some point as I get better as I went along.
Reading your posts takes me back to when I did mine.
I learned a lot along the way and will go back and re-do some of mine at some point as I get better as I went along.
'86 1.9 DG, 4 spd, tintop, camper conversion.
Split case club member.
Split case club member.
-
adie89
- Registered user
- Posts: 293
- Joined: 04 Sep 2012, 21:25
- 80-90 Mem No: 11532
- Location: Wiltshire
Re: Procrastinating never got anyone anywhere
Some more progress:
The step and bottom of the a pillar after much swearing and buggering about are repaired but I completely forgot to take a picture.
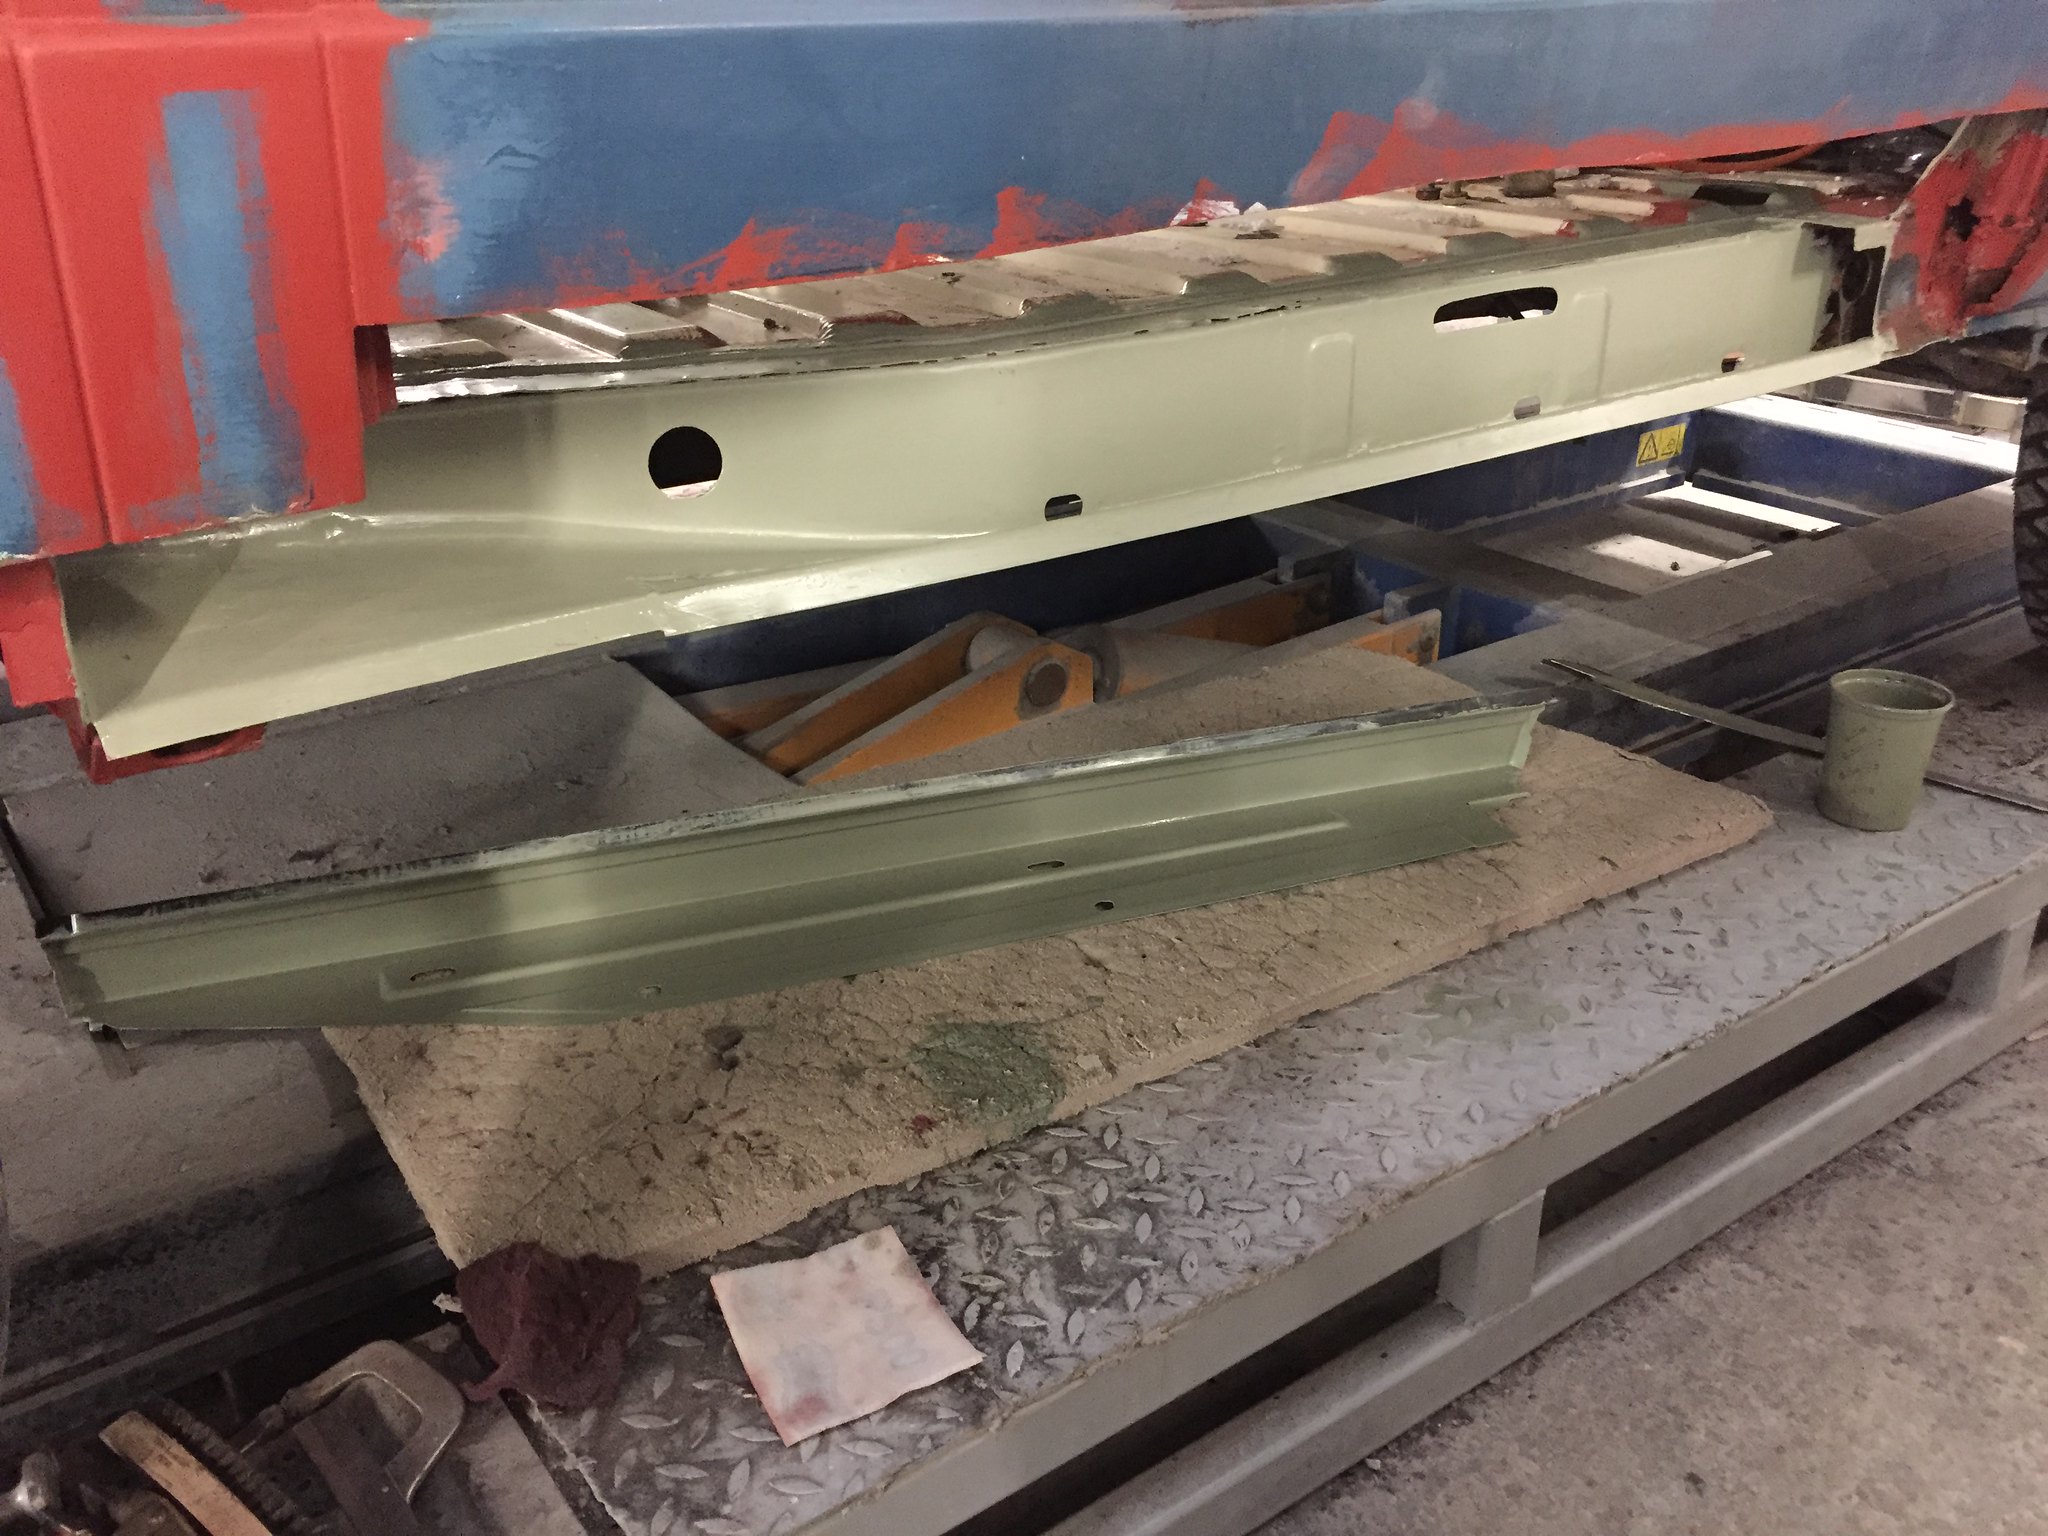
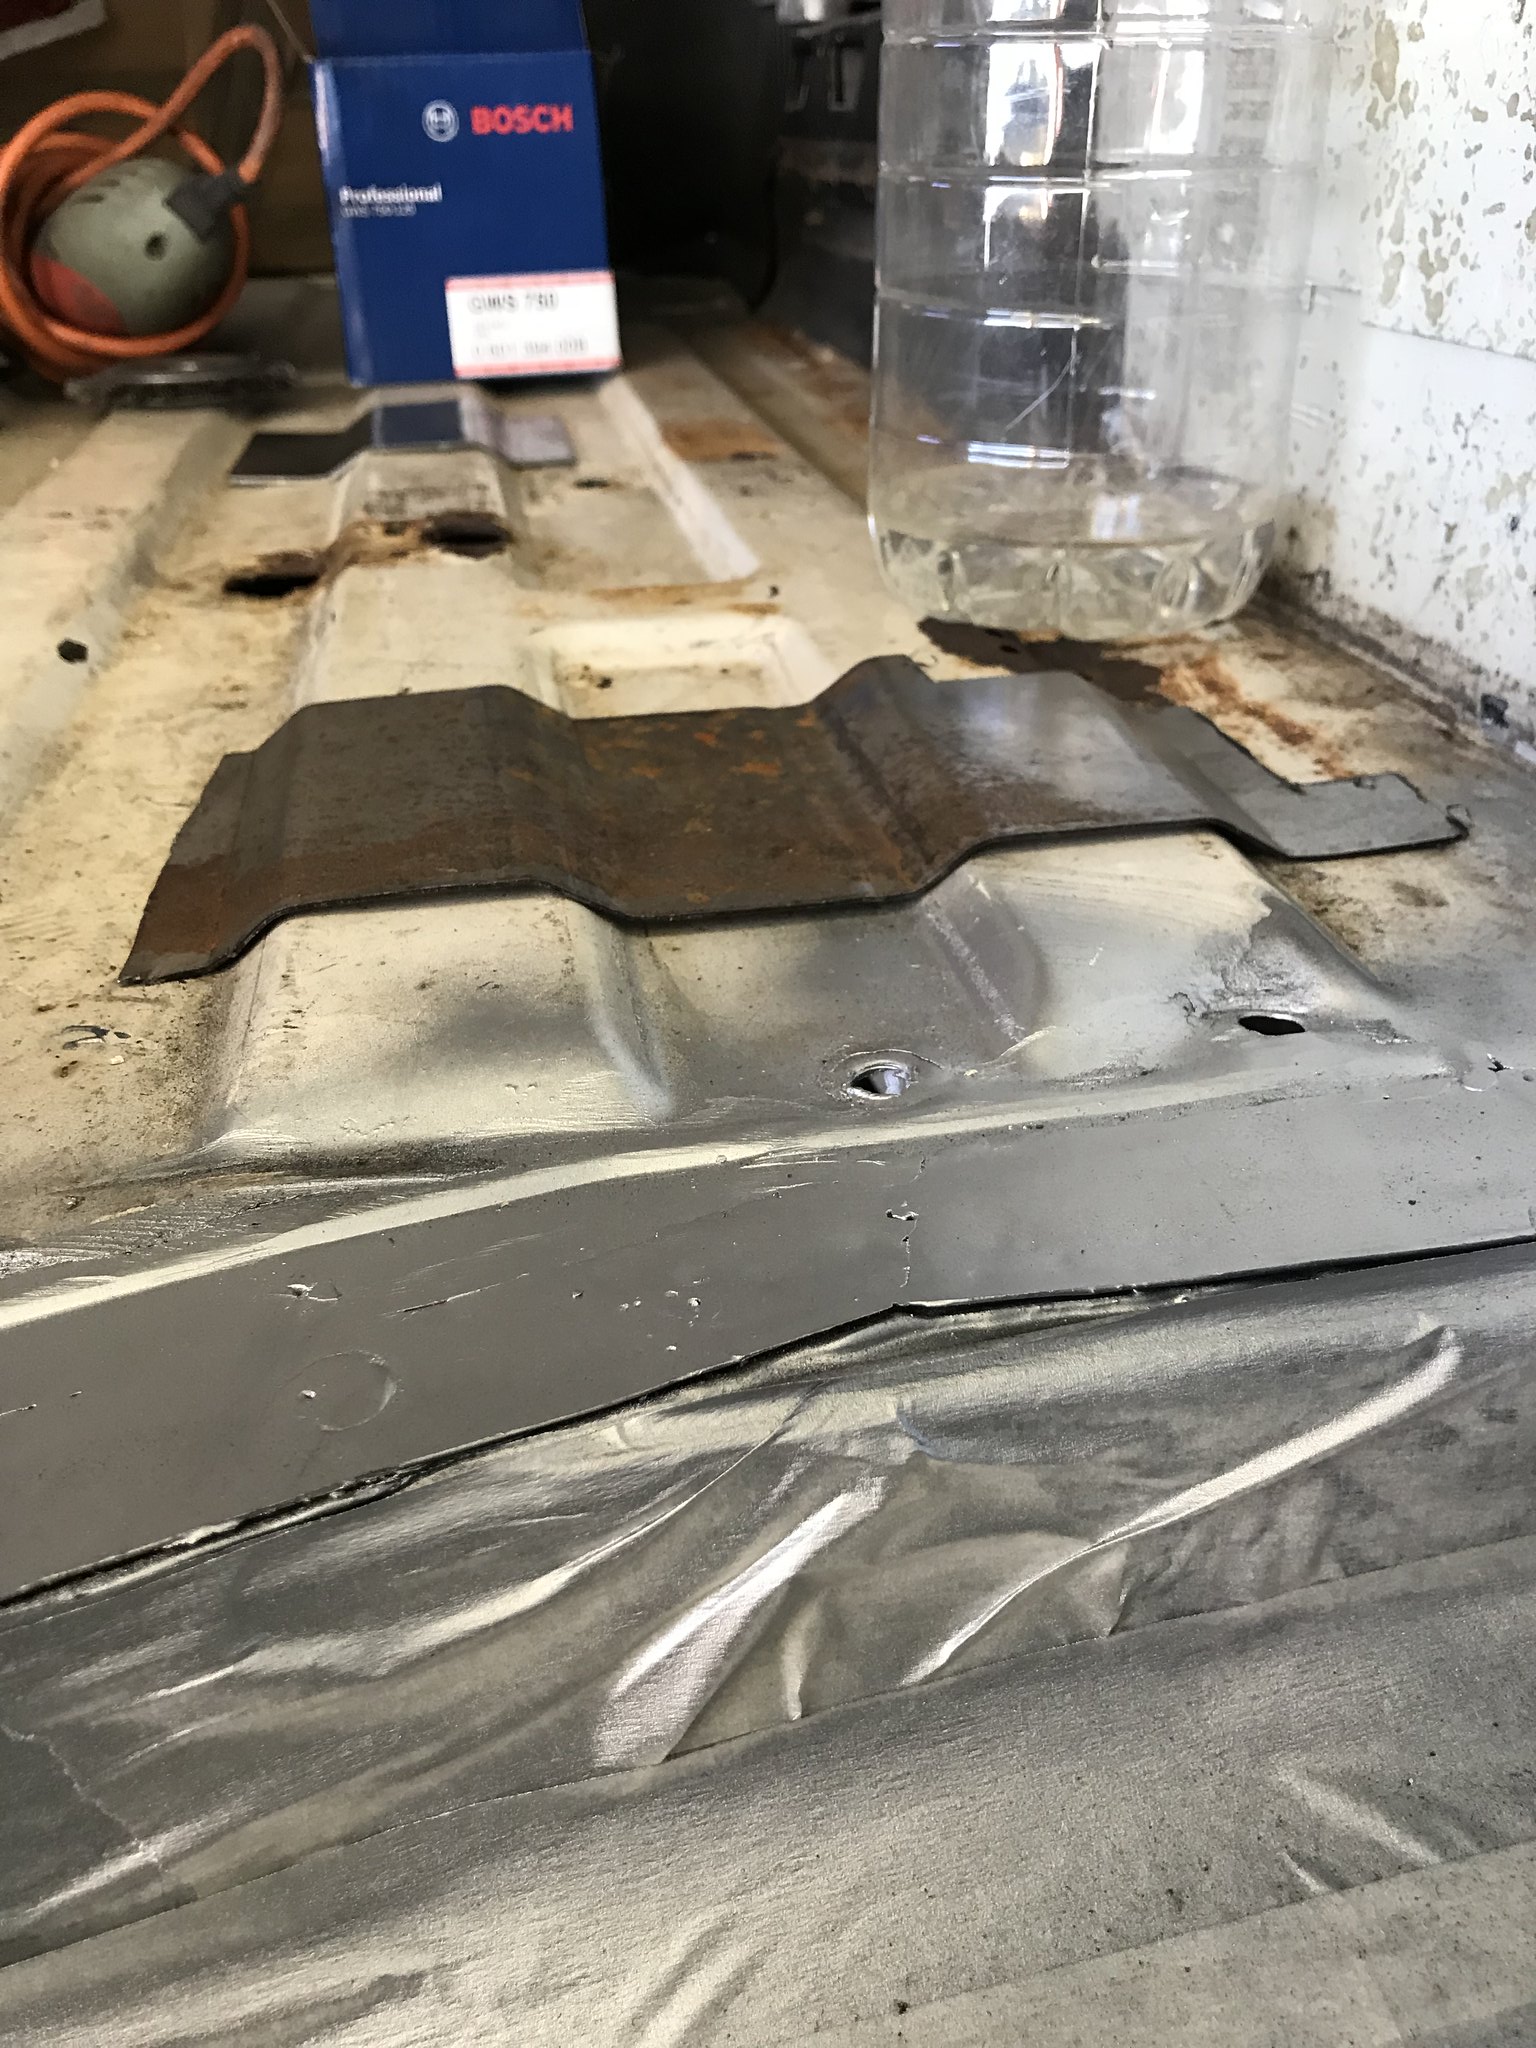
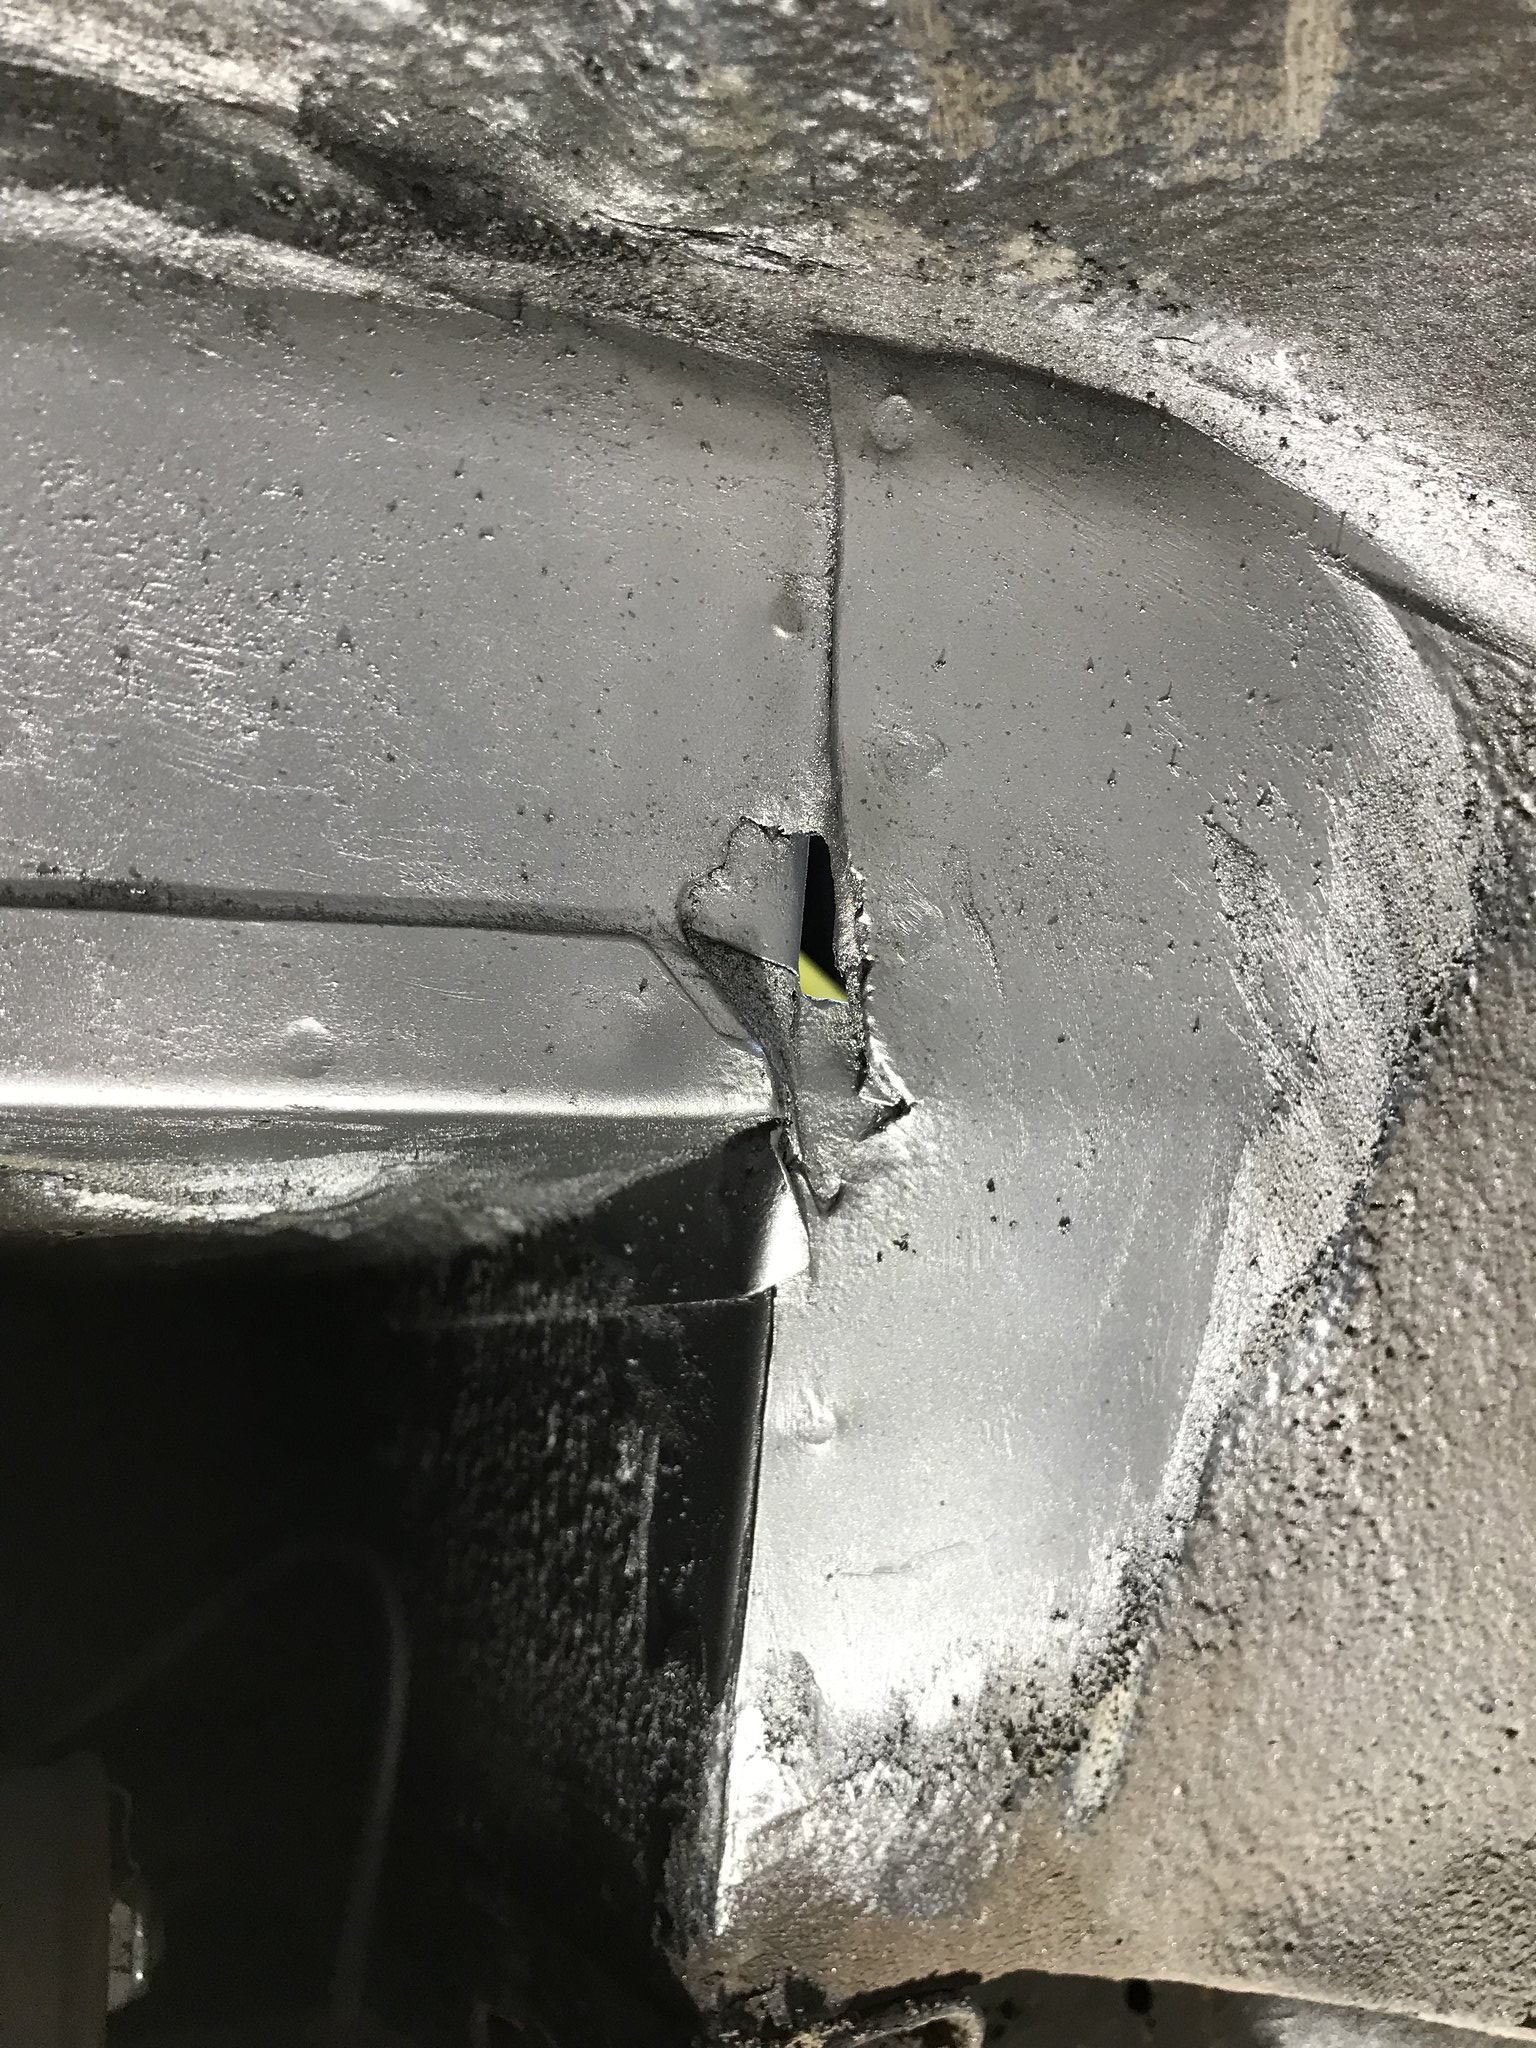
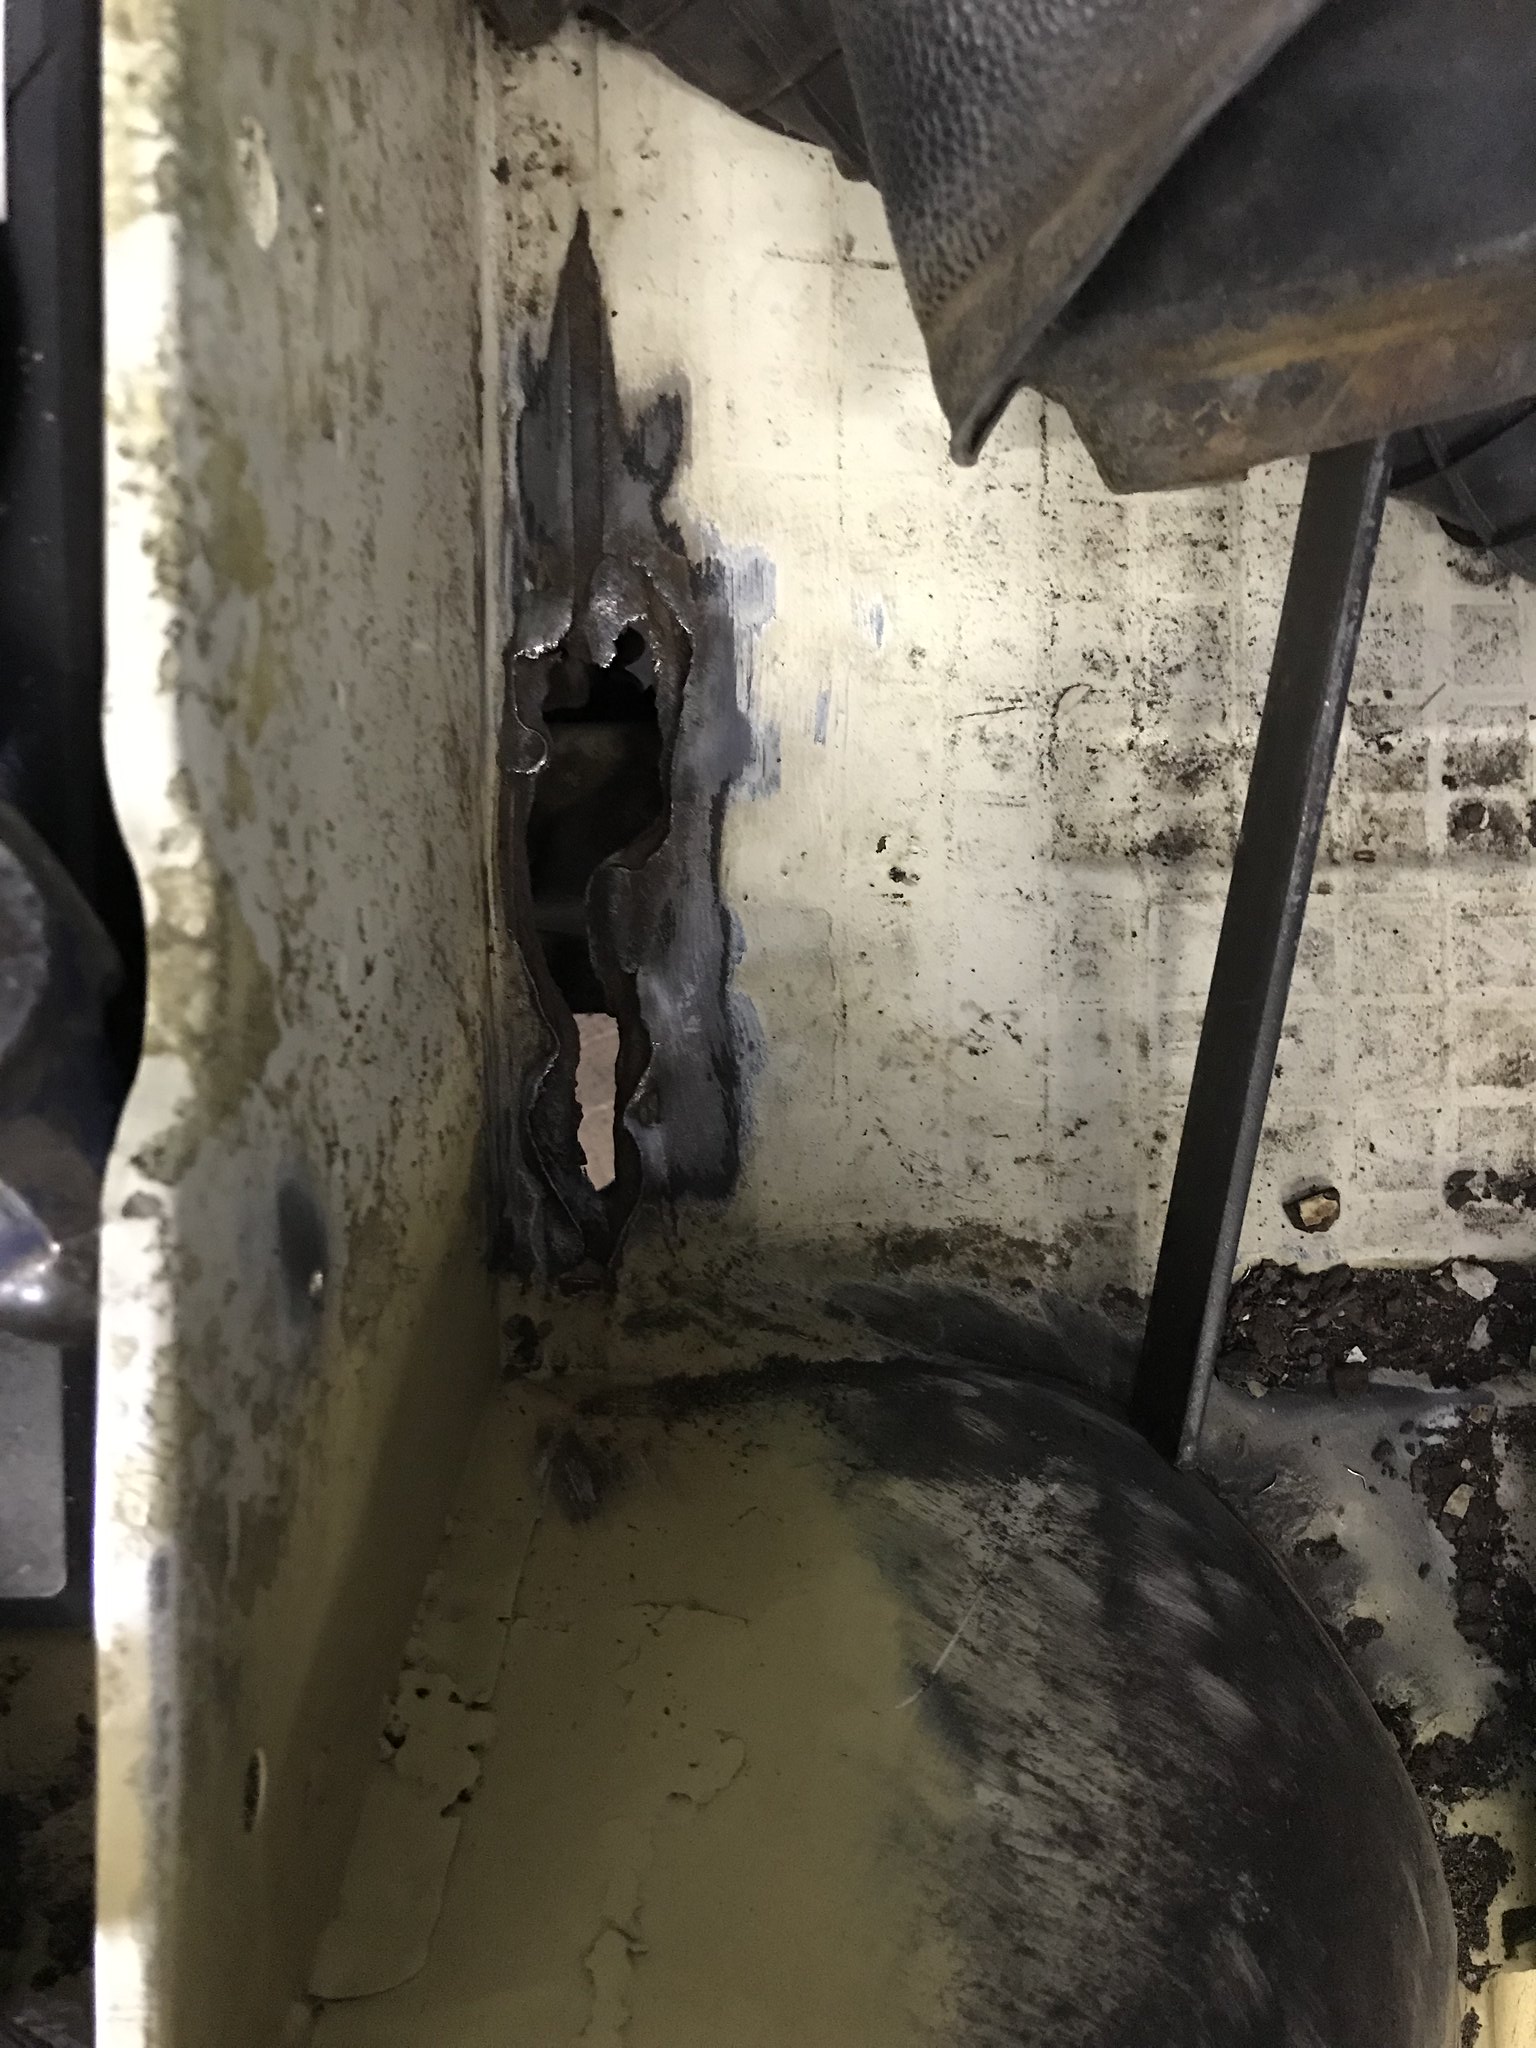
So I moved onto the last bit for the front, I cut out the front of the passenger battery box and sliced out a section of the floor because of this:
Cleaned out with a twisted brush on the grinder Revealed the supporting rail on top of the chassis had rotted through on the top.
Floor and box cut out meant I could cut the rail out. It was only tacked on the outer chassis legs and spot welded to the body which were already drilled out/rotted through.
Original, cardboard template, folded up in fresh 1.5mm steel.
To make the transition from flat on the chassis rail to angled under the cab I marked out and made a slit the cut some scrap box to the same angle so I could make the sharper fold.
Resulted in

Once I was happy it fit, you can see better in this pic what I had to cut out for access

View from in the wheel arch

I massaged the slit with a mark 1 tapometer to close it up before welding then zinc primed underneath before welding back in. Yet again, I failed to take a pic after final fit dammit!
I have no 1mm steel and 1.5 is too hard to bend for the seat box which I was surprised to find the original was only .7mm. So here’s the template ready for steel.

I moved onto trial fitting the c pillar, but I left my joggler at home, so that didn’t get done either.
Next update will be a while, rear bearings, diff seals and poly bushes to do on my S4 so I can get to work on Monday need doing first and the parts arrived today. Ironically cheaper for for a bearing, two seals and 2 litres of oil for an Audi S4 than for one bearing for the syncro.
The step and bottom of the a pillar after much swearing and buggering about are repaired but I completely forgot to take a picture.
So I moved onto the last bit for the front, I cut out the front of the passenger battery box and sliced out a section of the floor because of this:
Cleaned out with a twisted brush on the grinder Revealed the supporting rail on top of the chassis had rotted through on the top.
Floor and box cut out meant I could cut the rail out. It was only tacked on the outer chassis legs and spot welded to the body which were already drilled out/rotted through.
Original, cardboard template, folded up in fresh 1.5mm steel.
To make the transition from flat on the chassis rail to angled under the cab I marked out and made a slit the cut some scrap box to the same angle so I could make the sharper fold.
Resulted in
Once I was happy it fit, you can see better in this pic what I had to cut out for access
View from in the wheel arch
I massaged the slit with a mark 1 tapometer to close it up before welding then zinc primed underneath before welding back in. Yet again, I failed to take a pic after final fit dammit!
I have no 1mm steel and 1.5 is too hard to bend for the seat box which I was surprised to find the original was only .7mm. So here’s the template ready for steel.
I moved onto trial fitting the c pillar, but I left my joggler at home, so that didn’t get done either.
Next update will be a while, rear bearings, diff seals and poly bushes to do on my S4 so I can get to work on Monday need doing first and the parts arrived today. Ironically cheaper for for a bearing, two seals and 2 litres of oil for an Audi S4 than for one bearing for the syncro.
Greta: 85’ LHD 2.5L Subaru 14in Syncro
http://forum.club8090.co.uk/viewtopic.php?t=165773
http://forum.club8090.co.uk/viewtopic.php?t=165773
-
adie89
- Registered user
- Posts: 293
- Joined: 04 Sep 2012, 21:25
- 80-90 Mem No: 11532
- Location: Wiltshire
Re: Procrastinating never got anyone anywhere
To follow up the last post with the missing pictures.
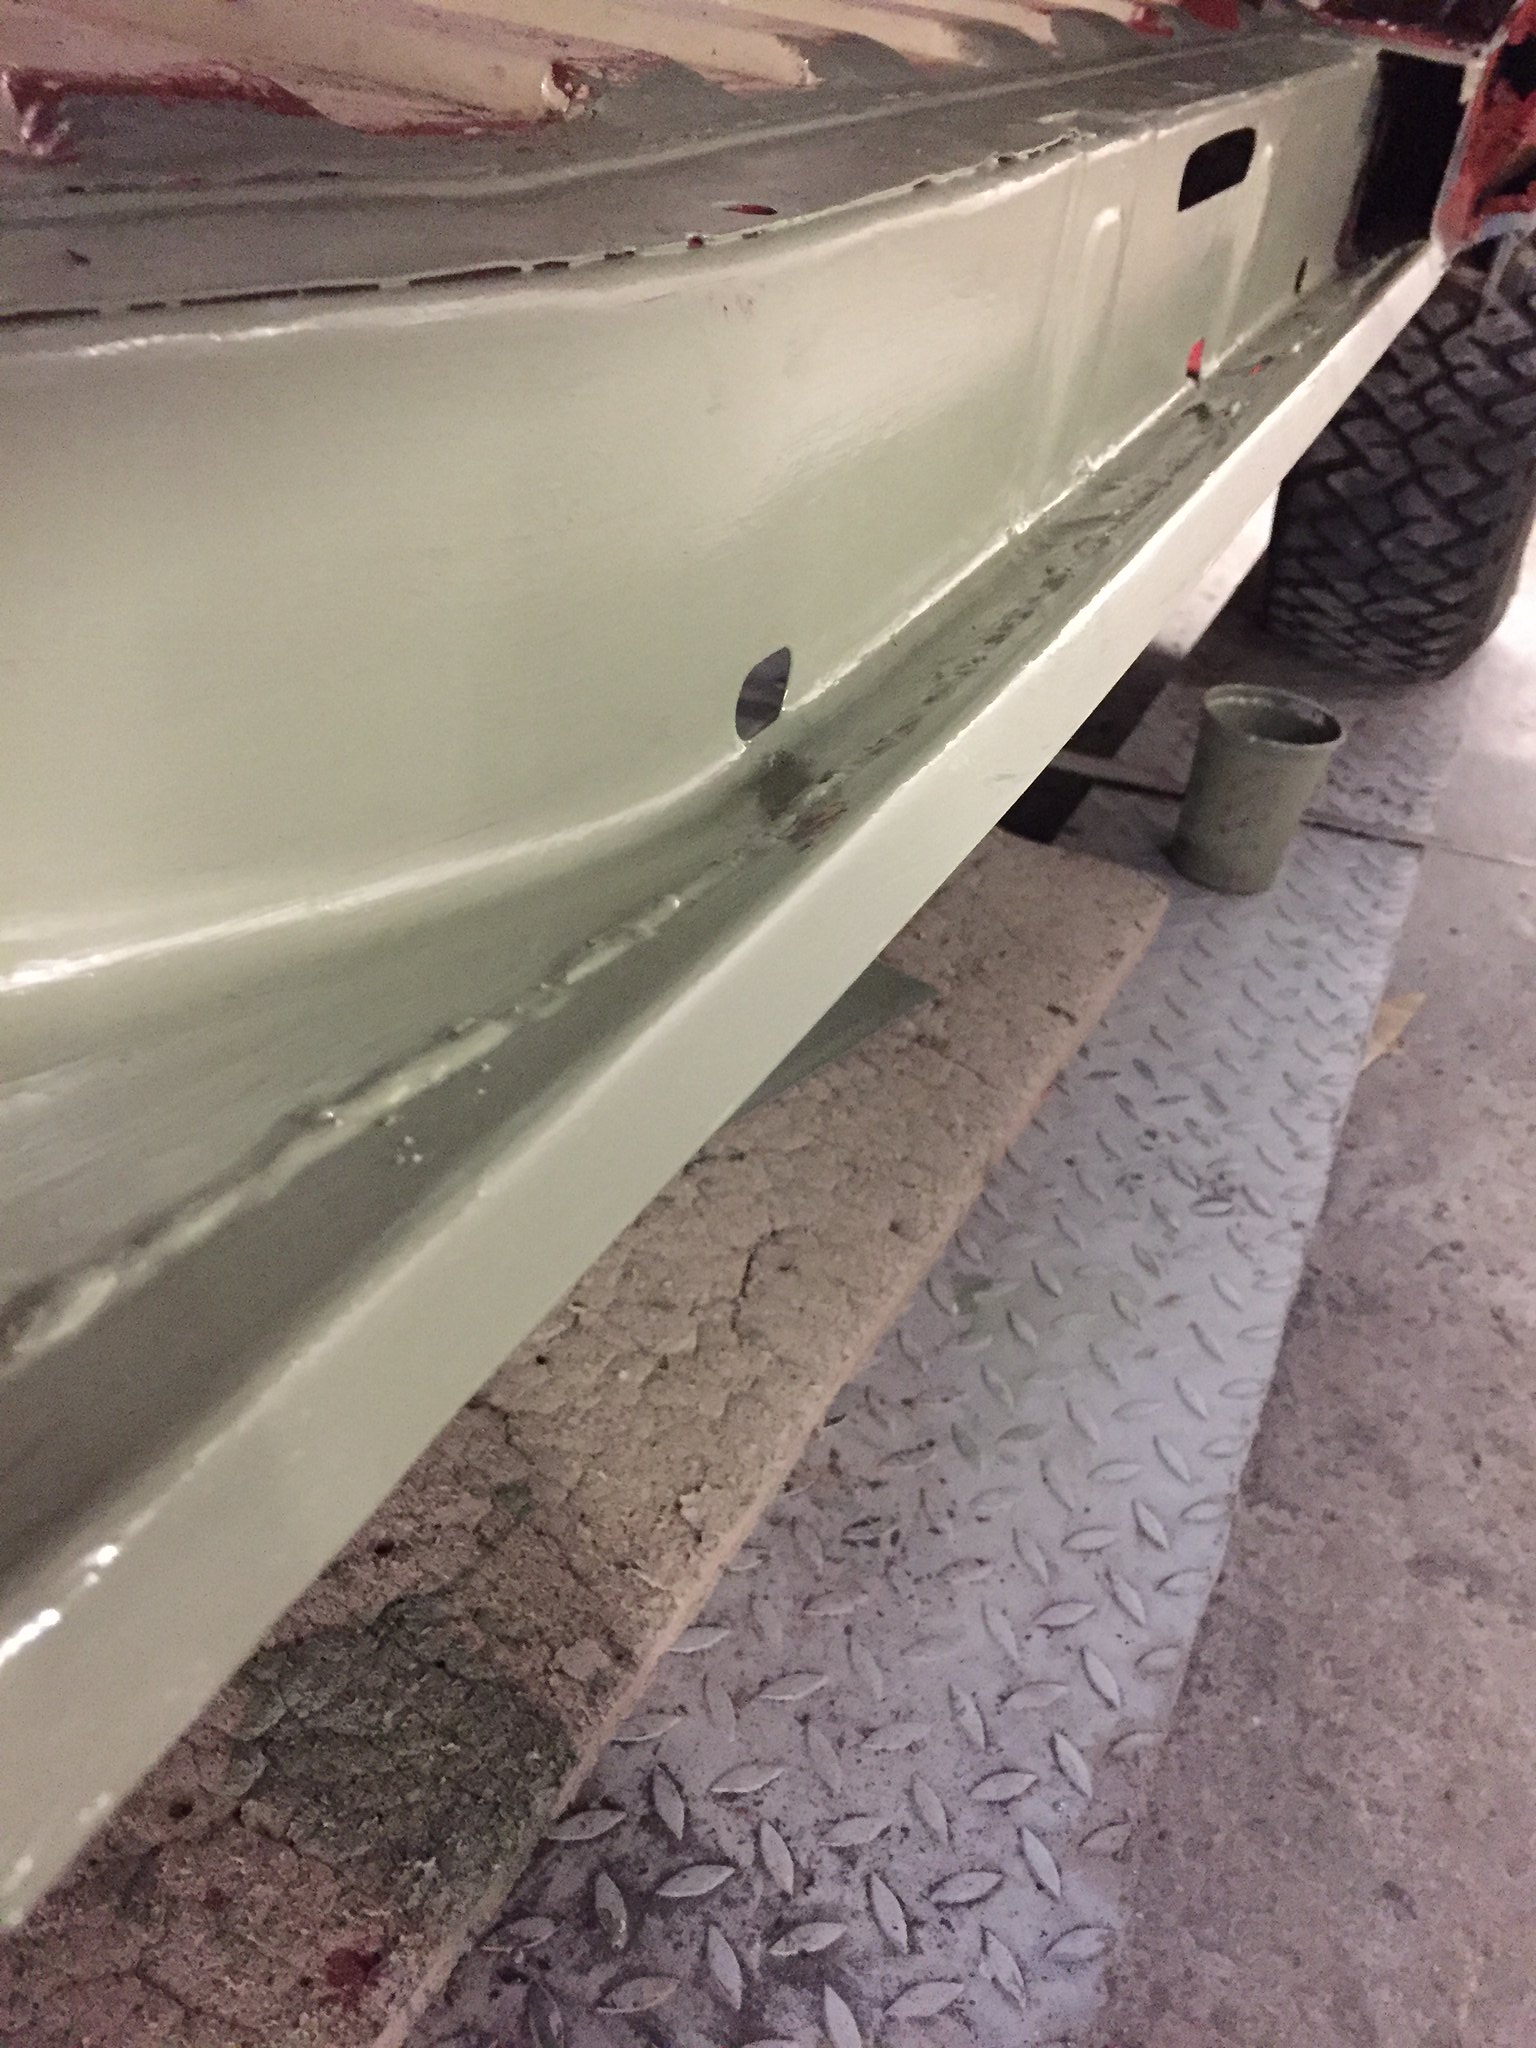
The bottom of the a pillar, still needs dressing underneath, it was awkward and didn’t come out prettily
The cab floor support welded in and awaiting steel for the floor

So while I wait for Monday for my steel there’s always more needs doing.
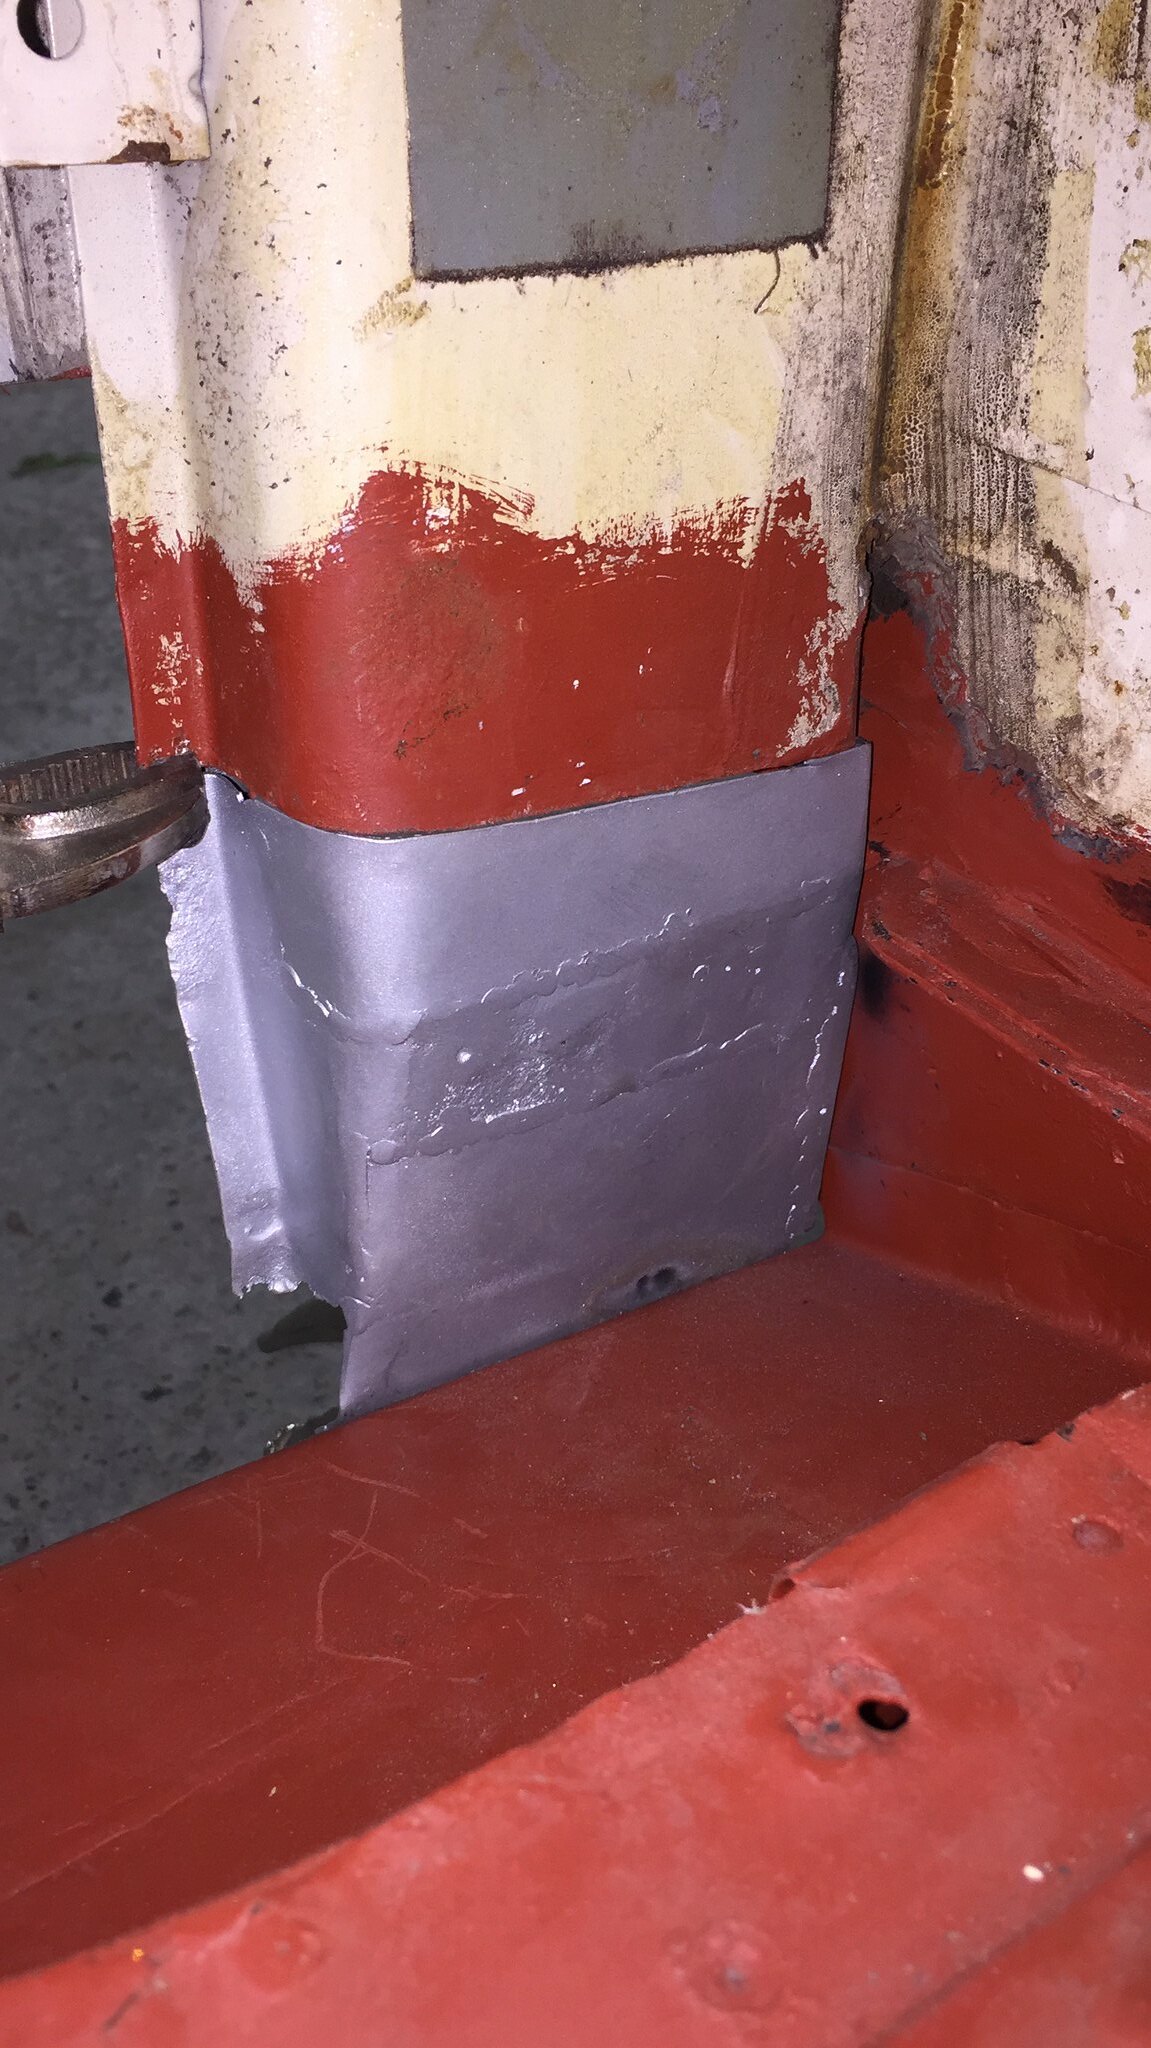
I trimmed the bottom of my new c pillar and matched it very carefully a little at a time to the existing pillar. I then stepped the edges so I would have adjustment room and plenty of metal to weld to, it’ll be inside the van so less likely to rust again. So here it is stepped and after many trial fits. I slitted along the corners and used pliers to create the step on the thin complex folds
Zinc primered and held in place prior to welding with self tappers so I could match the outer sill
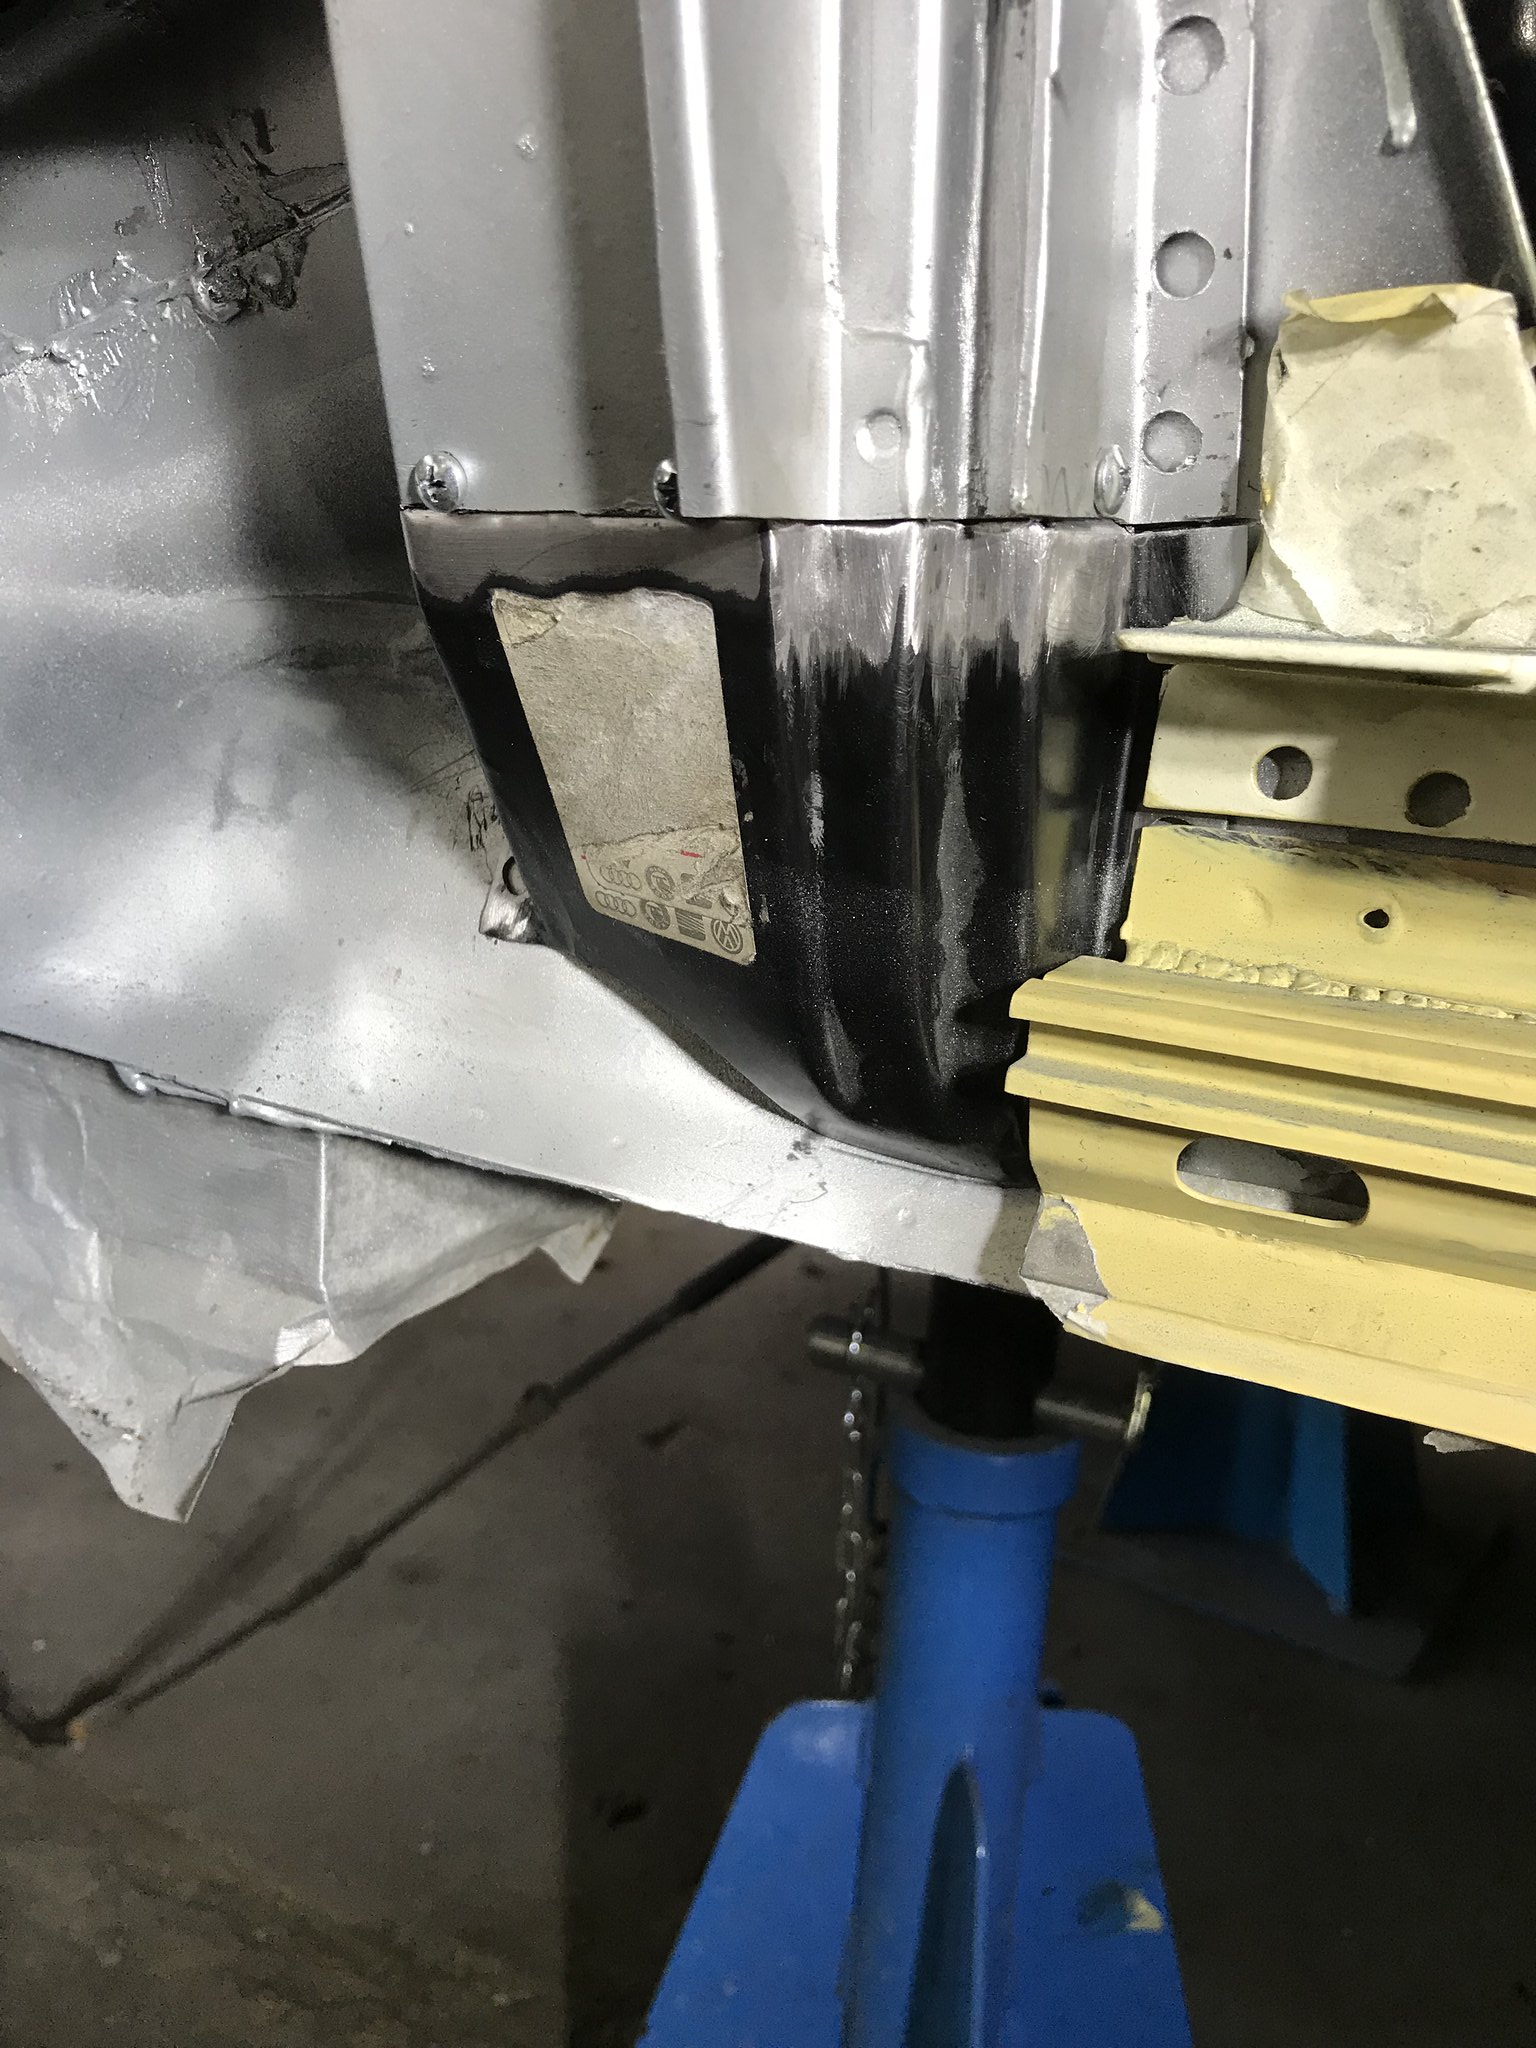
While the zinc primer dried, I cleaned up the old water filler point. The tank wasn’t there when I bought the van, I don’t have the key so it’s just another hole in the van.
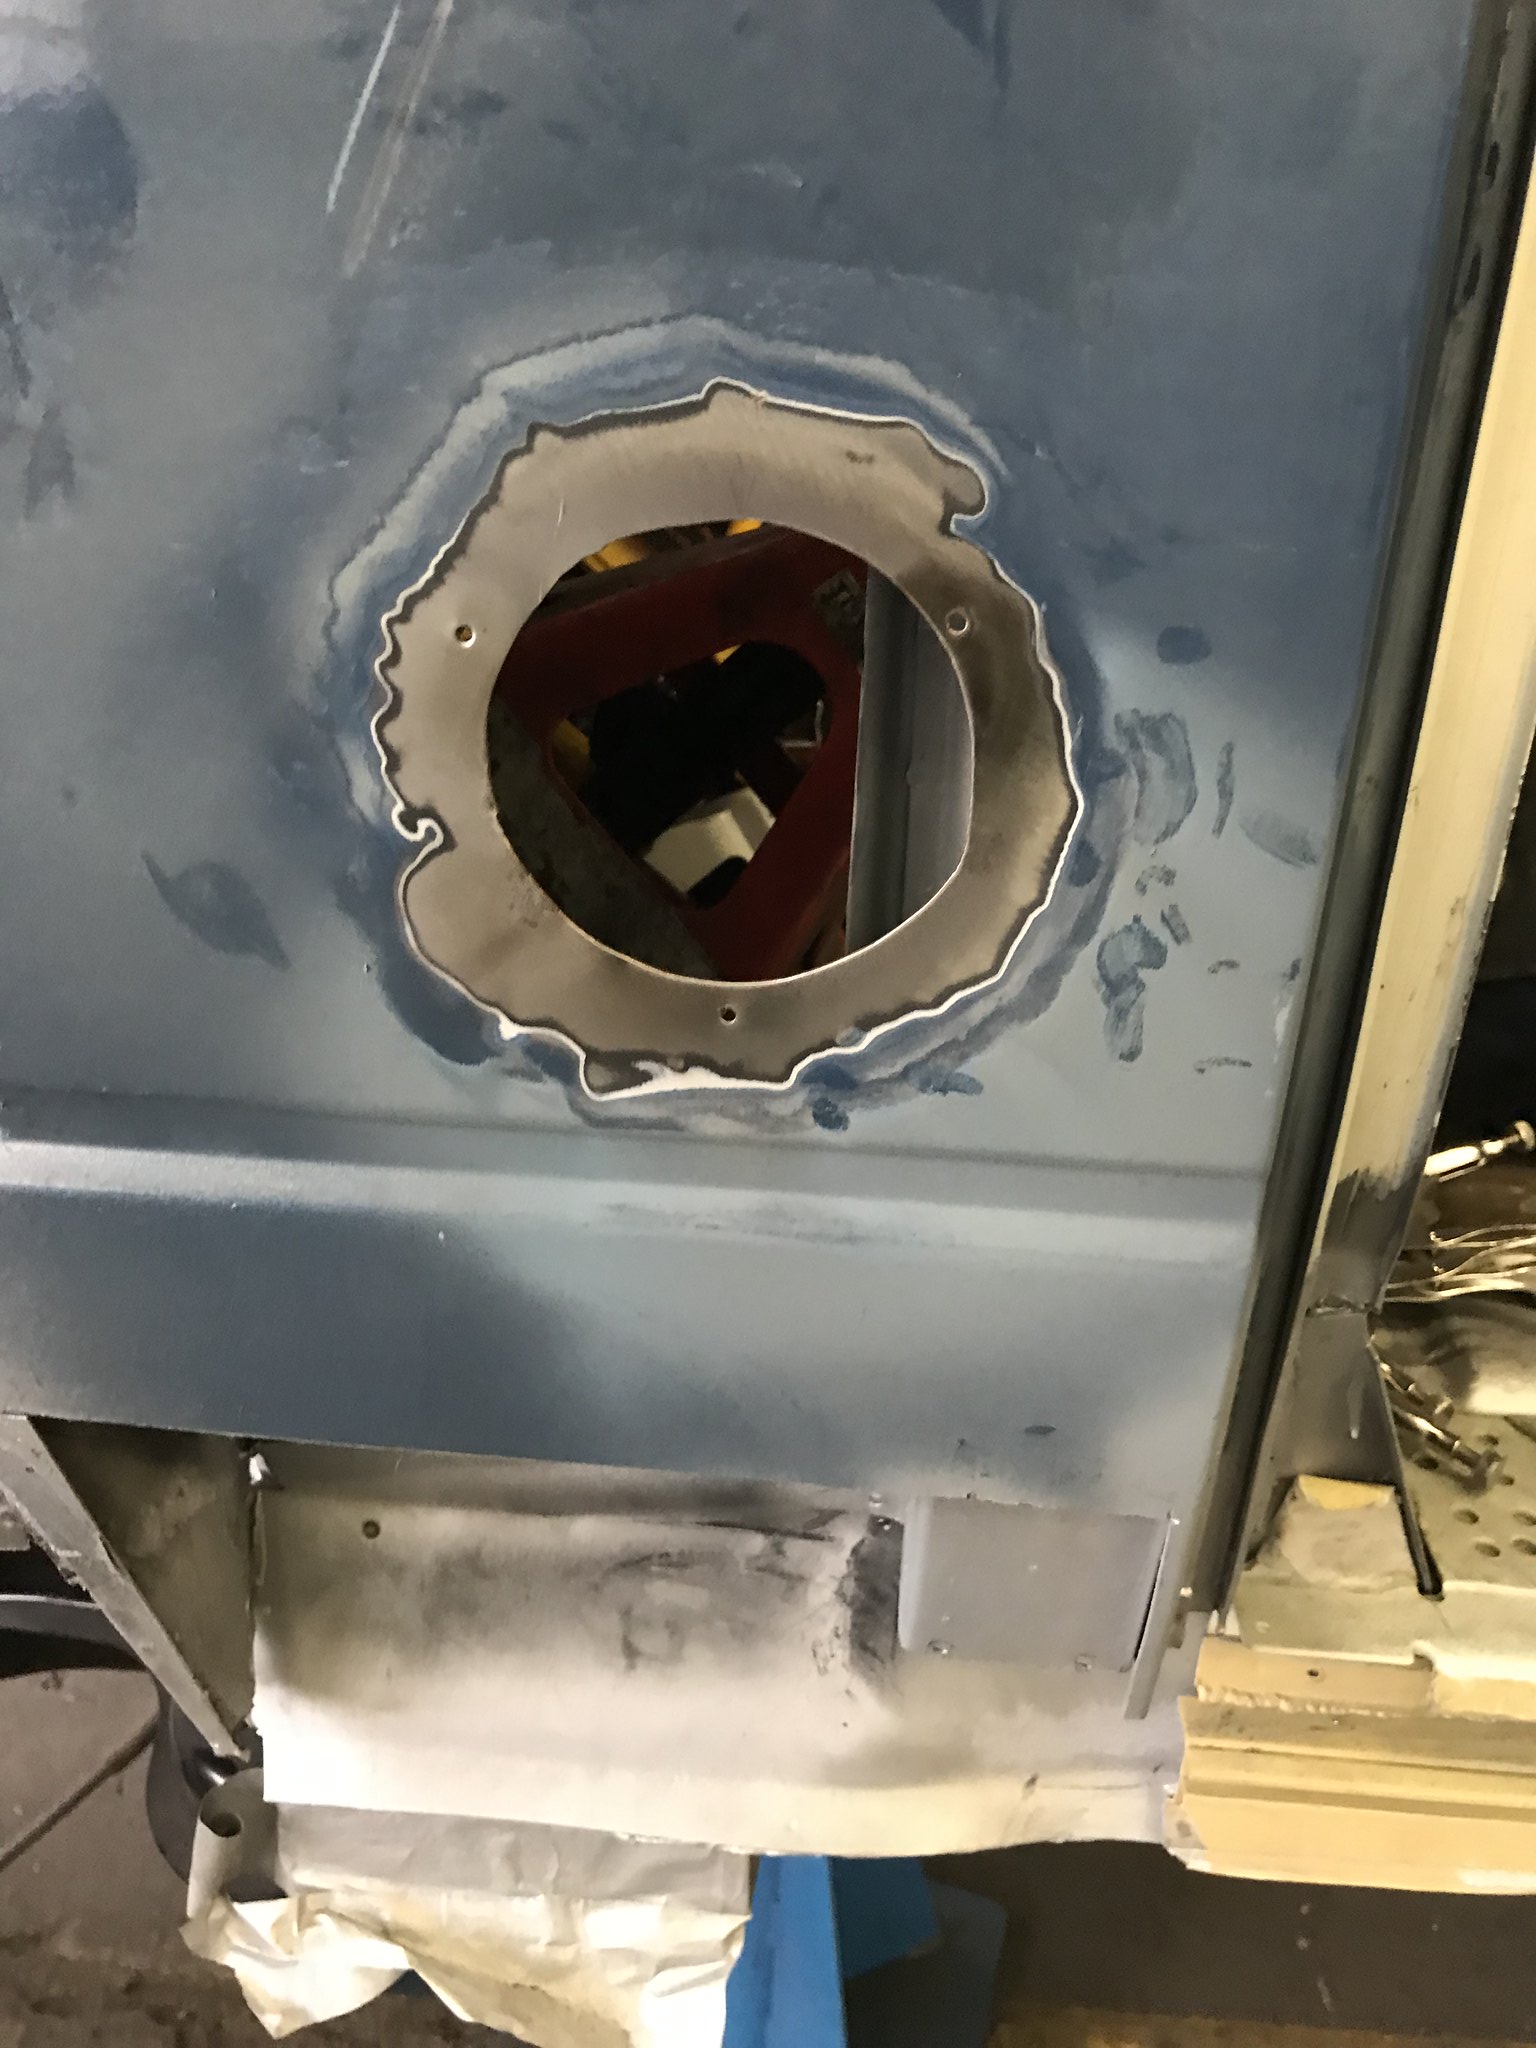
So I had an old door skin from a mate’s van, paper template,
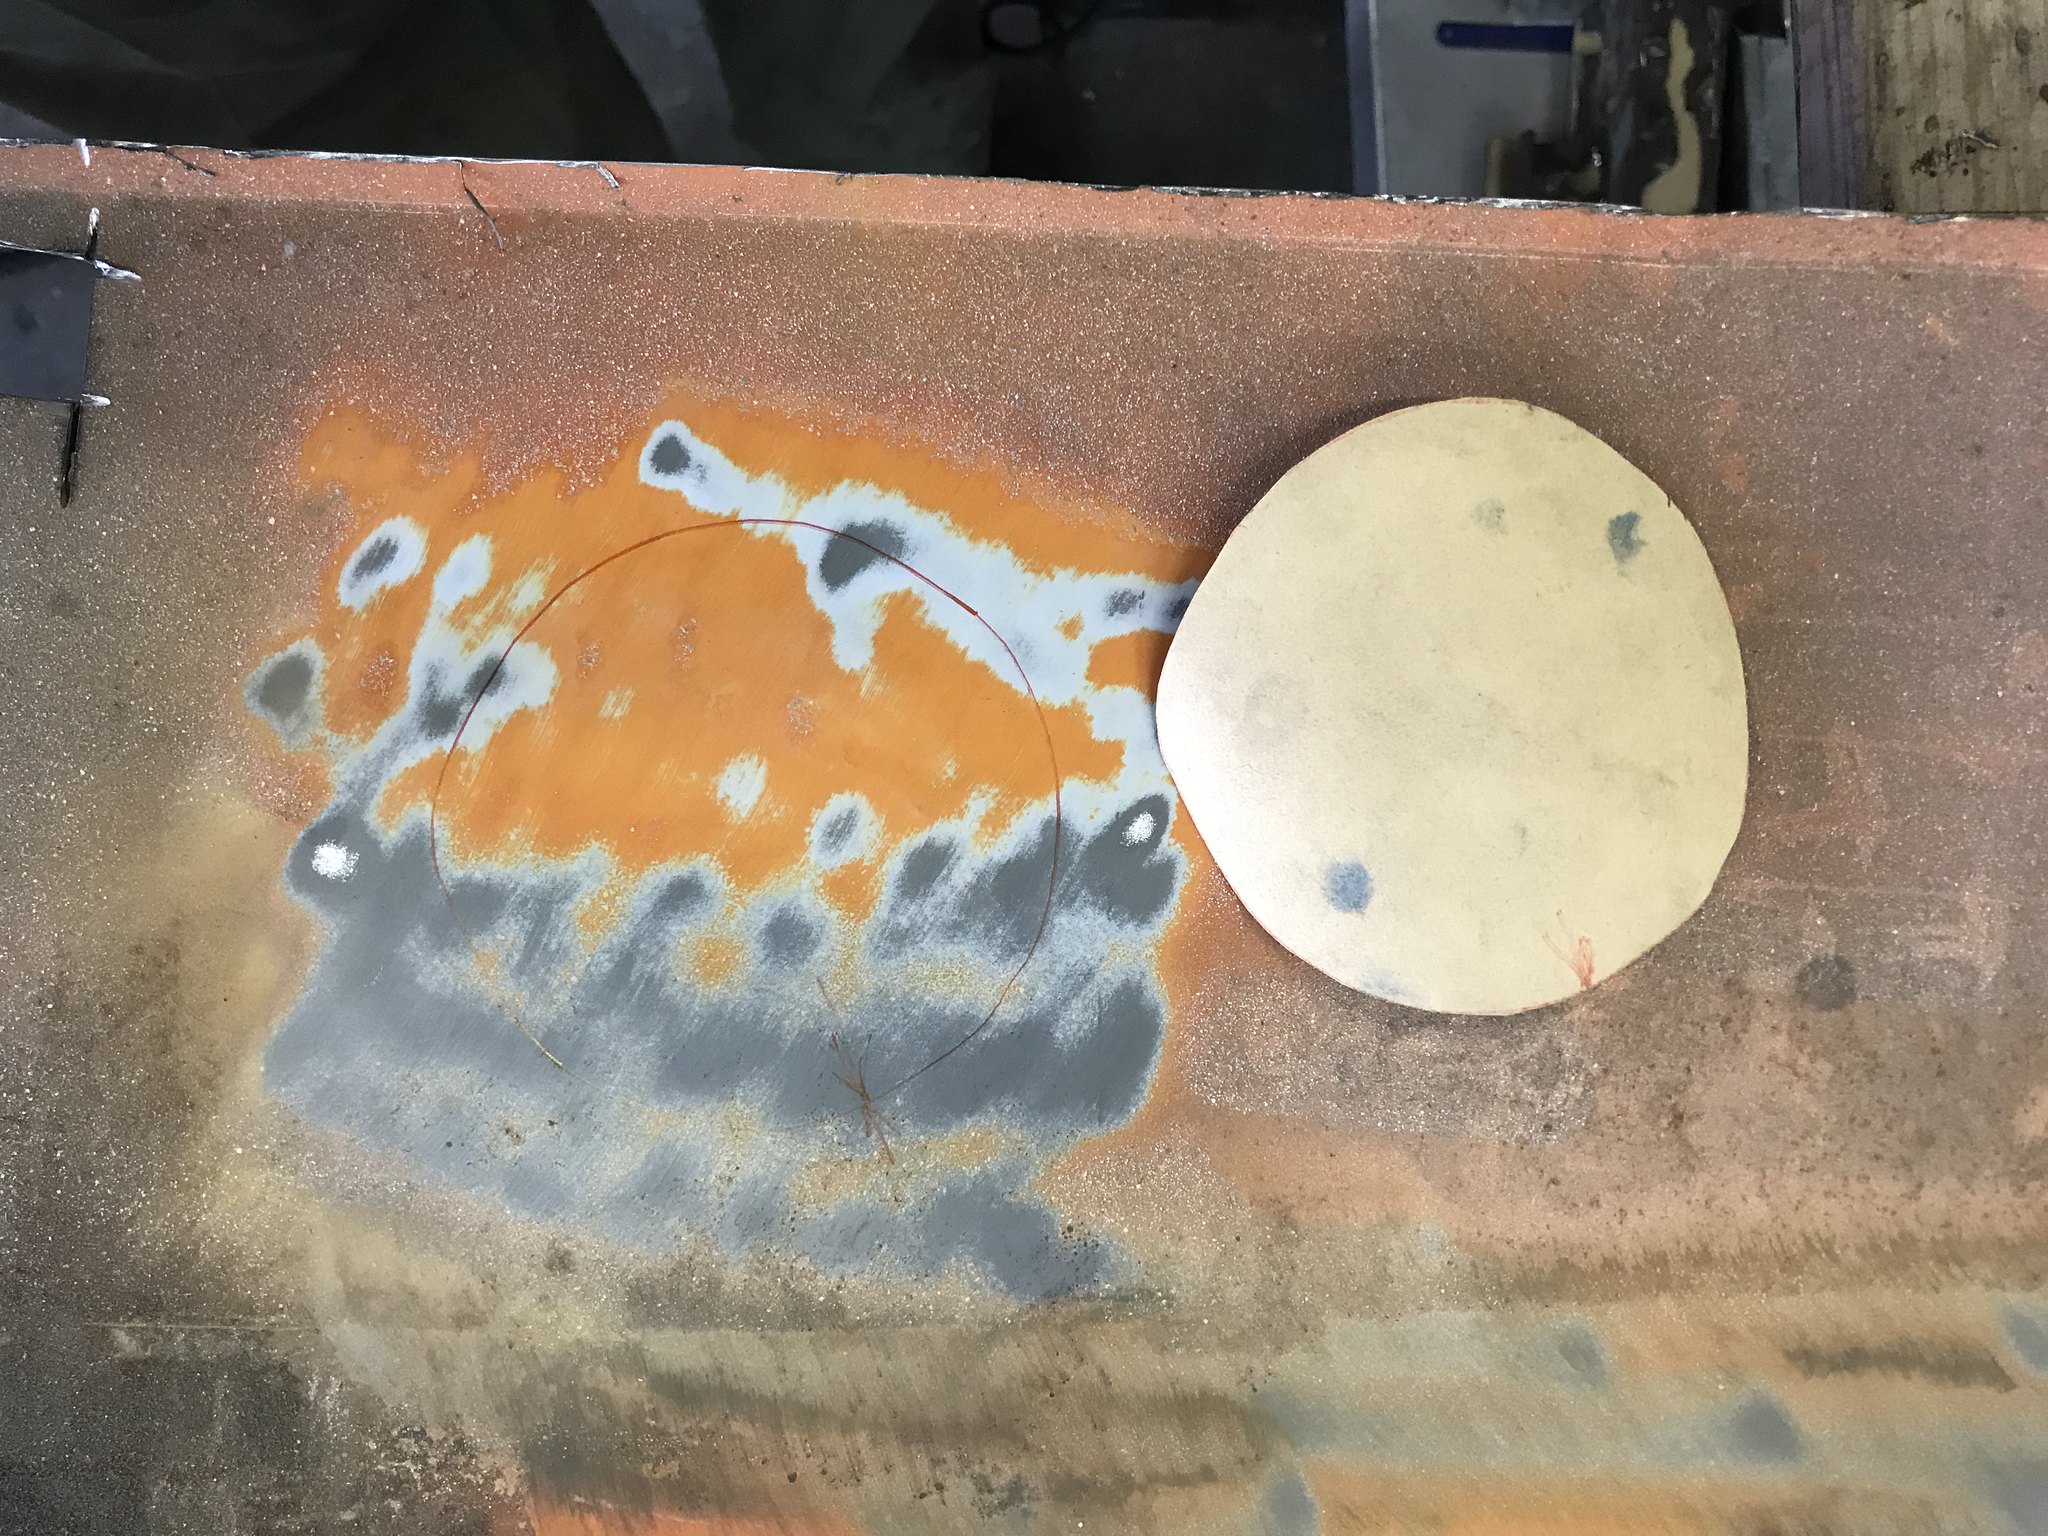
rough cut with a grinder and refined with a belt sander
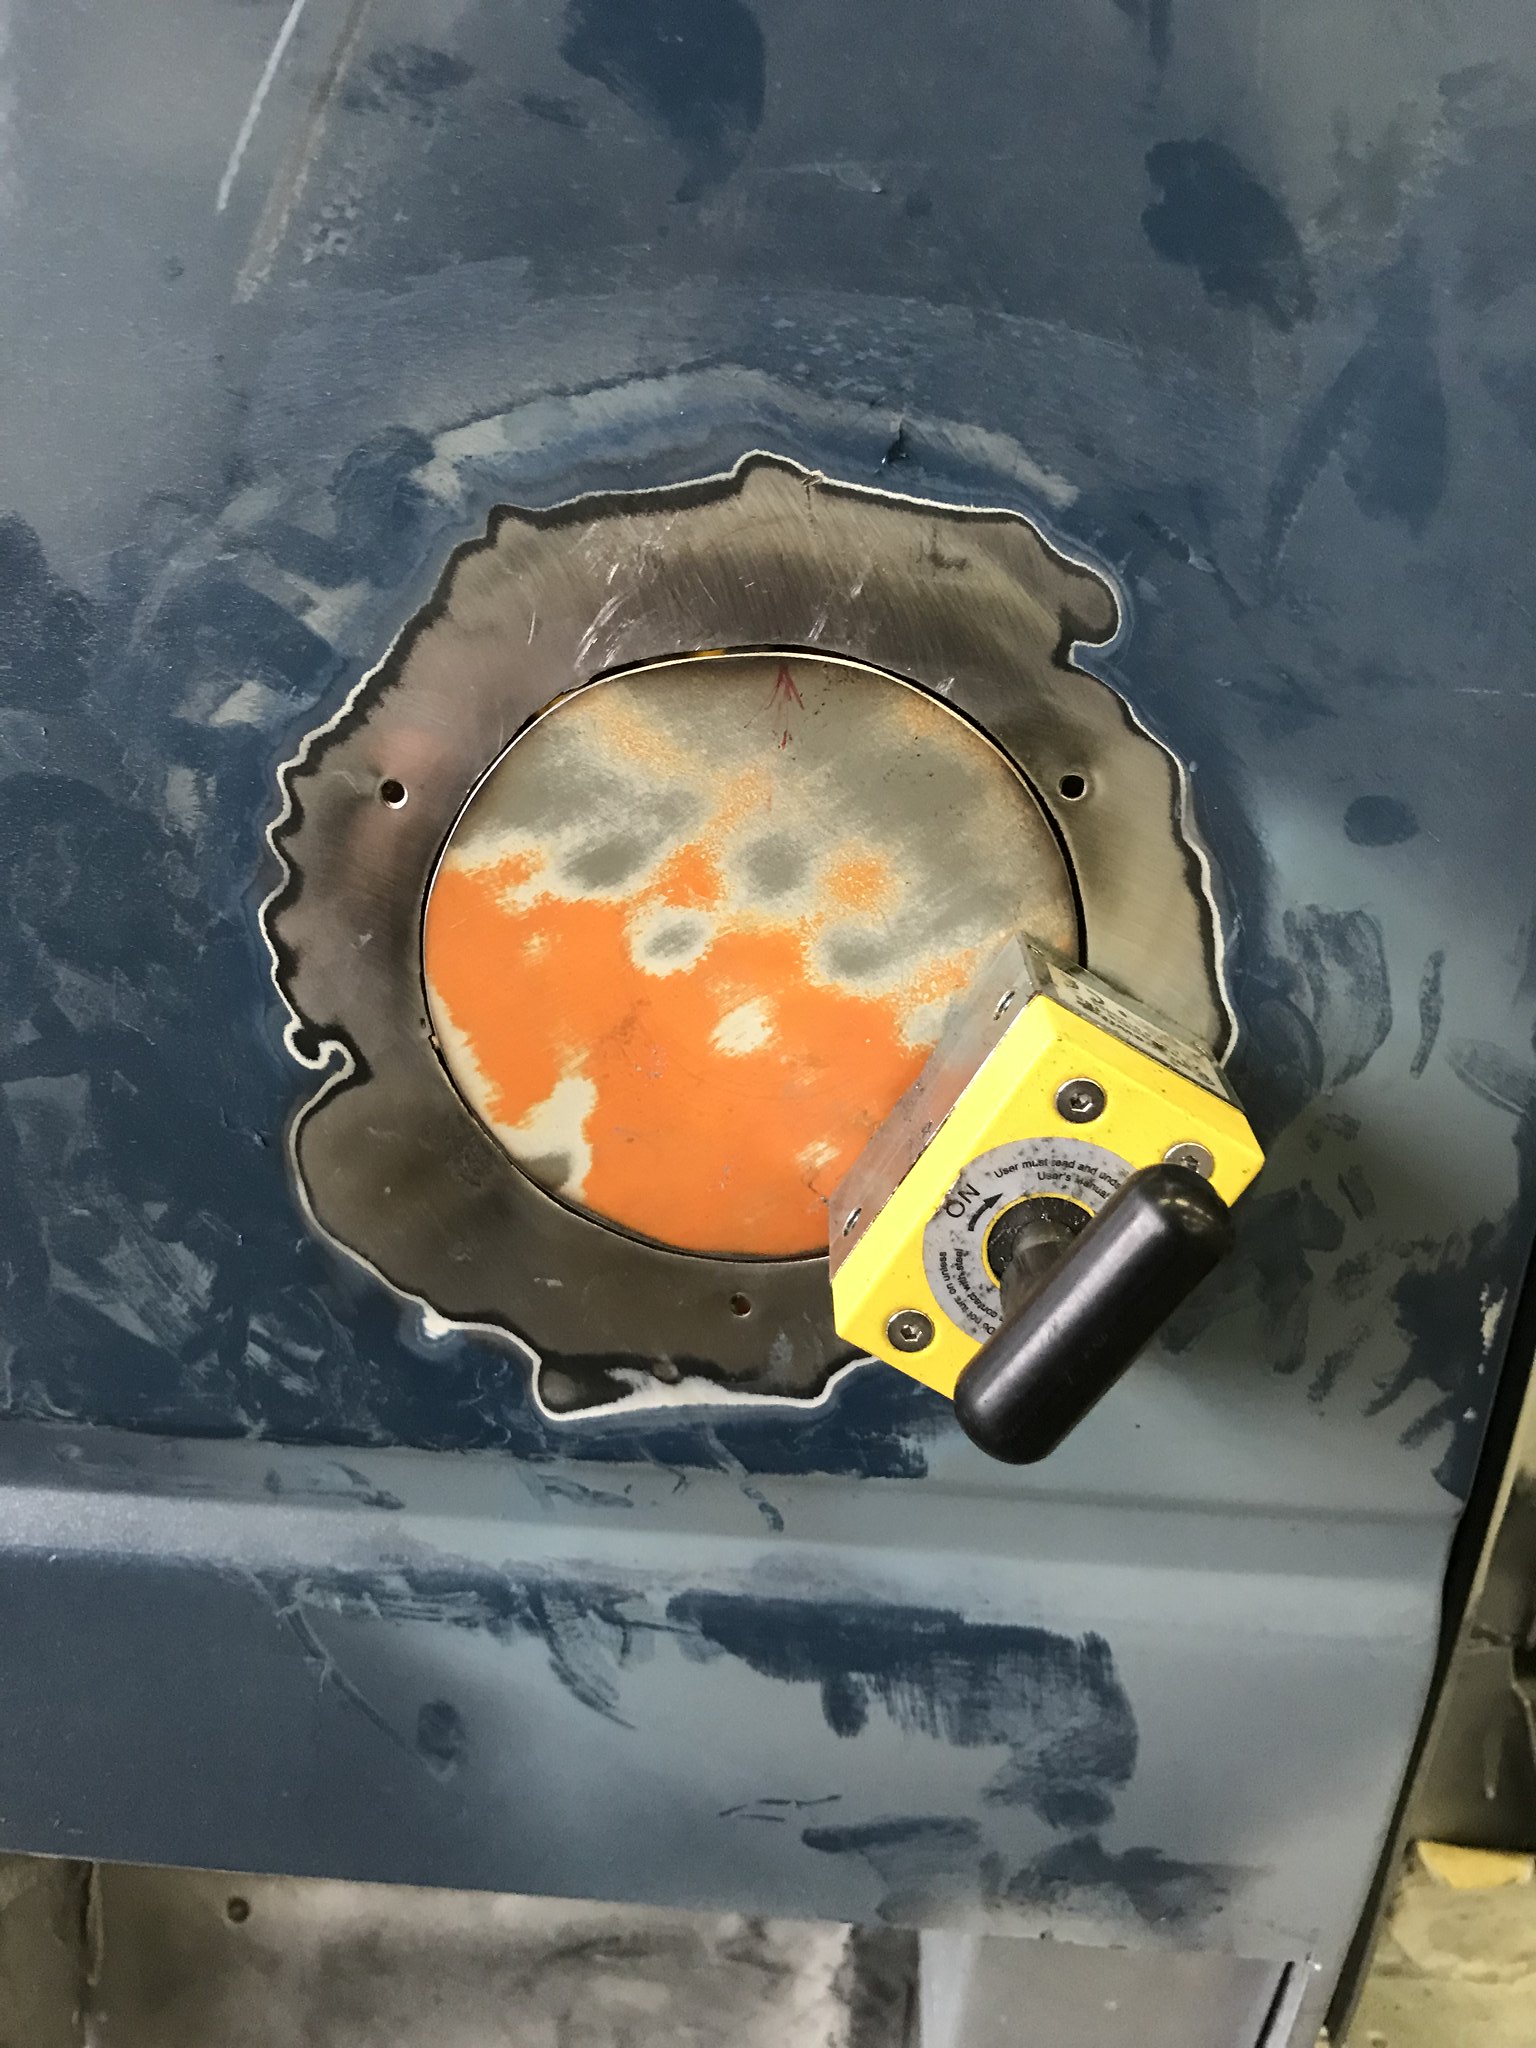
I set up the welder using the old door skin as test piece and then stitched the hole up gradually to keep the heat down. The panel was already warped from previous repairs which explained the 1/4 in of filler! It’s reasonably flat now, a thin skim and block off should do the trick.

The bottom of the a pillar, still needs dressing underneath, it was awkward and didn’t come out prettily
The cab floor support welded in and awaiting steel for the floor
So while I wait for Monday for my steel there’s always more needs doing.
I trimmed the bottom of my new c pillar and matched it very carefully a little at a time to the existing pillar. I then stepped the edges so I would have adjustment room and plenty of metal to weld to, it’ll be inside the van so less likely to rust again. So here it is stepped and after many trial fits. I slitted along the corners and used pliers to create the step on the thin complex folds
Zinc primered and held in place prior to welding with self tappers so I could match the outer sill
While the zinc primer dried, I cleaned up the old water filler point. The tank wasn’t there when I bought the van, I don’t have the key so it’s just another hole in the van.
So I had an old door skin from a mate’s van, paper template,
rough cut with a grinder and refined with a belt sander
I set up the welder using the old door skin as test piece and then stitched the hole up gradually to keep the heat down. The panel was already warped from previous repairs which explained the 1/4 in of filler! It’s reasonably flat now, a thin skim and block off should do the trick.
Greta: 85’ LHD 2.5L Subaru 14in Syncro
http://forum.club8090.co.uk/viewtopic.php?t=165773
http://forum.club8090.co.uk/viewtopic.php?t=165773
-
adie89
- Registered user
- Posts: 293
- Joined: 04 Sep 2012, 21:25
- 80-90 Mem No: 11532
- Location: Wiltshire
Re: Procrastinating never got anyone anywhere
So a few hours on several days has resulted in:
C pillar stitched in fully. It was much easier to get a nice run with a joggled edge than a butt joint.
The lone screw I accidentally caught with the welder and need to grind it out.
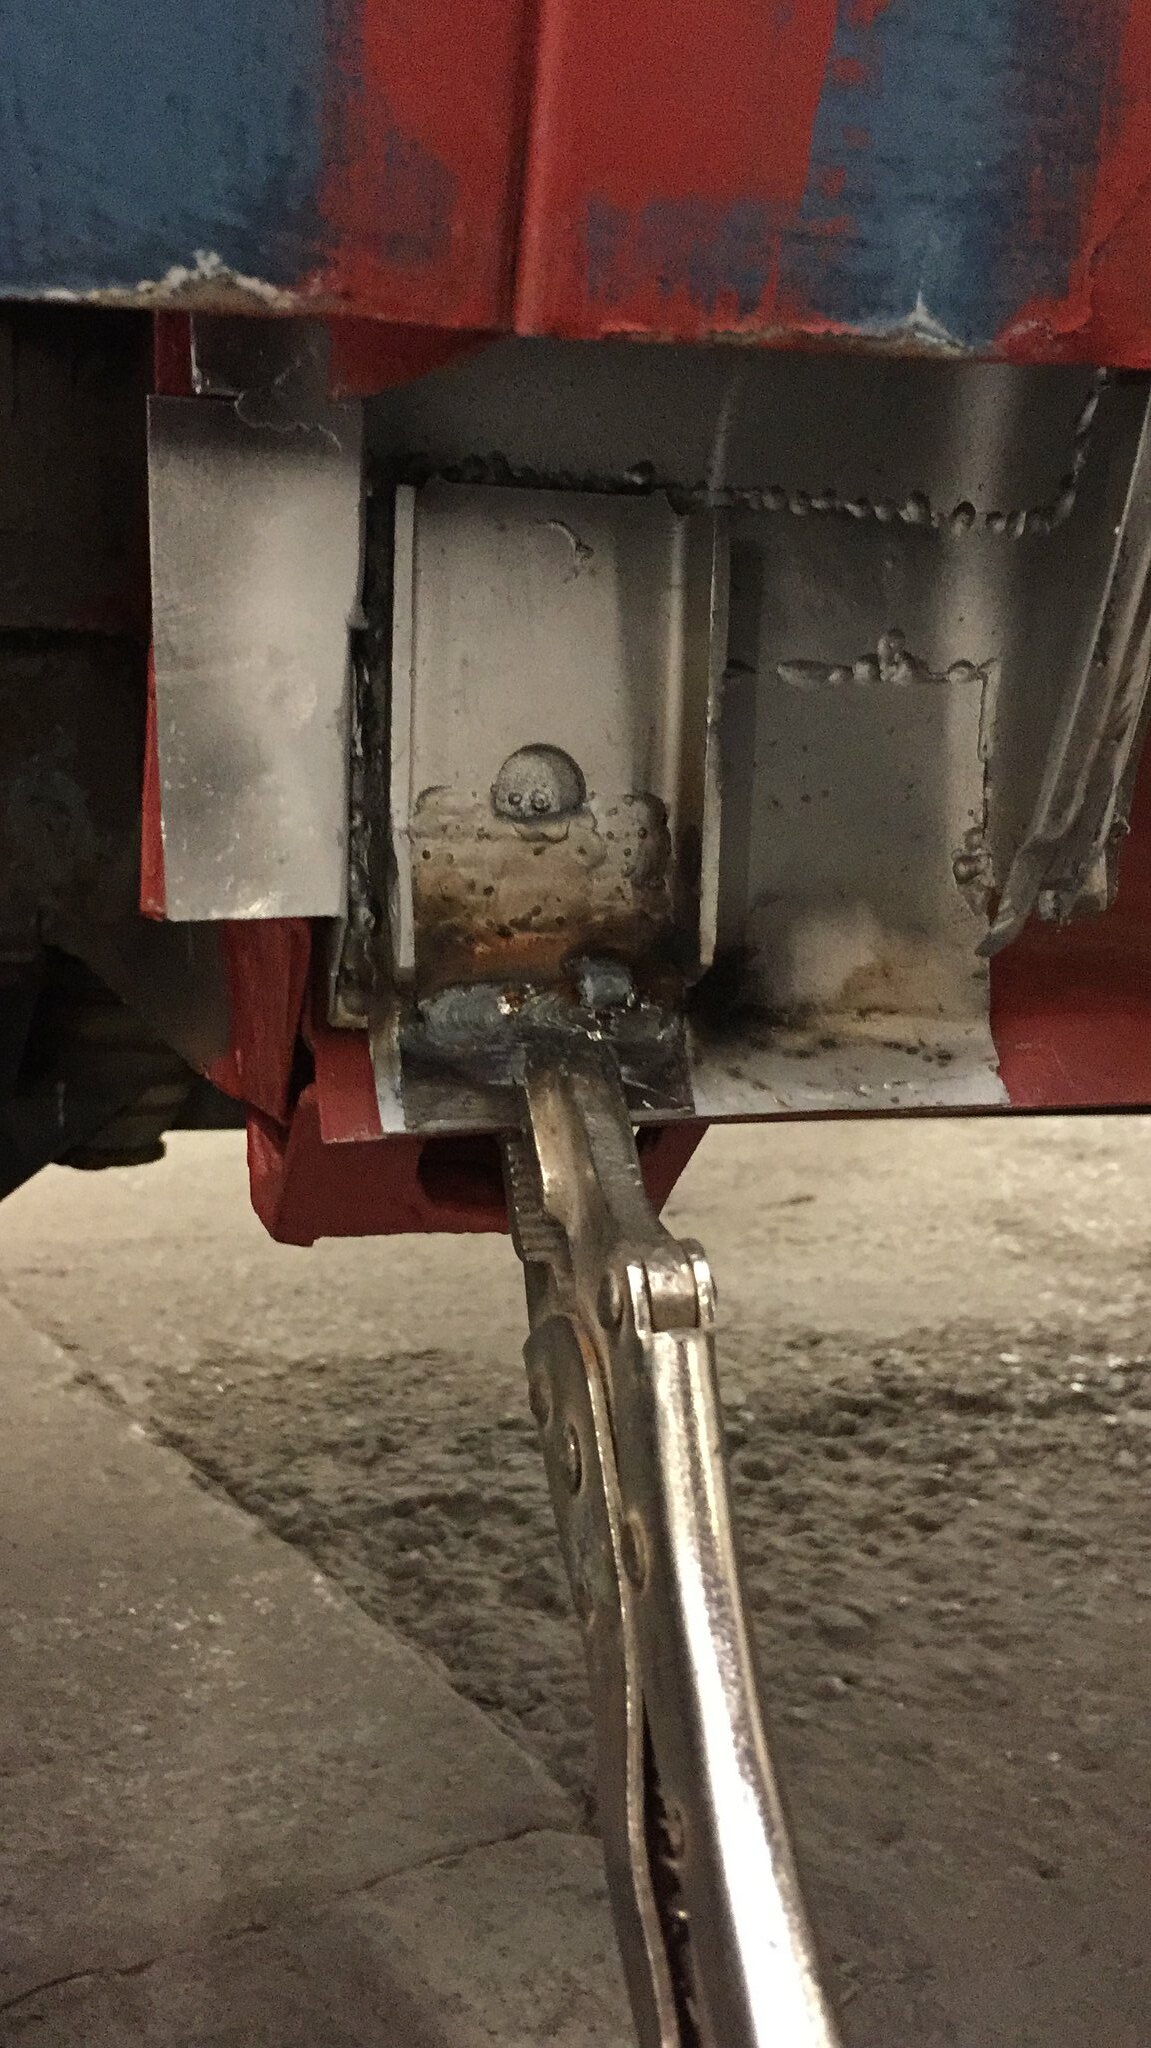
The front of the seat box folded up and plug welded in in fresh 1mm steel. Original was .7. I made the template on a previous post. I folded it up, decided it didn’t fit, unfolded and refolded it to realise it actually fit the first fold up and hadn’t test fit it properly.
From underneath
I then etch primered and then CV epoxy primered the new bracket. The old floor was only welded on the rear half of the top, this left a gap between the remainder and the floor which trapped dirt and moisture and rusted through.

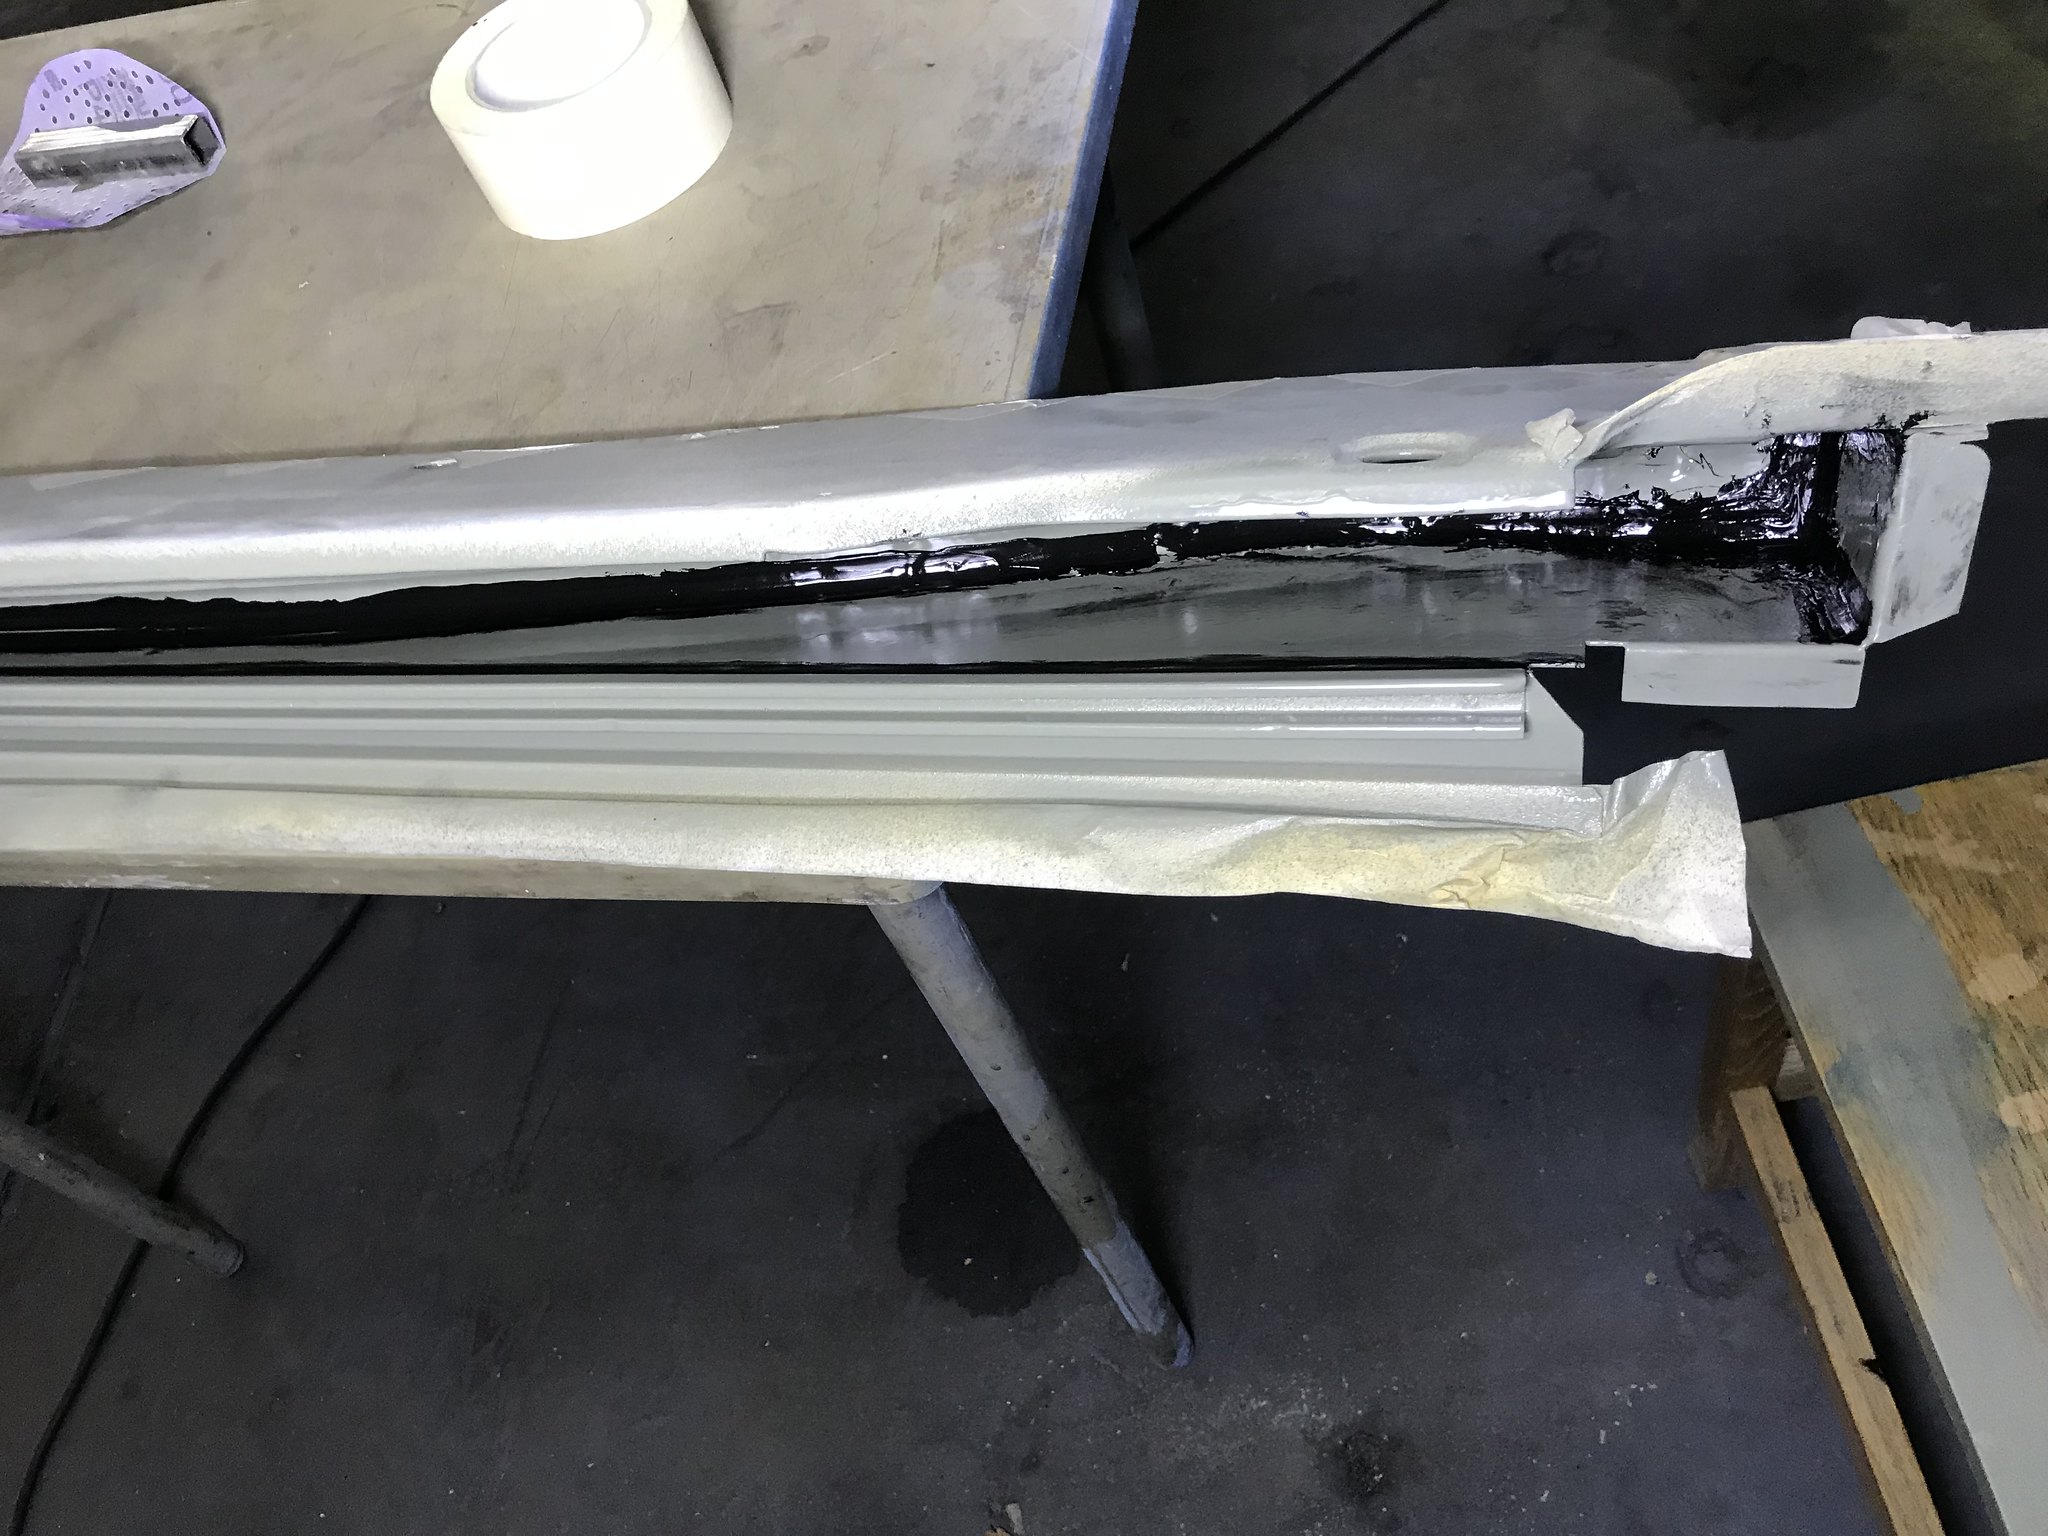
It then got seam sealer on ready for a colour coat before welding the remainder of the floor in.
I also seam sealed inside the new door track ready for a colour coat before welding in, I won’t be able to get to it properly once it’s in.
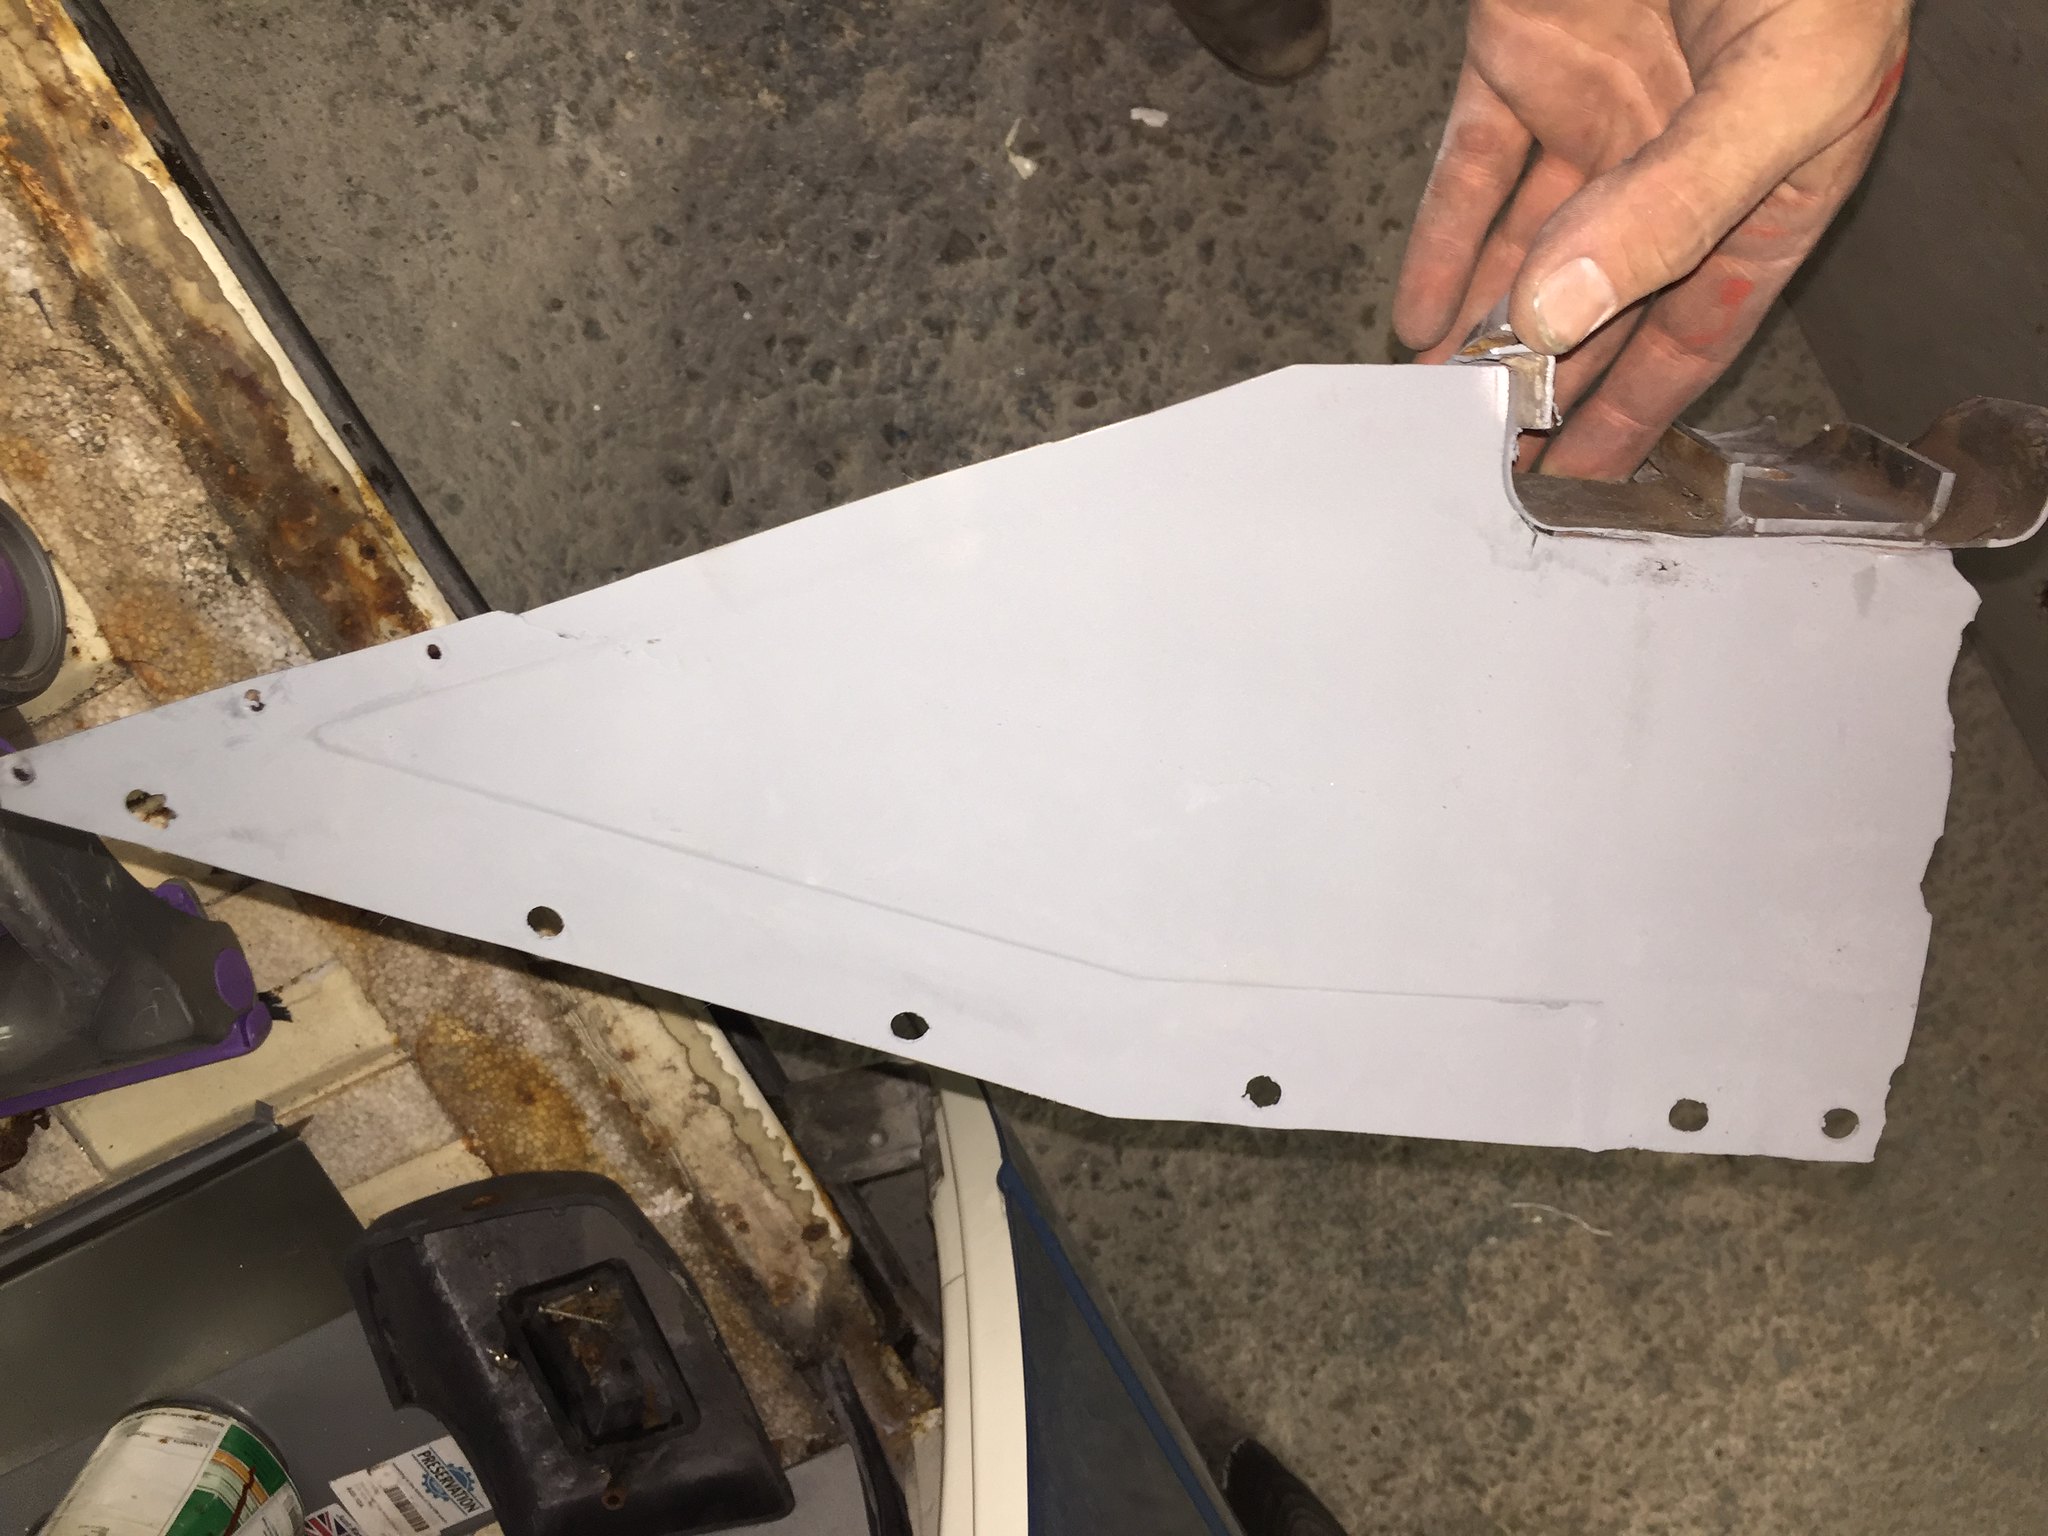
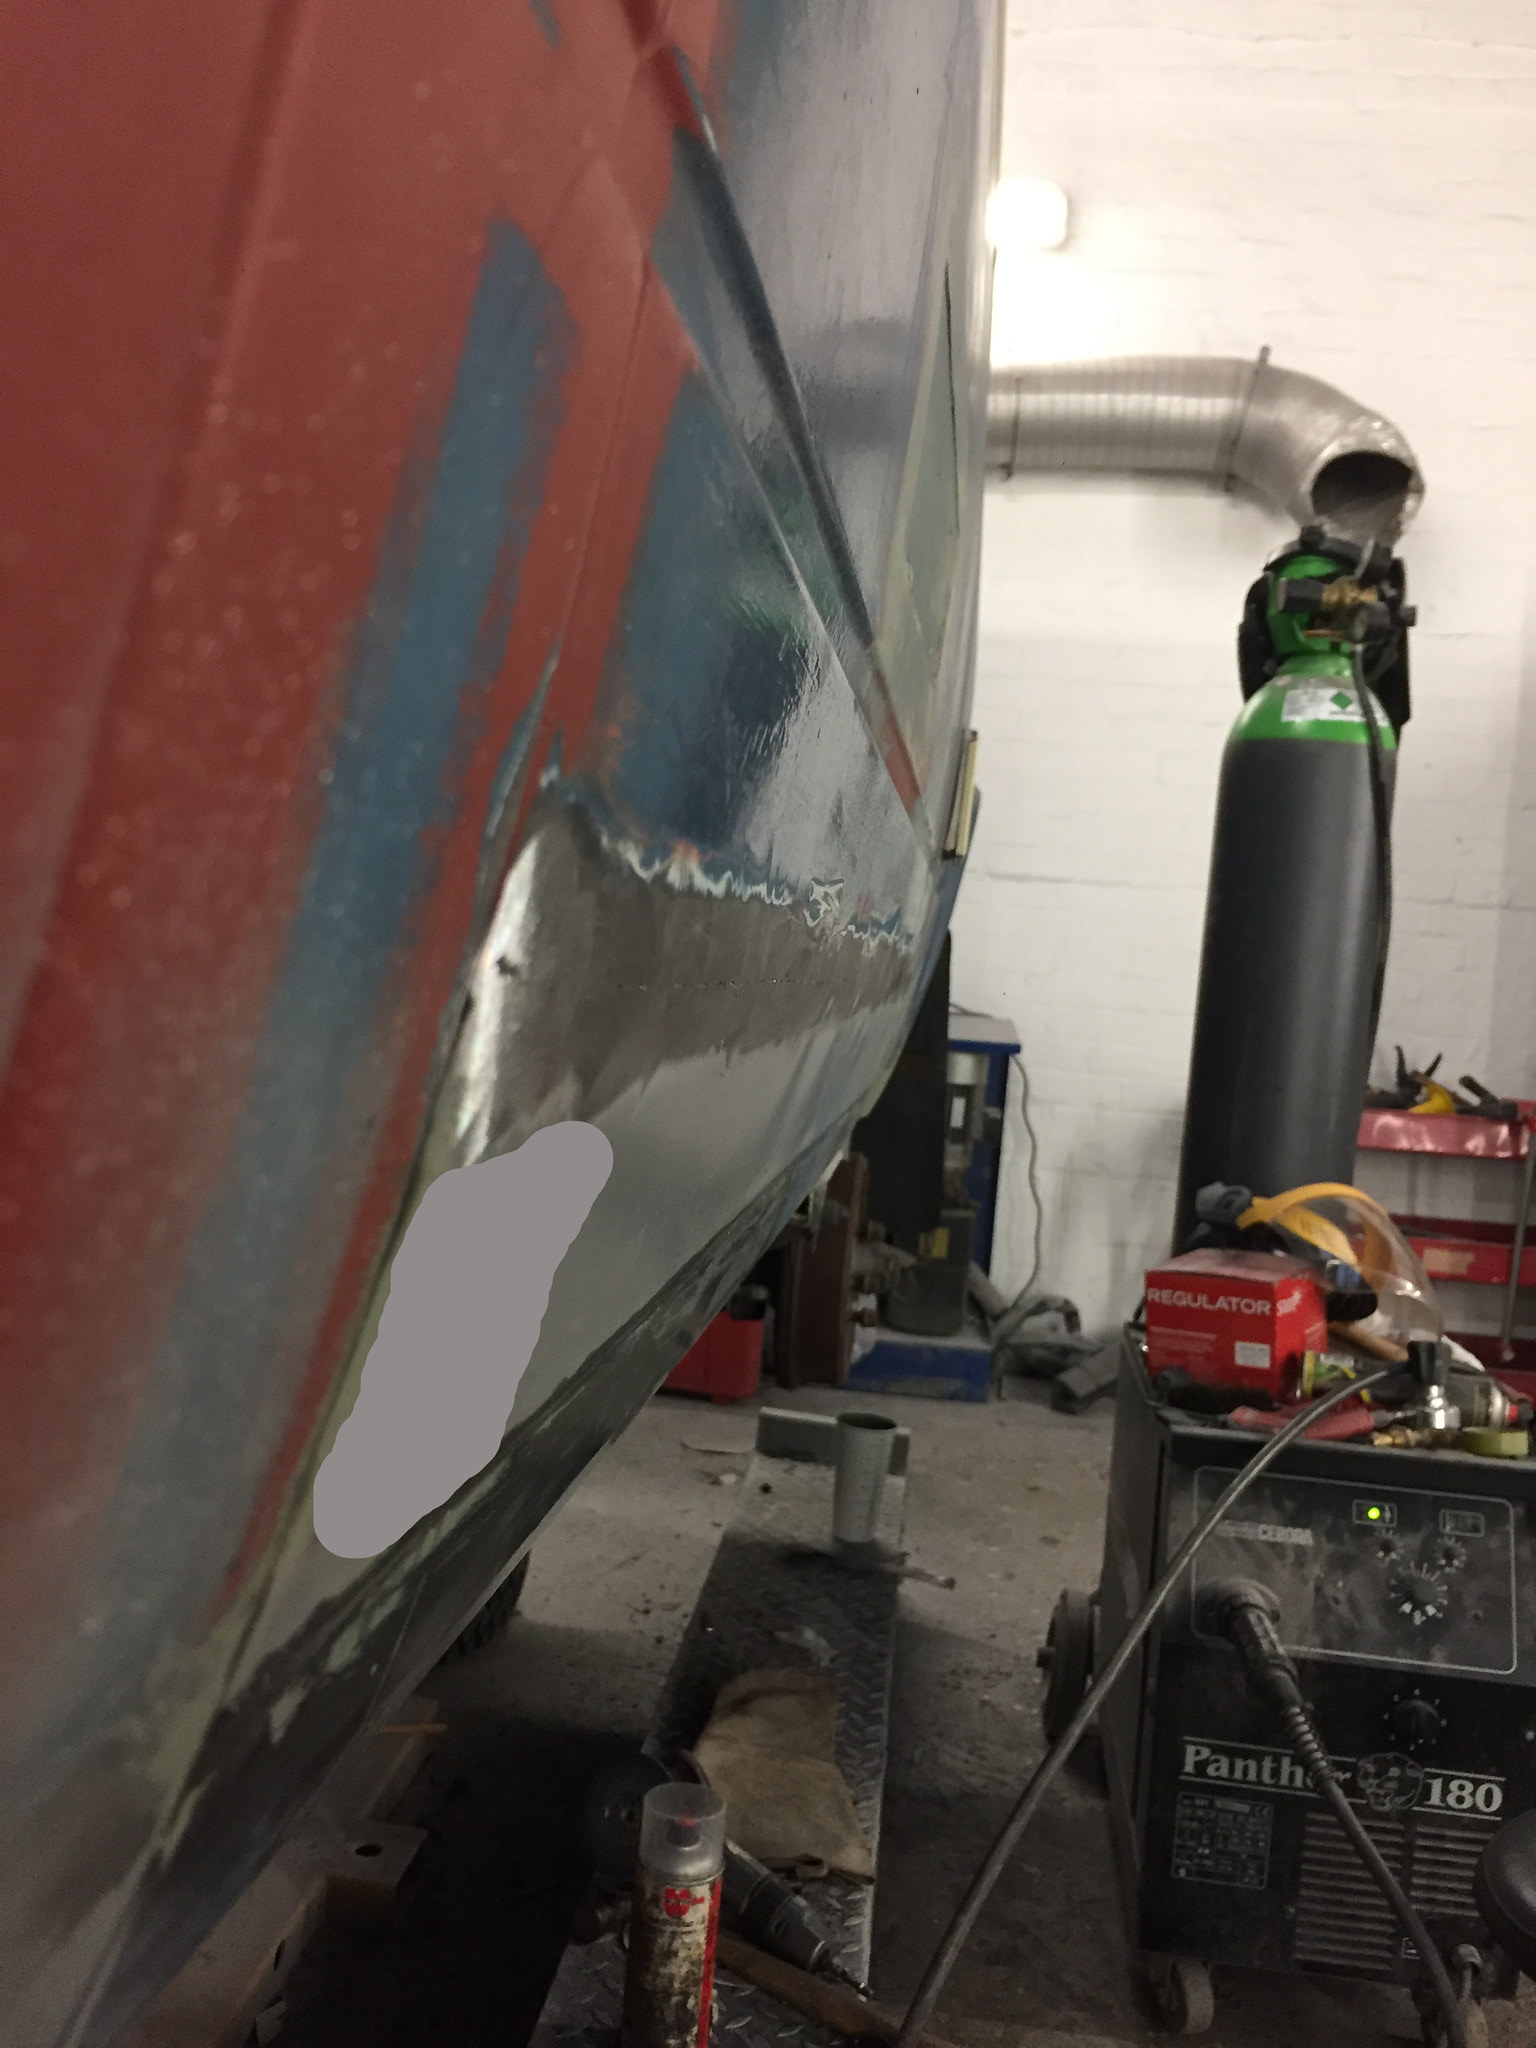
While the seam sealer went off I started cutting out the rear arch, I have a full panel to go back in but need to check what else lurks beneath. So after quite a bit of effort to find all the spot and plug welds it’s out. I flush cut it to the edge of the body first for a better view and this came out, I’ve taken a photo for anyone else to see where all the welds were

View from the inside
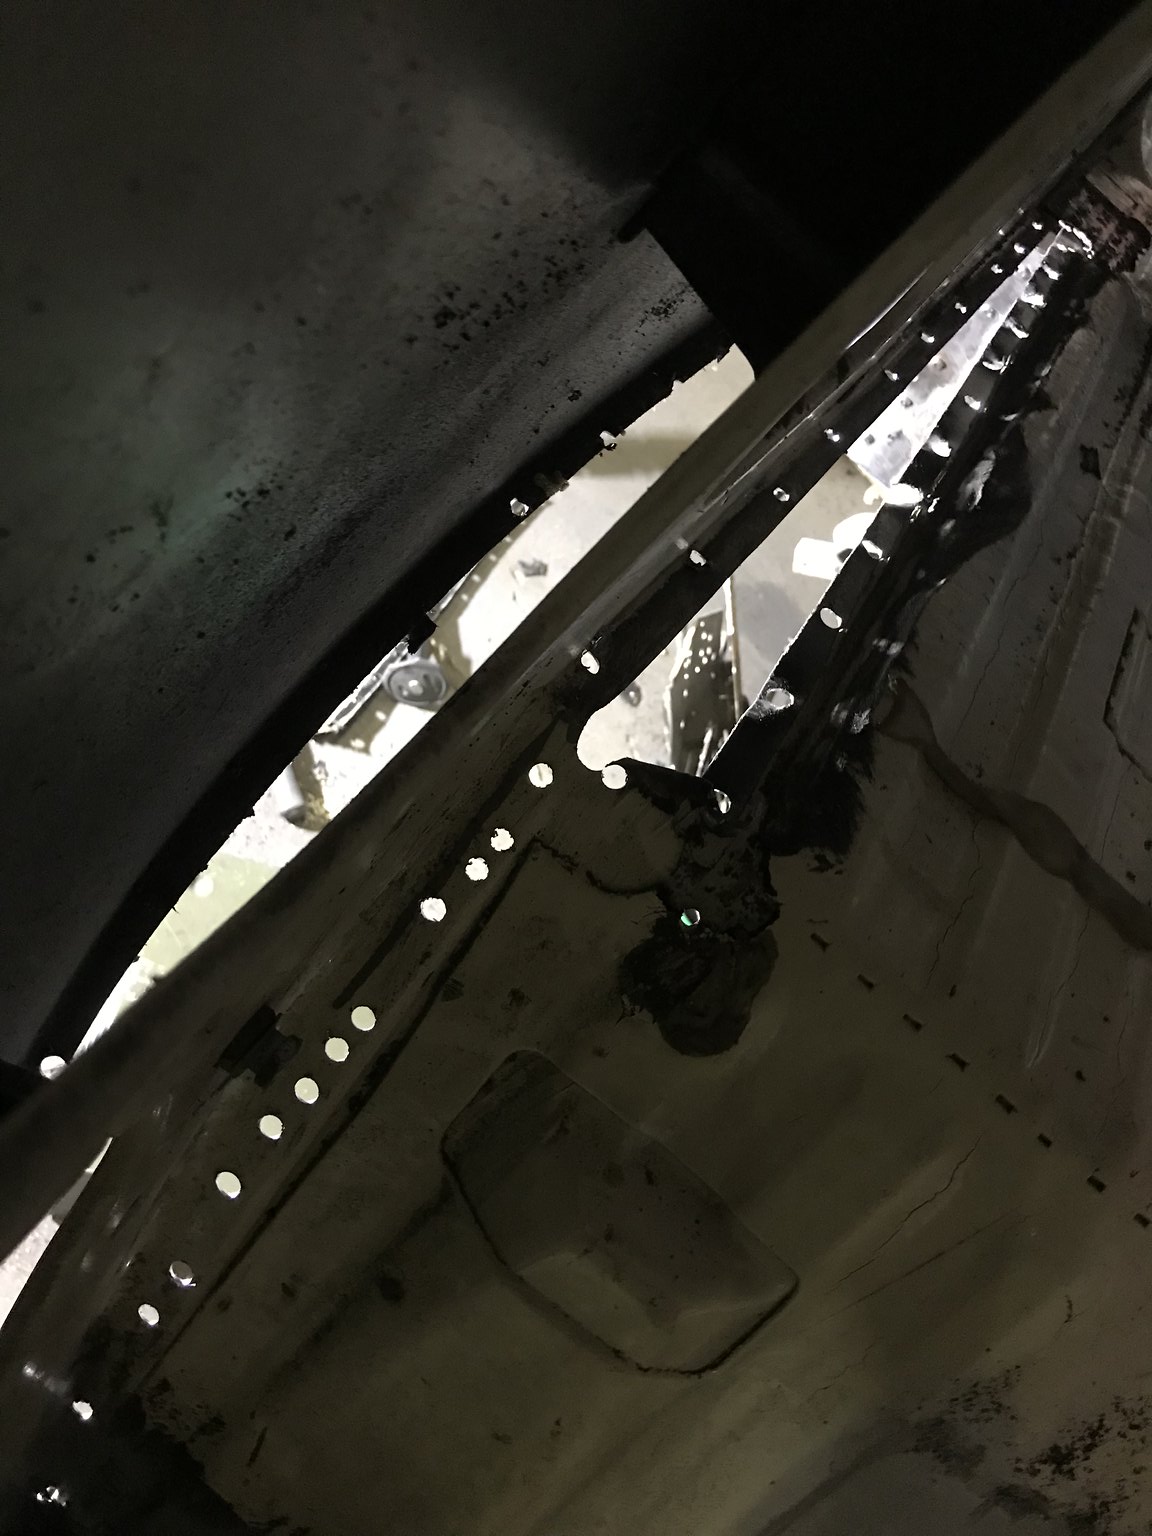
And from underneath, the news is actually quite good, a bit of cleaning up and a few patches and it’ll be good to go back in, there is a hole by the fuel filler cap that will require a little more effort, but certainly not a show stopper

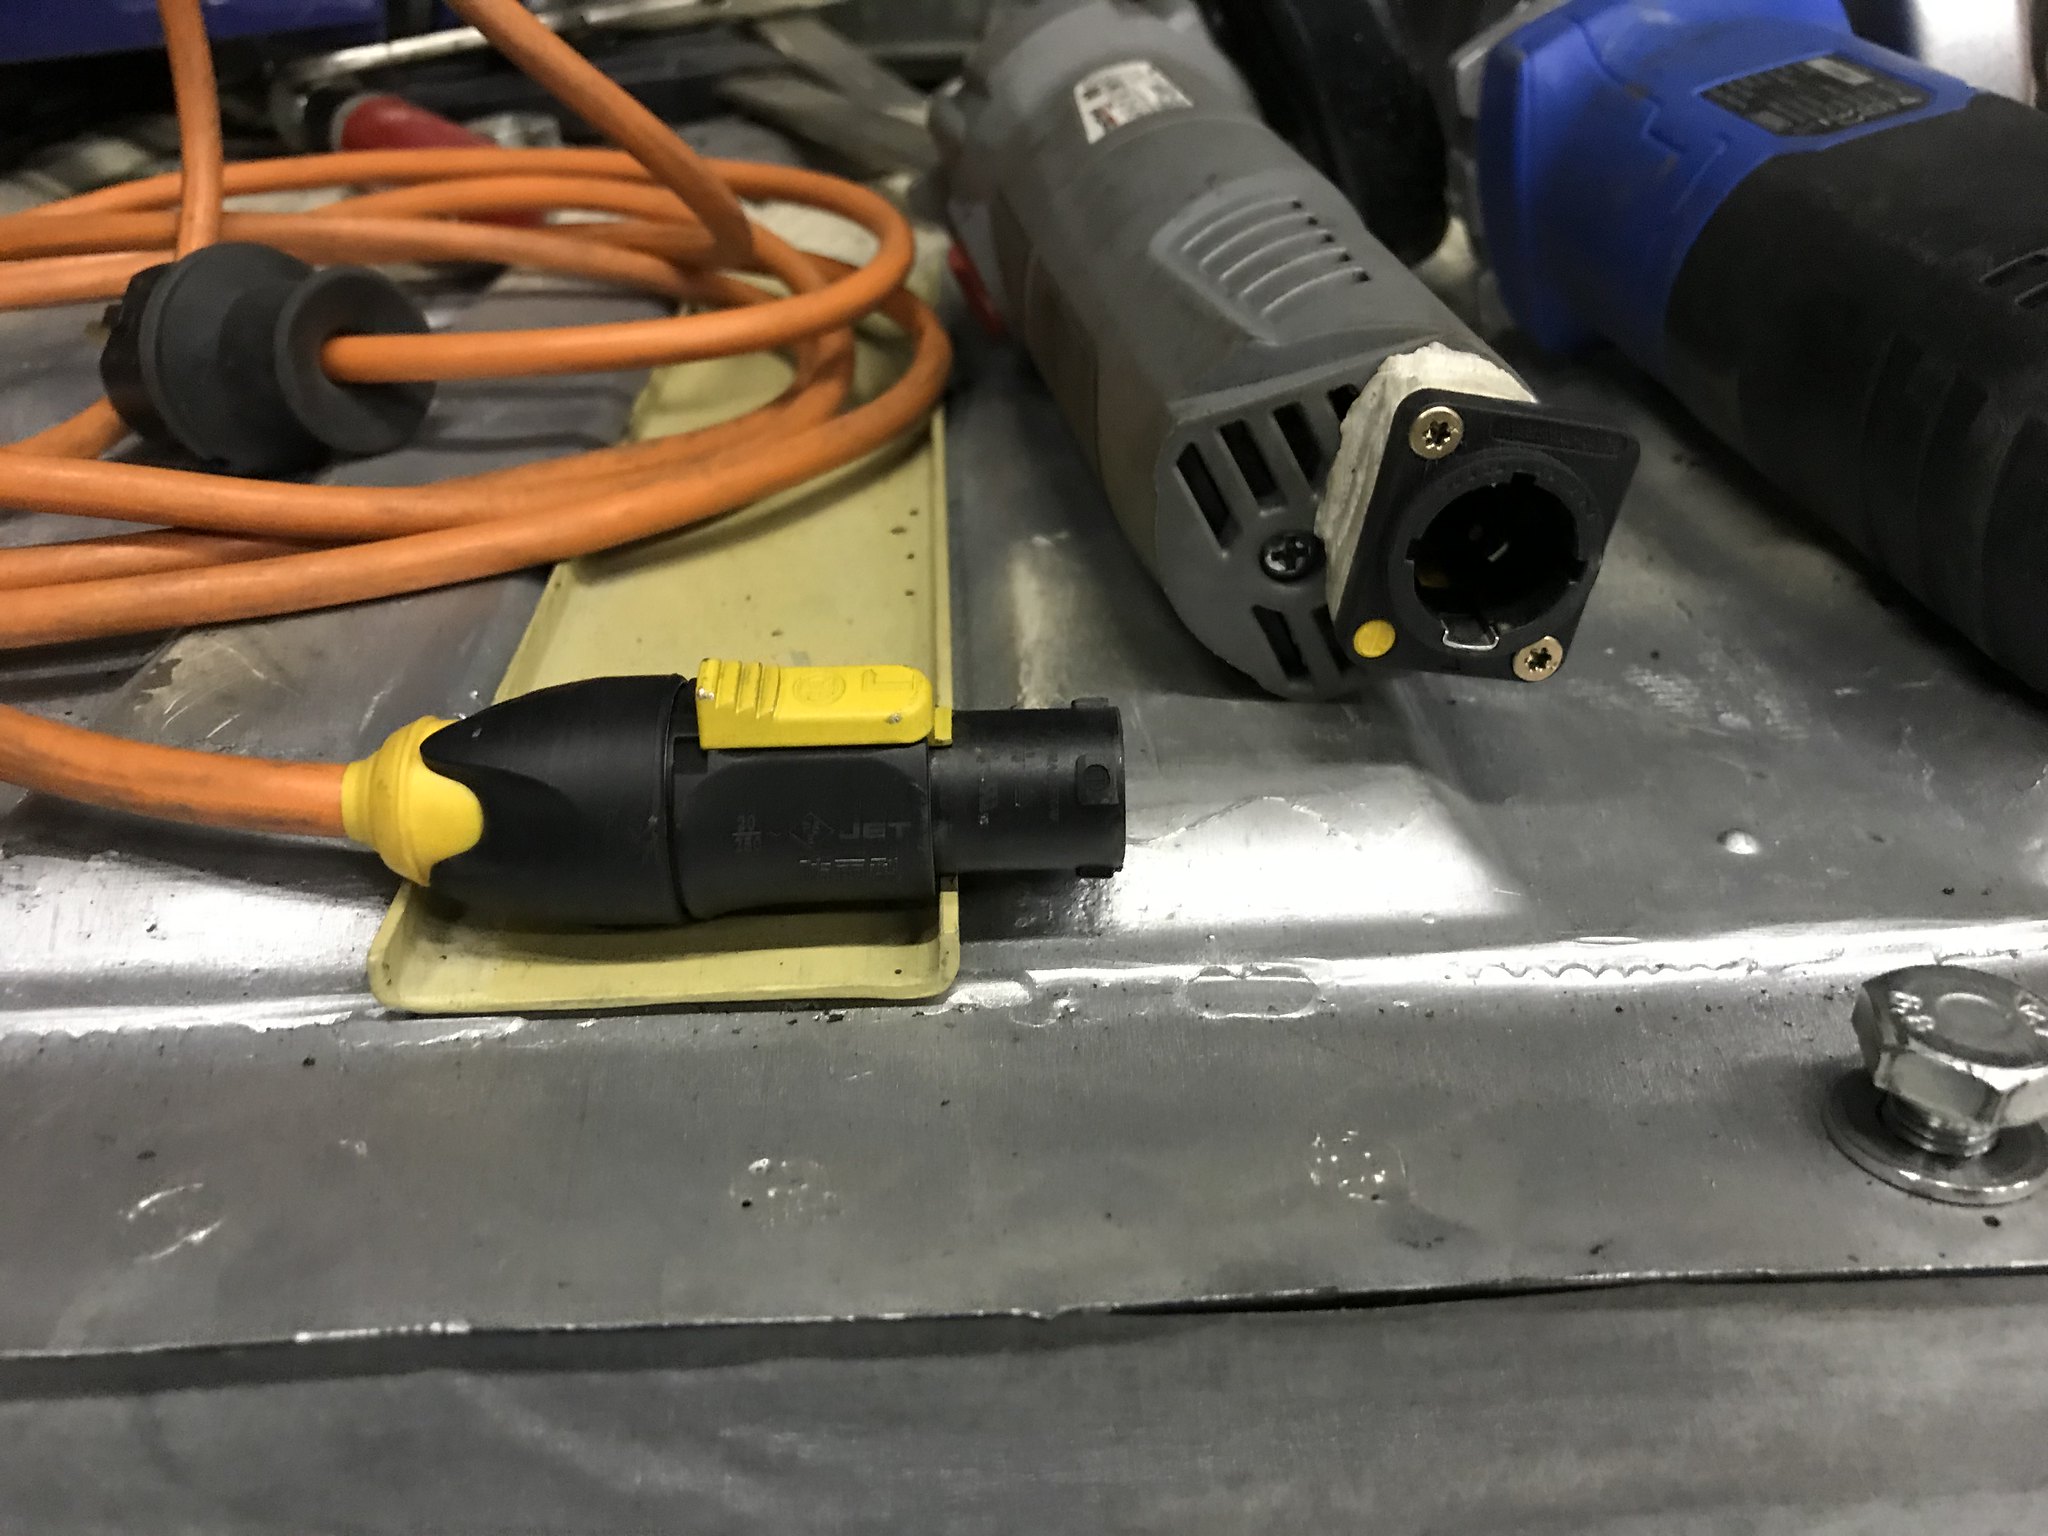
On another note, I’d bought a couple of cheap grinders to save time keep swapping cutting, grinding, flap wheel, mop, twisted brush etc. I then drove myself batty with the cables everywhere, take an extension, a floodlight two grinders, a welder and a finger file and you can imagine the hazard it created. So following inspiration from Festool’s single cable system that has a socket in the back of the tools I bought some Neutrik trueone power sockets and plugs. I’ve only done about five tools with a combination of sockets and flyleads but it’s made a massive difference already, just one cable into the work area!

C pillar stitched in fully. It was much easier to get a nice run with a joggled edge than a butt joint.
The lone screw I accidentally caught with the welder and need to grind it out.
The front of the seat box folded up and plug welded in in fresh 1mm steel. Original was .7. I made the template on a previous post. I folded it up, decided it didn’t fit, unfolded and refolded it to realise it actually fit the first fold up and hadn’t test fit it properly.
From underneath
I then etch primered and then CV epoxy primered the new bracket. The old floor was only welded on the rear half of the top, this left a gap between the remainder and the floor which trapped dirt and moisture and rusted through.
It then got seam sealer on ready for a colour coat before welding the remainder of the floor in.
I also seam sealed inside the new door track ready for a colour coat before welding in, I won’t be able to get to it properly once it’s in.
While the seam sealer went off I started cutting out the rear arch, I have a full panel to go back in but need to check what else lurks beneath. So after quite a bit of effort to find all the spot and plug welds it’s out. I flush cut it to the edge of the body first for a better view and this came out, I’ve taken a photo for anyone else to see where all the welds were
View from the inside
And from underneath, the news is actually quite good, a bit of cleaning up and a few patches and it’ll be good to go back in, there is a hole by the fuel filler cap that will require a little more effort, but certainly not a show stopper
On another note, I’d bought a couple of cheap grinders to save time keep swapping cutting, grinding, flap wheel, mop, twisted brush etc. I then drove myself batty with the cables everywhere, take an extension, a floodlight two grinders, a welder and a finger file and you can imagine the hazard it created. So following inspiration from Festool’s single cable system that has a socket in the back of the tools I bought some Neutrik trueone power sockets and plugs. I’ve only done about five tools with a combination of sockets and flyleads but it’s made a massive difference already, just one cable into the work area!
Greta: 85’ LHD 2.5L Subaru 14in Syncro
http://forum.club8090.co.uk/viewtopic.php?t=165773
http://forum.club8090.co.uk/viewtopic.php?t=165773