Another question for you all!
On the crank shaft, how do you get the woodruff key out? Its stuck solid?
Do I have to heat it, or do I just try and get the mole grips on it and acpet that I'm probably going to chew it up?
Haynes manual seems to suggest that I simply 'recover it'. Thanks Mr Haynes, how?!?
Cheers,
Alex
1.9 DG - Attempting a full rebuild...
Moderators: User administrators, Moderators
-
T25Convert

- Registered user
- Posts: 402
- Joined: 20 Jun 2009, 09:27
- 80-90 Mem No: 7819
- Location: Chester
Re: 1.9 DG - Attempting a full rebuild...
RIP - George - 1.9DG '85 AutoSleeper Trident - rusted away
George Second - 1.9DG '89 Caravelle
George Second - 1.9DG '89 Caravelle
-
sarran1955

- Registered user
- Posts: 1442
- Joined: 11 Mar 2009, 18:51
- 80-90 Mem No: 6754
- Location: 6, les Hauts de Sarran 19800, Sarran ,Limousin ,FRANCE
Re: 1.9 DG - Attempting a full rebuild...
Hello,
People tend to use bearing locking compound to 'glue ' these in..
If your crank is well supported.. then by using a small punch and a light hammer on one end of the key.. it will push up at the other end.. (1/2 moon shape)
Try not to lose it, but they are available..
My oil pump arrived for 'Ooops' today..
Cordialement,

-
weimarbus
- Registered user
- Posts: 808
- Joined: 19 Jun 2010, 12:53
- 80-90 Mem No: 10165
- Location: coulsdon
Re: 1.9 DG - Attempting a full rebuild...
it is best to reuse cam as it is rather than get a regrind, 3 that I have stripped have had significant pitting on the lobes but yours looks ok, best to refit as is, be aware that using any wet and dry will introduce ali oxide into the oil ways, be sure to flush with plenty of petrol and detergent before thinking of rebuilding what looks like a clean crankcase
P.S. it does take hours of cleaning, to do it right.
P.S. it does take hours of cleaning, to do it right.
1985 hi-top 2.1MV with DG carb and LPG
1955 trials buggy with 1.9 DG high lift cam and twin dell's (now sold)
1972 1303 beetle
1992 Audi 100 2.8 quattro estate
1967 Vw Madison kit
1955 trials buggy with 1.9 DG high lift cam and twin dell's (now sold)
1972 1303 beetle
1992 Audi 100 2.8 quattro estate
1967 Vw Madison kit
-
itchyfeet

- Registered user
- Posts: 12427
- Joined: 23 Jul 2007, 17:24
- 80-90 Mem No: 12733
- Location: South Hampshire
Re: 1.9 DG - Attempting a full rebuild...
an old dishwasher from ebay is what you need to give the parts a through clean before reassembly 
ordinary dishwasher tabs will do the job
ordinary dishwasher tabs will do the job
-
kevtherev

- Registered user
- Posts: 18830
- Joined: 23 Oct 2005, 20:13
- 80-90 Mem No: 2264
- Location: Country estate Wolverhampton Actually
Re: 1.9 DG - Attempting a full rebuild...
Nice tipitchyfeet wrote:an old dishwasher from ebay is what you need to give the parts a through clean before reassembly
ordinary dishwasher tabs will do the job
AGG 2.0L 8V. (Golf GTi MkIII)
-
mm289
- Registered user
- Posts: 314
- Joined: 31 Dec 2010, 22:00
- 80-90 Mem No: 9111
- Location: Dover, Kent
Re: 1.9 DG - Attempting a full rebuild...
Good work Alex, great to see another mad fool having a go at rebuilding one of these, much less worrying than buying a mass produced refurb
Keep the posts coming
MM
Keep the posts coming
MM
'89 Autosleeper Trident
2.1 DJ
Member 9111
2.1 DJ
Member 9111
-
weimarbus
- Registered user
- Posts: 808
- Joined: 19 Jun 2010, 12:53
- 80-90 Mem No: 10165
- Location: coulsdon
Re: 1.9 DG - Attempting a full rebuild...
kevtherev wrote:Nice tipitchyfeet wrote:an old dishwasher from ebay is what you need to give the parts a through clean before reassembly
ordinary dishwasher tabs will do the job
Thats a great idea, will try that next time when my wife is out
1985 hi-top 2.1MV with DG carb and LPG
1955 trials buggy with 1.9 DG high lift cam and twin dell's (now sold)
1972 1303 beetle
1992 Audi 100 2.8 quattro estate
1967 Vw Madison kit
1955 trials buggy with 1.9 DG high lift cam and twin dell's (now sold)
1972 1303 beetle
1992 Audi 100 2.8 quattro estate
1967 Vw Madison kit
-
mrhutch

- Registered user
- Posts: 1111
- Joined: 09 Jun 2006, 09:27
- 80-90 Mem No: 2698
- Location: Herefordshire & all over
Re: 1.9 DG - Attempting a full rebuild...
itchyfeet wrote:an old dishwasher from ebay is what you need to give the parts a through clean before reassembly
ordinary dishwasher tabs will do the job
I can confirm that the above works rather well http://www.brick-yard.co.uk/forum/ghett ... page1.html
1981 Vanagon Westy Burning oil as fuel...
-
T25Convert
- Registered user
- Posts: 402
- Joined: 20 Jun 2009, 09:27
- 80-90 Mem No: 7819
- Location: Chester
Re: 1.9 DG - Attempting a full rebuild...
Hmm... will have to try and find a suitable dishwasher (I am using the in-laws garage, so they may find a treat in theirs this weekend!)
One more question for now, and then I'll go and leave you in peace: honing / glaze busting.
The liners are smooth, with just the faintest trace of cross hatching on them. Assuming that they are not too badly ovalled the plan is to fit new rings (if ovalled than splash out for a new set, but at £400 keen to aovid if possible!)
I made the mistake of looking at the internet for advice on glaze busting and there are horror stories on both sides. It seems that I will suffer excessive oil consumtion if I glaze bust, or if I don't! Both arguements make sense but am now confused. Curses to google!
So, what do people reccommend? If its to glaze bust, does the £30 three stones on a stick with a power drill work, or will I do more damage than good?
Cheers in advance!
Alex
RIP - George - 1.9DG '85 AutoSleeper Trident - rusted away
George Second - 1.9DG '89 Caravelle
George Second - 1.9DG '89 Caravelle
-
mm289
- Registered user
- Posts: 314
- Joined: 31 Dec 2010, 22:00
- 80-90 Mem No: 9111
- Location: Dover, Kent
Re: 1.9 DG - Attempting a full rebuild...
For me, when fitting new ring I give them a light hone and yes use the 3 legged honing tool in a battery drill. You are trying to emulate the cross hatch pattern so move the hone up and down as the drill is turning - don't just spin it in on place then move down.
This IMHO helps the new rings bed in. Again IMHO you would have to go mad with a honing tool to score the walls enough to cause excessive oil consumption and/or re-use the old rings.
Think there a pic of the tool I used in my engine build thread.
Cheers,
MM
This IMHO helps the new rings bed in. Again IMHO you would have to go mad with a honing tool to score the walls enough to cause excessive oil consumption and/or re-use the old rings.
Think there a pic of the tool I used in my engine build thread.
Cheers,
MM
'89 Autosleeper Trident
2.1 DJ
Member 9111
2.1 DJ
Member 9111
-
T25Convert
- Registered user
- Posts: 402
- Joined: 20 Jun 2009, 09:27
- 80-90 Mem No: 7819
- Location: Chester
Re: 1.9 DG - Attempting a full rebuild...
Thanks MM, good to hear people’s real life experience.
Latest update – more cleaning. This is starting to get boring!!
First, a piston – before:
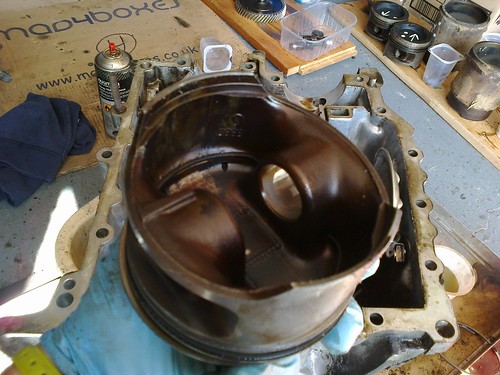
After:
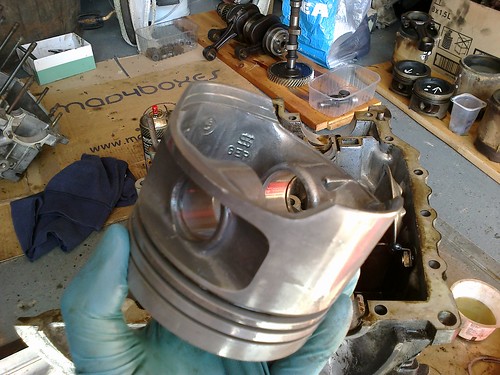
Some very light scuffing on the sides, more like a mild polishing. Look good. However, cannot shift the carbon off the top – seems impervious to scrubbing, carb cleaner, paraffin, wd40, brake cleaner and white spirit. Other than the dishwasher (not really practical!) is there any advice?
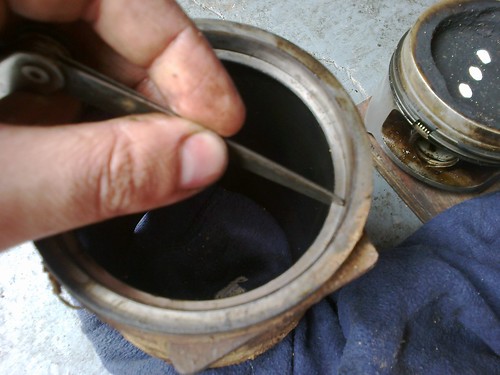
First liner now de-rusted, and water scale removed, only three more to go:

With a clean liner and piston I did some measuring. Couldn’t get the 0.05mm feeler gauge between piston skirt and liner with piston the right way or wrong way up, nor 90 degrees rotated, so this and the lack of any evidence of wear suggests that they’re fine. Will get them measured ‘properly’ but seems positive.
Old rings were well worn though, with ring gap at over 1.0mm – guessing that’s partly where the lack of puff and oil use has come from...
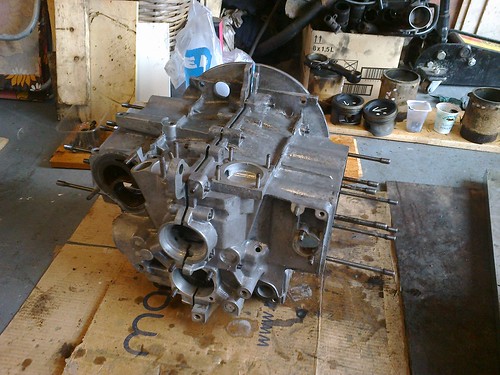
After this little distraction it was back to case cleaning with my new toys – one steel, one nylon and one brass version like this:

After almost 12 hours spent scrubbing it’s clean. There are some patches where the corrosion has left a king of darkened stain, but as I’m planning to paint it its good enough!! Popped the two halves back together to minimise the chance of me somehow damaging the inside!
Sarran – many thanks, with a punch and a big hammer I managed to drift out the woodruff key – there was a combination of rust and black gunge holding it in. My puller was too short though, so got one on order!
Felt pleased with progress until I spotted the heads that still need cleaning Will it ever end?!
Next steps are clean the head, and dismantle the crank.
Cheers,
Alex
Latest update – more cleaning. This is starting to get boring!!
First, a piston – before:
After:
Some very light scuffing on the sides, more like a mild polishing. Look good. However, cannot shift the carbon off the top – seems impervious to scrubbing, carb cleaner, paraffin, wd40, brake cleaner and white spirit. Other than the dishwasher (not really practical!) is there any advice?
First liner now de-rusted, and water scale removed, only three more to go:
With a clean liner and piston I did some measuring. Couldn’t get the 0.05mm feeler gauge between piston skirt and liner with piston the right way or wrong way up, nor 90 degrees rotated, so this and the lack of any evidence of wear suggests that they’re fine. Will get them measured ‘properly’ but seems positive.
Old rings were well worn though, with ring gap at over 1.0mm – guessing that’s partly where the lack of puff and oil use has come from...
After this little distraction it was back to case cleaning with my new toys – one steel, one nylon and one brass version like this:
After almost 12 hours spent scrubbing it’s clean. There are some patches where the corrosion has left a king of darkened stain, but as I’m planning to paint it its good enough!! Popped the two halves back together to minimise the chance of me somehow damaging the inside!
Sarran – many thanks, with a punch and a big hammer I managed to drift out the woodruff key – there was a combination of rust and black gunge holding it in. My puller was too short though, so got one on order!
Felt pleased with progress until I spotted the heads that still need cleaning Will it ever end?!
Next steps are clean the head, and dismantle the crank.
Cheers,
Alex
RIP - George - 1.9DG '85 AutoSleeper Trident - rusted away
George Second - 1.9DG '89 Caravelle
George Second - 1.9DG '89 Caravelle
-
sarran1955
- Registered user
- Posts: 1442
- Joined: 11 Mar 2009, 18:51
- 80-90 Mem No: 6754
- Location: 6, les Hauts de Sarran 19800, Sarran ,Limousin ,FRANCE
Re: 1.9 DG - Attempting a full rebuild...
Hello,
I'm glad to see it is all coming along nicely..
Got to be careful when talking 'glaze busting'.. there is this bloke from the 'Hone office'...
I made up a base plate with 2 lengths of studding welded to it..
Sits in an oven tray to catch the oil..
This locks the barrel, and then with locking nuts I modified a cheap drill/ router stand
To take a B+d drill.. holding the 3 stone router..
Don’t set it too strong..
I used cutting oil, but diesel will do..
Wash out the bores with soap and water..
You could always try the dishwasher..
If I was doing a Mk2 machine....
I would have a dimmer switch vario to get a steady low speed..
Pics:
I am stopped on Ooops as 81 Aircooled is going on hols.. and French engineering shops close for the month of August..
I'm going to build an engine oil pressure testing rig..
But I think we are in for a crank regrind..
PS.. for dismantling your big ends you will probably need a 14 mm thin wall socket.. like for the spark plugs on modern citroens and stuff..
Cordialement,
-
T25Convert
- Registered user
- Posts: 402
- Joined: 20 Jun 2009, 09:27
- 80-90 Mem No: 7819
- Location: Chester
Re: 1.9 DG - Attempting a full rebuild...
Sarran - thanks for the detailed feedback. Looks like a bit of fun to make. You touched on something I thought of, which is that to get 45 degree hatching the rotation speed has to equal the up/down speed. Was wondering if an electric screwdriver may be a better power source as much slower than a drill... Hmm, some tinkering required here!
Still cleaning parts, very bored of this now! Bought a spring compressor to liven things up a bit (I need to get out more...)
 [/url]
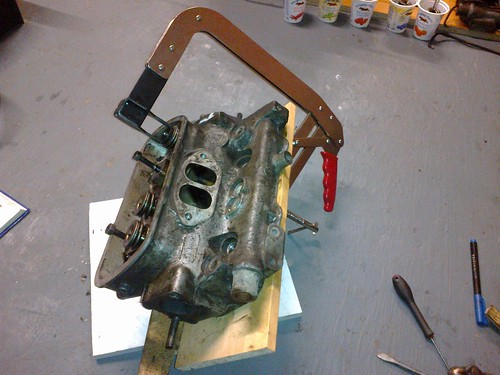
What a pain that was. Followed previous advice and gave all the spring retainers a quick blow with a mallet, but the collets still didn't want to let go! Didn't help that the spring compressor wouldn't sit nicely on the retainers - had to resort to a little remodelling with a file!
All the valves now out - lateral wear is less than 1.0mm on all of them using the valve in guide and rock method, so worn, but within spec. Heavy carbon on the exhaust appears to have been hampering sealing on a couple of the exhaust valves, but all valve seats look fine. No cracks either!
 [/url]
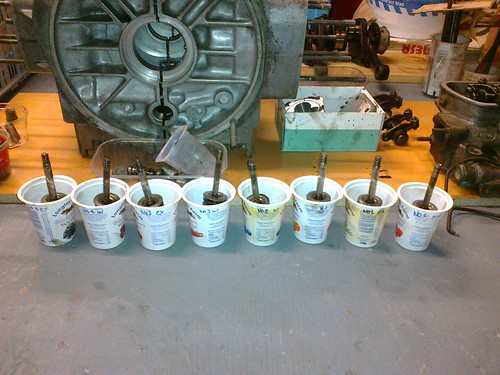
All eight valves out and awaiting a clean and measure (yes, I eat a lot of yoghurt!):
 [/url]
Next is to finish cleaning and see how pitted the sealing face for the water jacket is - looks pretty pitted in its dirty state. Am I right in thinking that liquid metal and a good sand is the best way to deal with any big holes?
Cam shaft came up nicely though. Wear is minimal so it will be going back in to the engine!!
 [/url]
Lots of carbon removal with a cheap brillo pad got me to here:
 [/url]
Note that someone has drawn a ‘4’ on the piston. It wasn’t me, so presumably a previous rebuilder thought this was a good idea. It is to be fair piston 4, so it’s quite handy. Does make me worry slight less about making any small scratches on the piston crown!! Wonder if numbers 1 to 3 are also labelled?
Final things left to clean, heads, three pistons, two liners, rockers and crank...
So far I’ve got through:
5L degreaser, 1 bottle paraffin, two tins carb cleaner, four tooth brushes, 15 brillo pads, a tin of WD40, four scouring pads, two brass brushes, two paint brushes (Harris ‘no loss’ brushes do loose bristles when used to clean engines!!), 2 litres of vinegar and the skin off most of my knuckles.
Got another full day on Saturday, so hope to have all the cleaning done!
Cheers,
Alex
Still cleaning parts, very bored of this now! Bought a spring compressor to liven things up a bit (I need to get out more...)
[/url]What a pain that was. Followed previous advice and gave all the spring retainers a quick blow with a mallet, but the collets still didn't want to let go! Didn't help that the spring compressor wouldn't sit nicely on the retainers - had to resort to a little remodelling with a file!
All the valves now out - lateral wear is less than 1.0mm on all of them using the valve in guide and rock method, so worn, but within spec. Heavy carbon on the exhaust appears to have been hampering sealing on a couple of the exhaust valves, but all valve seats look fine. No cracks either!
[/url]All eight valves out and awaiting a clean and measure (yes, I eat a lot of yoghurt!):
[/url]Next is to finish cleaning and see how pitted the sealing face for the water jacket is - looks pretty pitted in its dirty state. Am I right in thinking that liquid metal and a good sand is the best way to deal with any big holes?
Cam shaft came up nicely though. Wear is minimal so it will be going back in to the engine!!
[/url]Lots of carbon removal with a cheap brillo pad got me to here:
[/url]Note that someone has drawn a ‘4’ on the piston. It wasn’t me, so presumably a previous rebuilder thought this was a good idea. It is to be fair piston 4, so it’s quite handy. Does make me worry slight less about making any small scratches on the piston crown!! Wonder if numbers 1 to 3 are also labelled?
Final things left to clean, heads, three pistons, two liners, rockers and crank...
So far I’ve got through:
5L degreaser, 1 bottle paraffin, two tins carb cleaner, four tooth brushes, 15 brillo pads, a tin of WD40, four scouring pads, two brass brushes, two paint brushes (Harris ‘no loss’ brushes do loose bristles when used to clean engines!!), 2 litres of vinegar and the skin off most of my knuckles.
Got another full day on Saturday, so hope to have all the cleaning done!
Cheers,
Alex
RIP - George - 1.9DG '85 AutoSleeper Trident - rusted away
George Second - 1.9DG '89 Caravelle
George Second - 1.9DG '89 Caravelle
-
sarran1955
- Registered user
- Posts: 1442
- Joined: 11 Mar 2009, 18:51
- 80-90 Mem No: 6754
- Location: 6, les Hauts de Sarran 19800, Sarran ,Limousin ,FRANCE
Re: 1.9 DG - Attempting a full rebuild...
Hello,
Well done.. keep at it..
I would fit new exhaust valves every time..
They work much harder..and in a hotter environment..
Their only effective heat transfer area is the valve seat, so its really important to grind the valves.. all of them..
really well...
If you have gone this far and you have, or can get to, a compressor and air hammer .. why not change the valve guides while you're at it.. at 5€ a shot..
I will lend you by post my gadgets and reams for doing the job....if you like.
Are you going directly for a crankshaft regrind.. or try measuring and using standard bearings..
Cordialement,
-
T25Convert
- Registered user
- Posts: 402
- Joined: 20 Jun 2009, 09:27
- 80-90 Mem No: 7819
- Location: Chester
Re: 1.9 DG - Attempting a full rebuild...
sarran1955 wrote:
I would fit new exhaust valves every time..
They work much harder..and in a hotter environment..
Funny enough they look better than the inlet valves! The inlet valves tops are almost all mushroomed, some quite badly. The exhaust valves all look to be in very good condition, but wonder if they were replaced during the last rebuild of the engine? Will add these to the list of parts to get.
sarran1955 wrote:If you have gone this far and you have, or can get to, a compressor and air hammer .. why not change the valve guides while you're at it.. at 5€ a shot..
I will lend you by post my gadgets and reams for doing the job....if you like.
I don't have access to a compressor unfortunately, thanks for the offer though, very kind. May pay the machine shop to pop new ones in.
sarran1955 wrote:Are you going directly for a crankshaft regrind.. or try measuring and using standard bearings..
Aiming to go for standards throughout rather than grind anything, assuming they haven't already been ground or they are oval / worn!
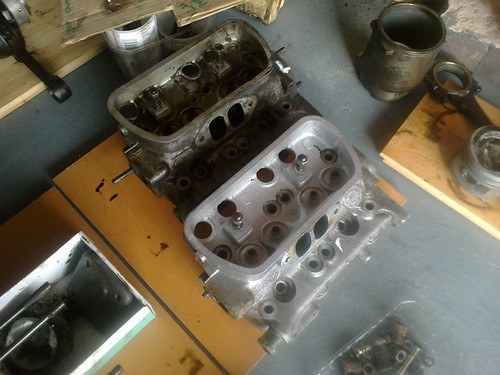
By way of update I'm still cleaning parts - one head part done:
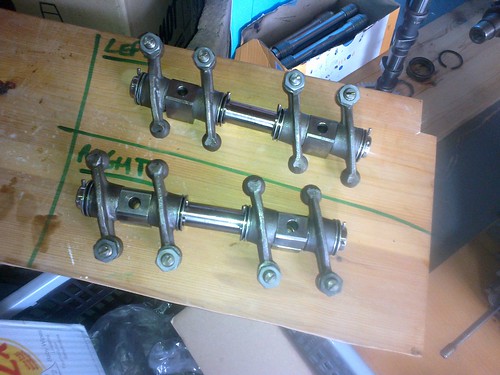
And the rocker shafts stripped, cleaned, lightly oiled and popped back together:
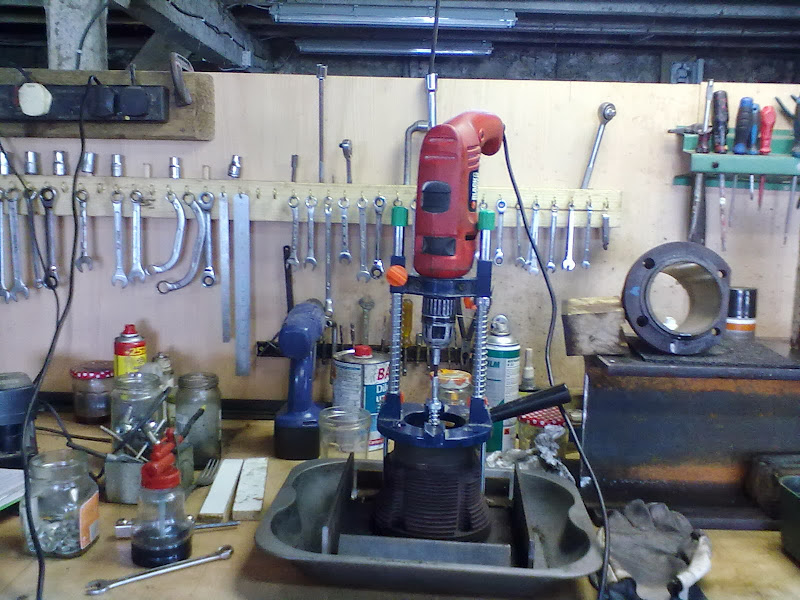
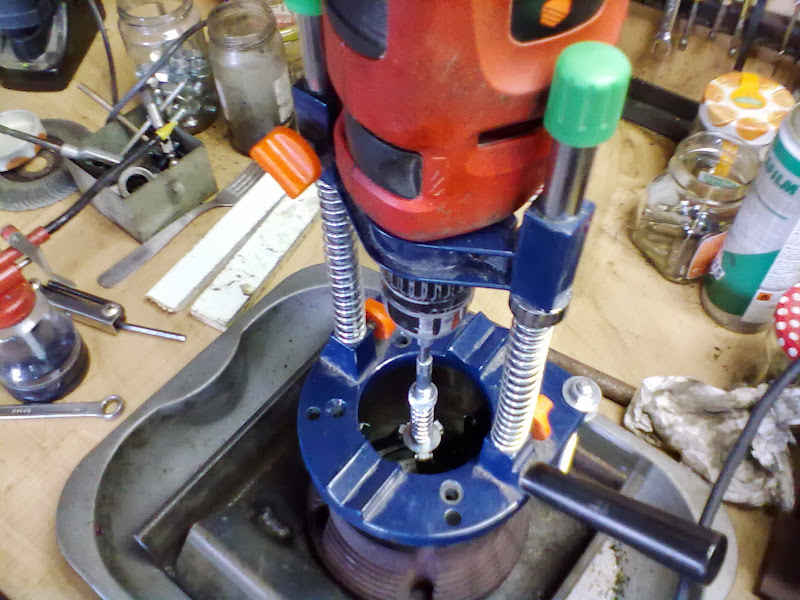
Next step was to remove the exhaust studs from the heads as they are well past their best. One out of the six still in the head unscrewed, the rest I’m going to have to drill out. Add to this the two bolt connection for the coolant port on one head, and that’s 7 studs to drill.
So far it’s taken me 4 hours to do two studs, and two drill bits. I’m keeping them well oiled, and taking it steady, but the studding seems to be quite tough. Means I’ve got 20 hours of drilling ahead of me – surely not!!
My current method is to trim stud roughly level with head, centre punch the middle of the stud, drill with 2mm bit all the way through, then 4mm, then 6.5mm then pick the bits out, before running a M8 tap in and out. The 6.5mm drill is a bit undersized really, a 7mm bit would be better, but it allows me to be a bit off centre! Any better suggestions to speed this up?!
Approached several local machine shops, and got a rather underwhelming response. Anyone got any recommendations for a machinist in the North West?
Cheers all,
Alex
RIP - George - 1.9DG '85 AutoSleeper Trident - rusted away
George Second - 1.9DG '89 Caravelle
George Second - 1.9DG '89 Caravelle