Headlight/front end loom

An alchemy of sparks, copper wire and earth

Moderators: User administrators, Moderators

Post Reply
User avatar
ELVIS
Trader
Posts: 2316
Joined: 14 Sep 2006, 16:22
80-90 Mem No: 3111

Headlight/front end loom

Post by ELVIS »

Not the horrendous ones that have numerous variations of cheapness on usual sites but OE ones!

Has anyone completes remade the front end lighting loom from the C plug/terminals on the back of the CE1 style fuse box?

considering it as (1) all the ‘up rated’ looms appear to have that horrendous shiney cheap cable with poor strand count and general crapness about them. (2) I don’t want to drape miles of said crapness around my van. 

Making it and sourcing parts doesn’t worry me. Just curious really as to other peoples experiences. 
 Ideas/pics/abuse/advice plz  :ok

User avatar
Robsey
Registered user
Posts: 1171
Joined: 19 May 2012, 20:45
80-90 Mem No: 11137
Location: East Manchester

Re: Headlight/front end loom

Post by Robsey »

As part of my exploits on the rusty blue skip...

The van is a 1983 wasserboxer.
When I was given the dubious task of rebuilding the van, I stripped out all the original looms.

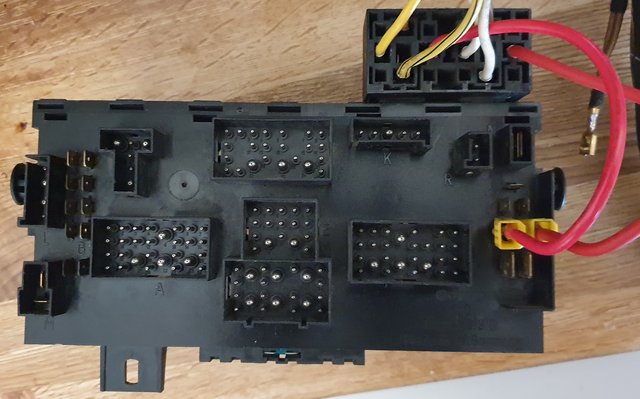
I then bought a CE1 fusebox in the possibly mis-guided thought that a CE1 would be better organised and would allow me to add modern comforts and extras.
I also bought used complete 1987 looms for the whole van.

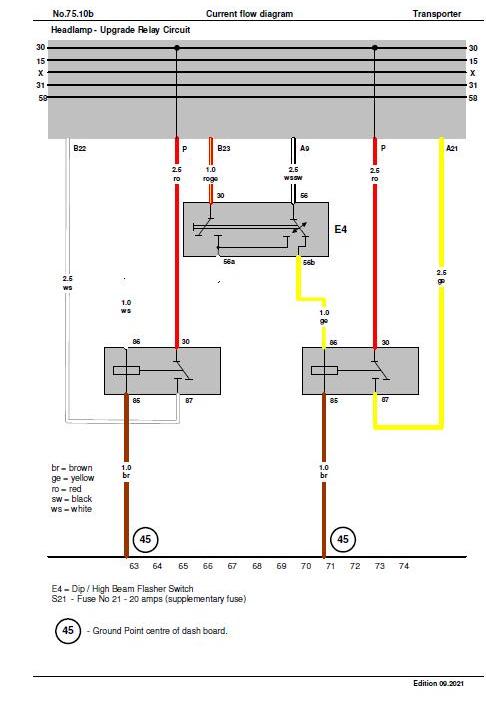
I too wanted to make up my own improvements like the light upgrade relay circuits.

I used the wires from my early looms to make up the headlamp circuits.

Or to be correct, I repositioned the wiring so that I could fit two relays on the fusebox.

The wiring from the high/low beam stalk switch comes into the relays - pin 86
From the relays - pin 87 out to the fusebox.
From where it then goes to the headlamp fuses.

I also had to replace well over 50 female spade terminals to ensure good clean connections.

And because I am a bit o.c.d., I also soldered on every single connector.
It has two benefits - prevents the terminal coming off, and also the solder reduces some of the capillary affect of moisture etc being drawn up the cable strands.

A lot of wires (especially in the engine bay) become tainted and tarnished. These will not solder easily, so you know that a soldered joint is likely to still have good copper strands inside.

Image

I wired one red wire for each relay, and wired each directly to it's own indevidual 'P' Terminal

Image

Brown relays are Bosch 40 amp units from a Vauxhall Vectra-C.
One for high beam, one for low beam.

Image

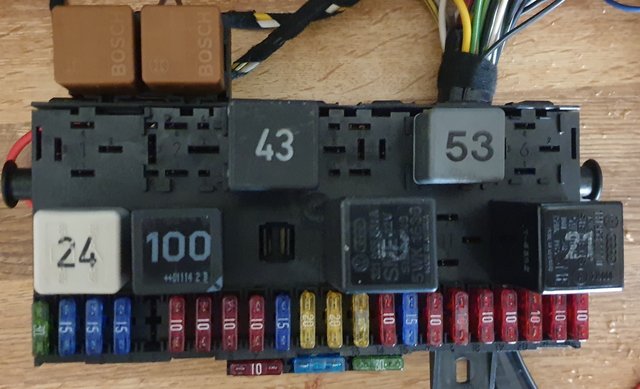
The output of each then feeds the four fuses in the fusebox.

As you can see - my o.c.d. also means that the fuses all have to be oriented the same way.
I also had to remove and refit some of the relay caps so that the numbers were all the correct way up.
Last edited by Robsey on 24 Aug 2022, 23:43, edited 1 time in total.
1983 Tin Top with a poorly DF and 4 speed DT box.
1987 Electrics and a DJ engine.
Maybe one day I might get it finished

User avatar
ELVIS
Trader
Posts: 2316
Joined: 14 Sep 2006, 16:22
80-90 Mem No: 3111

Re: Headlight/front end loom

Post by ELVIS »

Cheers for the reply. I’ve been online a few times but life is busy. Thanks for taking the time to give such an in-depth reply.  :ok

think it was your thread with all the terminal break downs on the CE1 box that started me thinking.  I did relays maybe 15yrs ago and (badly) kind of remade the loom and left the old one in place on my first van. 
 Things have progressed since then  :D
still like the ideas of relays on top of box. 
 Have bought an old loom from eBay for a tenner so hopefully that will be here this week. I just don’t like the idea of miles of crap that isn’t meant to be there, just draped around my van. Especially when the wires are the wrong colours (my ocd also :mrgreen:
 will keep you posted as to how I get on. Thanks again  :ok

User avatar
Robsey
Registered user
Posts: 1171
Joined: 19 May 2012, 20:45
80-90 Mem No: 11137
Location: East Manchester

Re: Headlight/front end loom

Post by Robsey »

It is my pleasure.
I have updated my diagram on my laptop, so will update my post over the next day or so.

The main gist is to -
Look at the wires at the fusebox end for the high / low beam stalk output.

1a - You could either -
a - cut off the tubular pins and fit female spades instead that you will plug into the relay trigger position. - 86 terminal of relay.
b - make up the mini-loom from the relay load / output terminal - 87 terminal.
Female spade at relay end and tubular pin at the fusebox end.
c - plug the tubular pin into the relevant slot that you took the original pin from.
Repeat for the other relay.

Or

1b -
a- Leave the tubular pins in the connector and cut the wires a reasonable distance from the fusebox end , long enough to reach the output terminal of relay.
b - Crimp and solder on female spade connector and plug into relay output terminal - 87 terminal.
c - Extend the wires from the high / low beam output of the stalk and crimp and solder on a female spade connector.
d - Plug the female spade connector into terminal 86 of the relay socket.

2 - Red wires from "P" terminal to 30 terminal of each relay socket.

3 - Brown ground wires from relay sockets 85 terminal. Obviously the other end goes to a good ground. I used ring terminals rather than female spades and ground to the van with an M6 fixture bolt for my blower motor casing. I somehow feel they are more secure than the earth crowns.

In essence, you are only making or modifying 8 wires about 8 to 10 inches (20 to 25cm) long, not making a huge loom that goes half way around the front of the vehicle.

I did 1a - I didn't like the idea of extending wires, even if I do solder and sleeve when I have no other choice.

Tubular pins are readily available from Brickwerks or Vehicle Wiring Products.

I do like the Brickwerks female spades... they are a lot better quality and grip the male spades better than many other female spades that I have come across.
1983 Tin Top with a poorly DF and 4 speed DT box.
1987 Electrics and a DJ engine.
Maybe one day I might get it finished

User avatar
Robsey
Registered user
Posts: 1171
Joined: 19 May 2012, 20:45
80-90 Mem No: 11137
Location: East Manchester

Re: Headlight/front end loom

Post by Robsey »

One "extra" wire that I put in was an extra battery to fusebox wire.
Sleeved it's entire length for protection.

I fitted the famous Corsa EPAS (powered steering column) which are quite 'powerful' at 50 to 60 amps rating... or in basic money two or three blower motors running at the same time at full turning input. - mine is a Mantasport model as opposed to the two usual suppliers that you read about.

My thinking being that by modern standards, the existing battery feed is quite "light" at only 6mm CSA.
In their early guise, there was very little on the standard vans needing power.

If your plans include adding any extra or more powerful equipment, then I recommend beefing up or doubling up your main power feed wire(s).

Even if it is just a more ooomphy radio, front fogs or whatever.
1983 Tin Top with a poorly DF and 4 speed DT box.
1987 Electrics and a DJ engine.
Maybe one day I might get it finished

User avatar
ELVIS
Trader
Posts: 2316
Joined: 14 Sep 2006, 16:22
80-90 Mem No: 3111

Re: Headlight/front end loom

Post by ELVIS »

Cheers again got your ideas/input/suggestions. 
 I make looms for engine conversions so have all the terminals and tools to do the job. 

I am going to be rewiring the whole rear end over the autumn (battery/alternator/starter/P1 terminal and earths) and have added main feed from P1 to relay plate to the list. 


User avatar
Robsey
Registered user
Posts: 1171
Joined: 19 May 2012, 20:45
80-90 Mem No: 11137
Location: East Manchester

Re: Headlight/front end loom

Post by Robsey »

I should probably clarify, that my second battery to fusebox wire for the EPAS does not actually go to the bigger 'P' terminals of the fusebox.

There aren't enough of the bigger 'P' pins in the fuse box - only two.
One from battery to fusebox (6.0mm csa)
And
One from fusebox to ignition switch. (4.0mm csa)

So my secondary wire feeds it's own fusible link behind the dash for the EPAS. This is mainly used as a junction plate to avoid messy cable joins.

And for those reading, there is a 50 amp fuse fitted close to the battery too - where it should be on any wire.
"As close to the supply point as possible to protect the wiring"

So for P terminals.

There are five standard 6.3mm (1/4") spades for battery live distribution.
Note that these are all un-fused.!!

And two larger 9.5mm (3/8") spades for the two main battery live wires, as described above.
1983 Tin Top with a poorly DF and 4 speed DT box.
1987 Electrics and a DJ engine.
Maybe one day I might get it finished

User avatar
Robsey
Registered user
Posts: 1171
Joined: 19 May 2012, 20:45
80-90 Mem No: 11137
Location: East Manchester

Re: Headlight/front end loom

Post by Robsey »

ELVIS wrote: 26 Aug 2022, 00:34
I am going to be rewiring the whole rear end over the autumn (battery/alternator/starter/P1 terminal and earths)


I whole heartedly recommend completely replacing the battery, starter and alternator wiring with new.
And all the ground braids too.

These are by far the worst affected cables due to heat and oxidation / tarnishing.

And as said earlier for the battery to fusebox cable.
They are probably on the "light" or "flimsy" side.

Although saying that, for the most part the wiring has been "up to the job" enough to out last the bodywork and therefore exceeded the vehicles' designed life span.
1983 Tin Top with a poorly DF and 4 speed DT box.
1987 Electrics and a DJ engine.
Maybe one day I might get it finished

User avatar
ELVIS
Trader
Posts: 2316
Joined: 14 Sep 2006, 16:22
80-90 Mem No: 3111

Re: Headlight/front end loom

Post by ELVIS »

I’ve also made a board to remake tail light looms due to voltage drop on old ones.

User avatar
Robsey
Registered user
Posts: 1171
Joined: 19 May 2012, 20:45
80-90 Mem No: 11137
Location: East Manchester

Re: Headlight/front end loom

Post by Robsey »

I could never understand why they didn't put a ground wire from each tail light cluster to the bodywork nearby.

There are lots of potential improvements that could be made to the wiring of the van.

I would be tempted to move the starter battery closer to the engine bay, and run the "front end" from a secondary "smart charged" battery where the current petrol battery resides under the driver's seat.
1983 Tin Top with a poorly DF and 4 speed DT box.
1987 Electrics and a DJ engine.
Maybe one day I might get it finished

Post Reply