Page 13 of 31
Re: Rustoration
Posted: 28 Aug 2018, 23:10
by RogerT
Got started fitting the swing arm in position so I can get the position of the swing arm mount.
Jacked up the nearside swing arm until the van was just off the axle stand on that side, measured axle to floor.
WRESTLED the offside arm on and lifted it to the appropriate axle height.


Angle of the flat part of the inner sill

On the vertical face of the swing arm hub mounting plate...


Ok, it’s a cheap little level, but you get the idea? Not a mile off!
Next, fore and aft placement of the swing arm mount...
Sent from my iPhone using Tapatalk
Re: Rustoration
Posted: 29 Aug 2018, 07:57
by 937carrera
Big work with nicely painted bits.
Did you take measurements before removal or are you taking them from a spec book.
Is the inner mount still in position, so is that a key part of positioning the the jacking point ?
I've been scratching my head a bit on this.
Re: Rustoration
Posted: 29 Aug 2018, 12:01
by RogerT
Couldn’t take measurements as my outer mount had come adrift. Inner mount still solid, so start from there. You’ll hopefully see when I move on to the next part of the process.
Re: Rustoration
Posted: 29 Aug 2018, 13:30
by RogerT
This is what I mean...
http://forum.club8090.co.uk/viewtopic.p ... 0#p8092091" onclick="window.open(this.href);return false;
Setting the toe-in and taking the mount position from that.
Re: Rustoration
Posted: 31 Aug 2018, 21:24
by RogerT
Had a first measure of the toe in, adjusted, measured again, looking good.
Forgot photos.
Anyway, measure twice, mark (weld) once.
I’ll check again tomorrow with a longer straight edge, and photos...
Re: Rustoration
Posted: 31 Aug 2018, 23:03
by mshaw1980
My rear swing arm mount repair according to the guy that did my alignment is 1mm further forward than the left. Still within tolerance so I am quite happy with a 1mm discrepancy

Re: Rustoration
Posted: 01 Sep 2018, 08:37
by RogerT
I have to do both, but nothing ventured-nothing gained. Impressive results you got there though!
Just been to get a long straight thing - wandered round Wickes and settled on PSE timber, eventually finding a piece that was really straight. I’ve a plan involving a laser pointer too, if I can find the one that’s been kicking round the house for 4 years and 2 house moves...

Re: Rustoration
Posted: 01 Sep 2018, 09:43
by mshaw1980
RogerT wrote:I have to do both, but nothing ventured-nothing gained. Impressive results you got there though!
Just been to get a long straight thing - wandered round Wickes and settled on PSE timber, eventually finding a piece that was really straight. I’ve a plan involving a laser pointer too, if I can find the one that’s been kicking round the house for 4 years and 2 house moves...
Hate losing tools. Needed my plastering trowel last week and could I find it in the garage? No.
Looks like you are doing a great job there mate. Keep it up

Re: Rustoration
Posted: 01 Sep 2018, 12:39
by RogerT
Found the laser pointer ... in my daughter’s make-up drawer?
Re: Rustoration
Posted: 01 Sep 2018, 13:00
by mshaw1980
RogerT wrote:Found the laser pointer ... in my daughter’s make-up drawer?
My spare T25 key was in my daughter's hair bobble box. One of the first placed I look if losing keys...not.
Re: Rustoration
Posted: 10 Sep 2018, 22:36
by RogerT
A little while later... where does the time go??
Here is a straight edge I found in the garage, clamped to the flange on the swing arm...

But it’s too flappy so no good to measure off.
Here’s a laser pointer clamped above it by my good pal Heath Robinson.

Shining along the length of the straight edge...

...and raise the beam up to measure off to the chassis rail

Get it parallel and check the bolt positions


So that, I think, indicates my laser concept works!
Here’s the rear JP from inside

So, take the inner sill and swing arm off, knowing that when I refit it I can get the rear JP on a good position, and next - chop back the rear crossmember to clean metal prior to rebuilding in two stages (i) the upper portion that the sill fits to, (then refit sill and JP) and (ii) the lower portion that the JP fits to.
Also need to clean up the inner swing arm mount so it’s ready for use. Looks crusty but it does seem to be clean around the bolt holes. Fingers crossed...
Sent from my iPhone using Tapatalk
Re: Rustoration
Posted: 10 Sep 2018, 22:56
by mrhutch
i'm liking this chap.. keep updates coming..
Re: Rustoration
Posted: 11 Sep 2018, 21:46
by RogerT
Test fit, test fit, test fit


Chop, chop, chop


Wee bit fabricated...

Sent from my iPhone using Tapatalk
Re: Rustoration
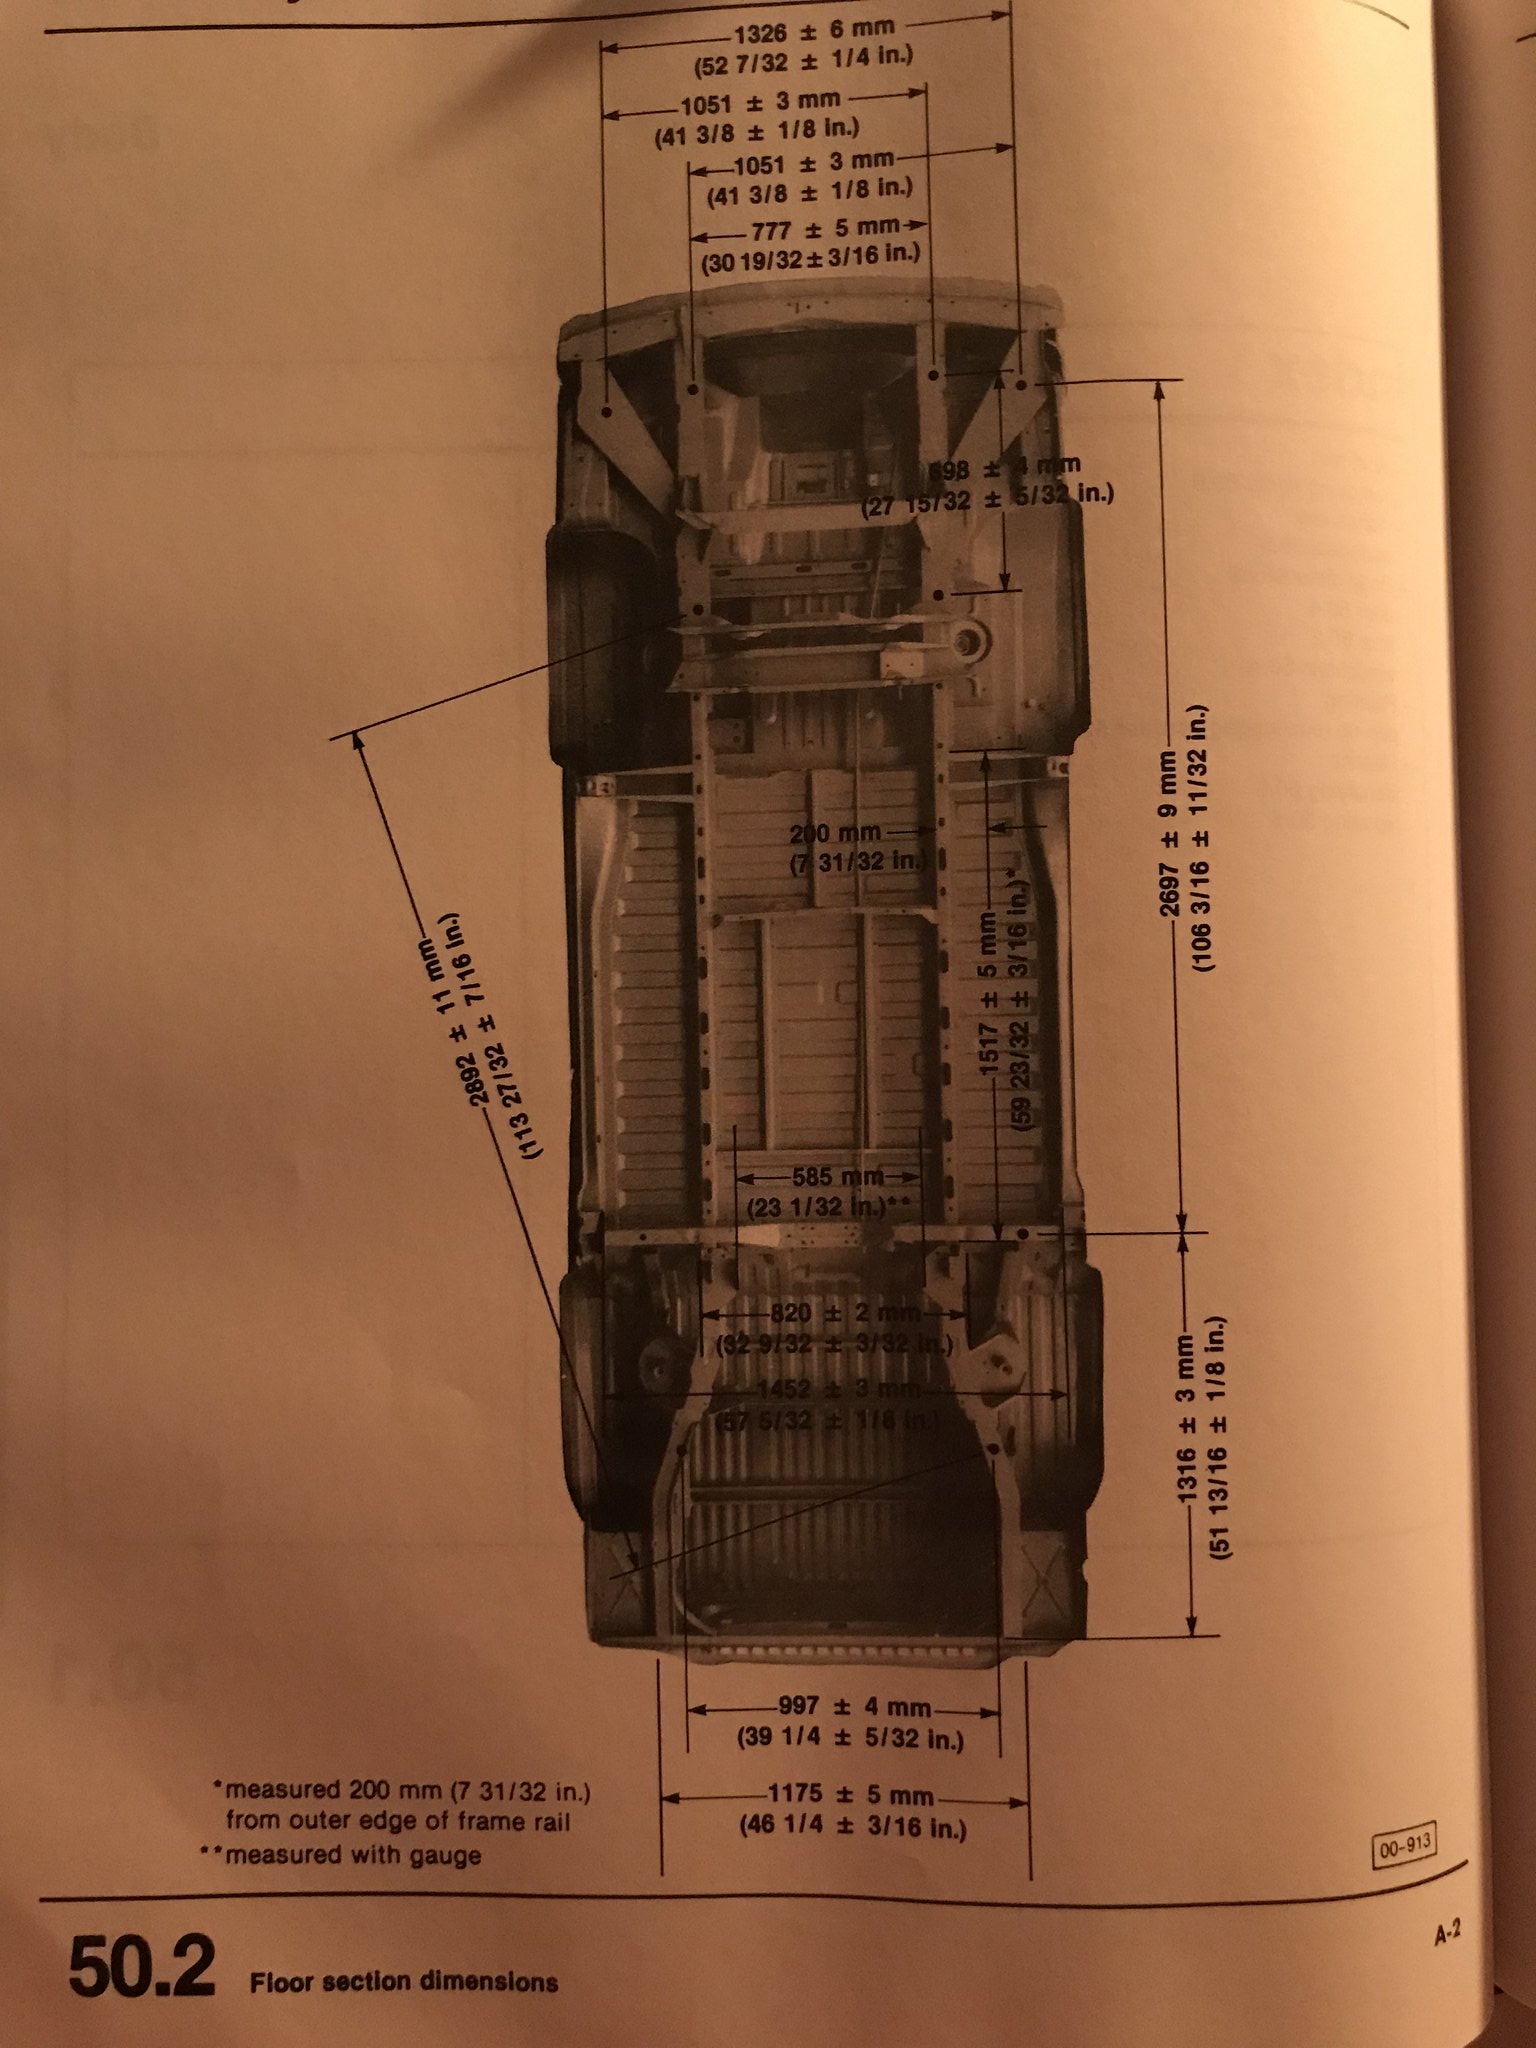
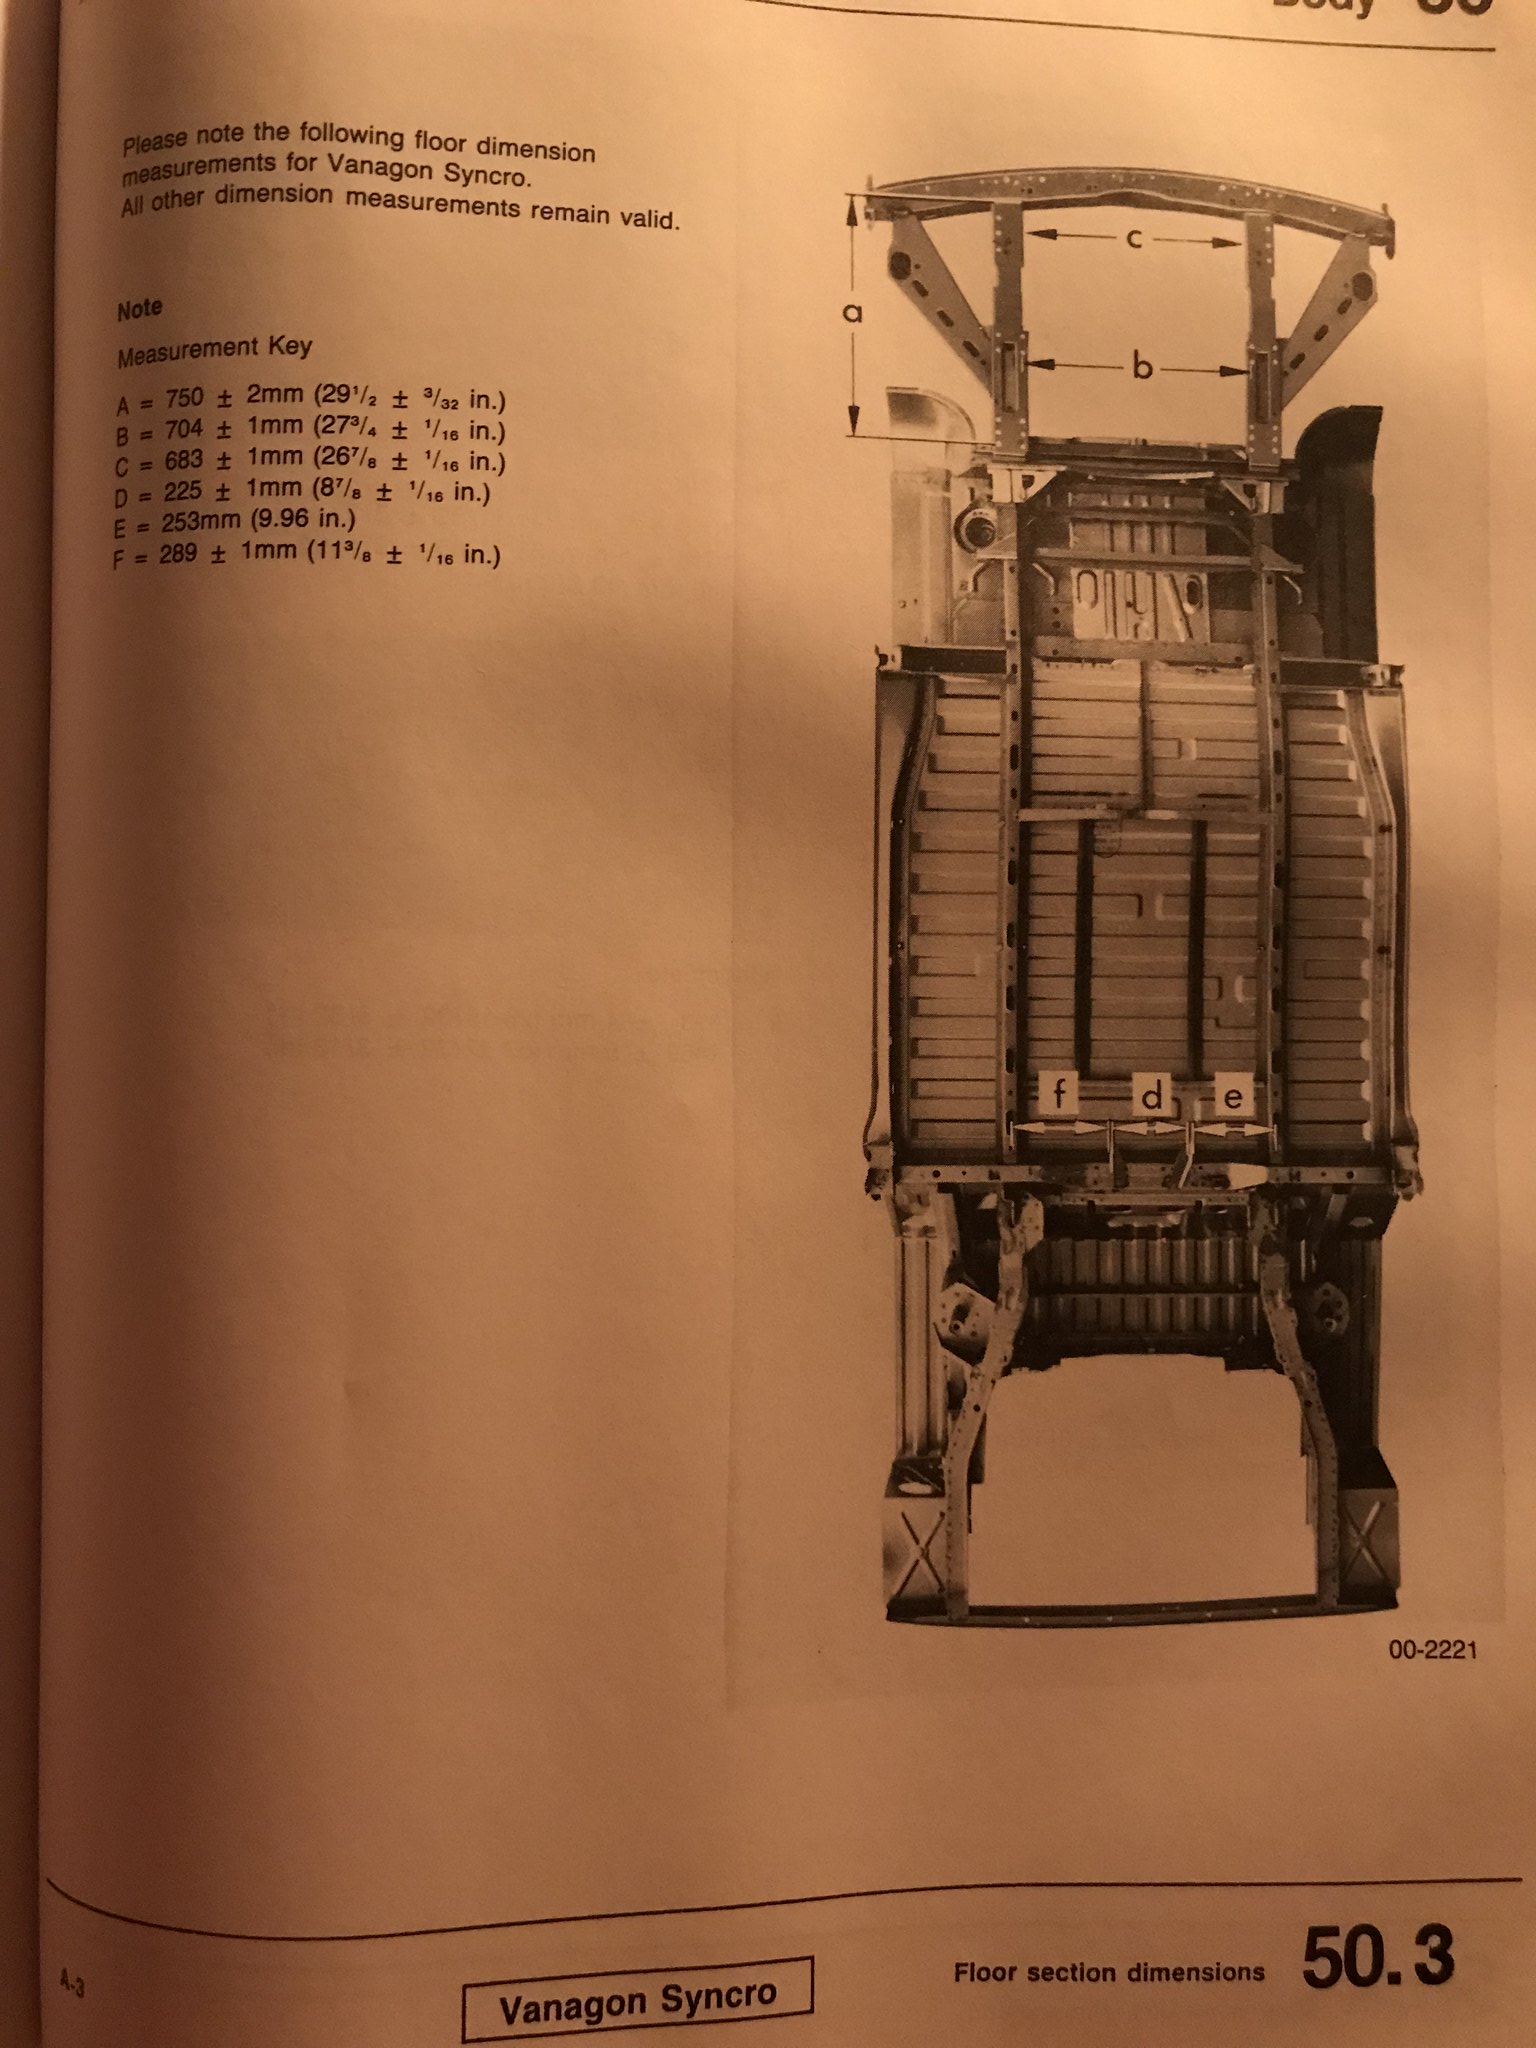
Posted: 09 Oct 2018, 20:51
by adie89
Found these in Bentley manual and thought of you
Re: Rustoration
Posted: 10 Oct 2018, 12:37
by RogerT
I need some van therapy, my head’s mince at work today, some practical stuff in the garage should sort me out. Hope to weld on my inner sill, then go back to my laser to position the JP. Thanks for these.


