WBXlog
Moderators: User administrators, Moderators
-
CovKid

- Trader
- Posts: 8409
- Joined: 30 Apr 2006, 13:19
- 80-90 Mem No: 3529
- Location: Ralph - Coventry (Retired)
- Contact:
Re: WBXlog
To be honest, this is the only way you'll get a proper rebuild at low cost. Just about all T3 replacement engines offered commercially are a compromise and some are downright bodges. It makes longevity a lottery. That said, most just don't want to pay the cost of new parts on top of the labour which is why corners get cut in order to provide engines buyers can afford. A top quality rebuild takes time, money, patience, and attention to detail.
Roller paint your camper at home: http://roller.epizy.com/55554/" onclick="window.open(this.href);return false; for MP4 download.
-
itchyfeet

- Registered user
- Posts: 12427
- Joined: 23 Jul 2007, 17:24
- 80-90 Mem No: 12733
- Location: South Hampshire
Re: WBXlog
Thanks for the replies 
Miss Itchy's lupo EGR valve spat it's dummy out so that's kept me busy tonight but got a little done.
cam out and the thrust bearing is shot, that's where the bearing material has come from
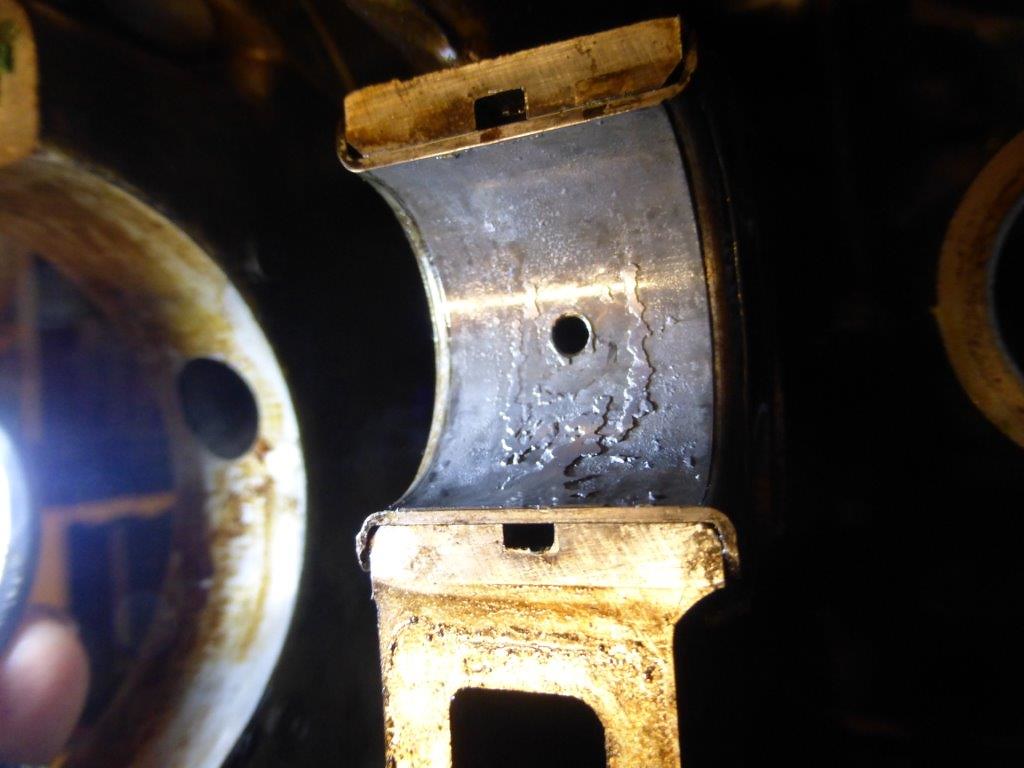 P1050298 by Paul_Barr, on Flickr
 P1050299 by Paul_Barr, on Flickr
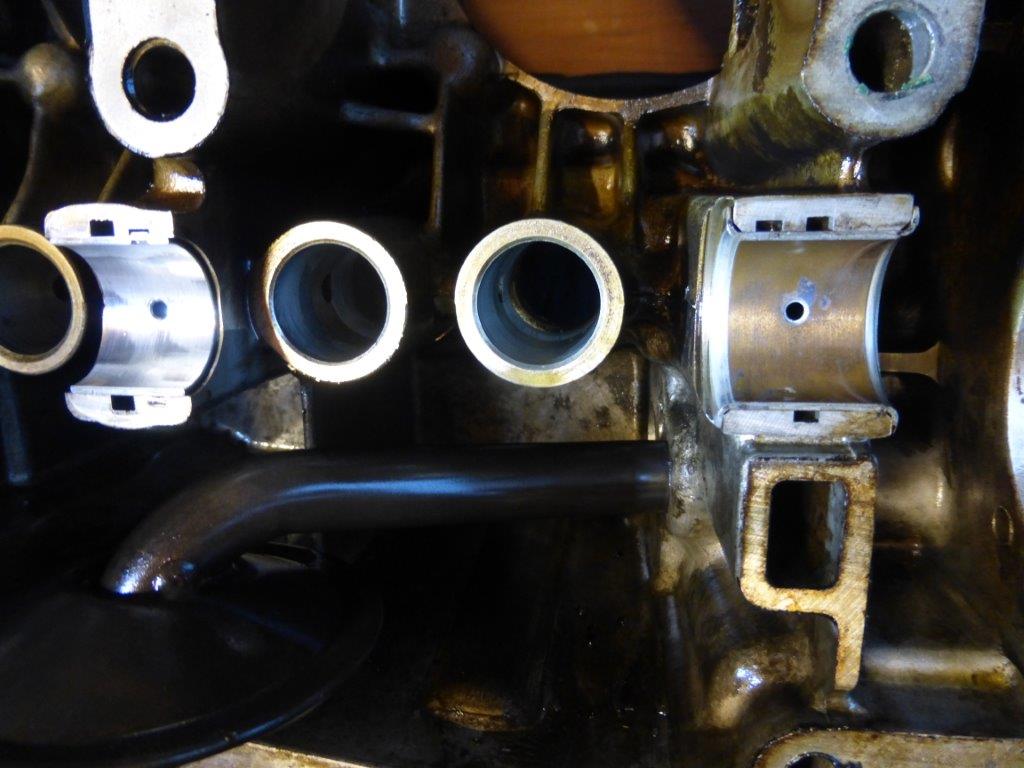
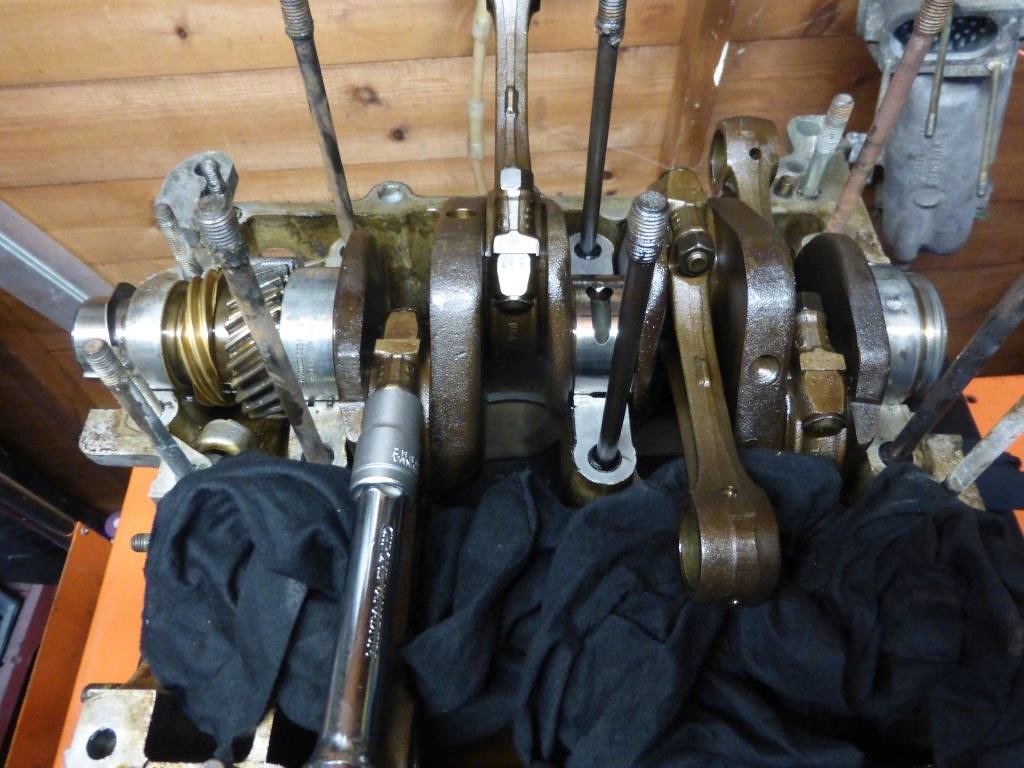
because I'm working on one side and because I think it's easier to remove con rod nuts when crank is in the case, I lifted crank out, swung the con rods 3& 4 over and replaced the crank.
photographed the position of the con rods first ( to replace same way) then released the nuts while holding crank in place to stop it lifting, 2 foot breaker bar makes it easy.
All bearings looked the same, quite worn but the crank looks fine at first glance, measure up later.
 P1050301 by Paul_Barr, on Flickr
 P1050302 by Paul_Barr, on Flickr
 P1050304 by Paul_Barr, on Flickr
 P1050305 by Paul_Barr, on Flickr
Miss Itchy's lupo EGR valve spat it's dummy out so that's kept me busy tonight but got a little done.
cam out and the thrust bearing is shot, that's where the bearing material has come from
P1050298 by Paul_Barr, on FlickrP1050299 by Paul_Barr, on Flickrbecause I'm working on one side and because I think it's easier to remove con rod nuts when crank is in the case, I lifted crank out, swung the con rods 3& 4 over and replaced the crank.
photographed the position of the con rods first ( to replace same way) then released the nuts while holding crank in place to stop it lifting, 2 foot breaker bar makes it easy.
All bearings looked the same, quite worn but the crank looks fine at first glance, measure up later.
P1050301 by Paul_Barr, on FlickrP1050302 by Paul_Barr, on FlickrP1050304 by Paul_Barr, on FlickrP1050305 by Paul_Barr, on Flickr
Last edited by itchyfeet on 05 Jul 2017, 16:58, edited 1 time in total.
-
itchyfeet
- Registered user
- Posts: 12427
- Joined: 23 Jul 2007, 17:24
- 80-90 Mem No: 12733
- Location: South Hampshire
Re: WBXlog
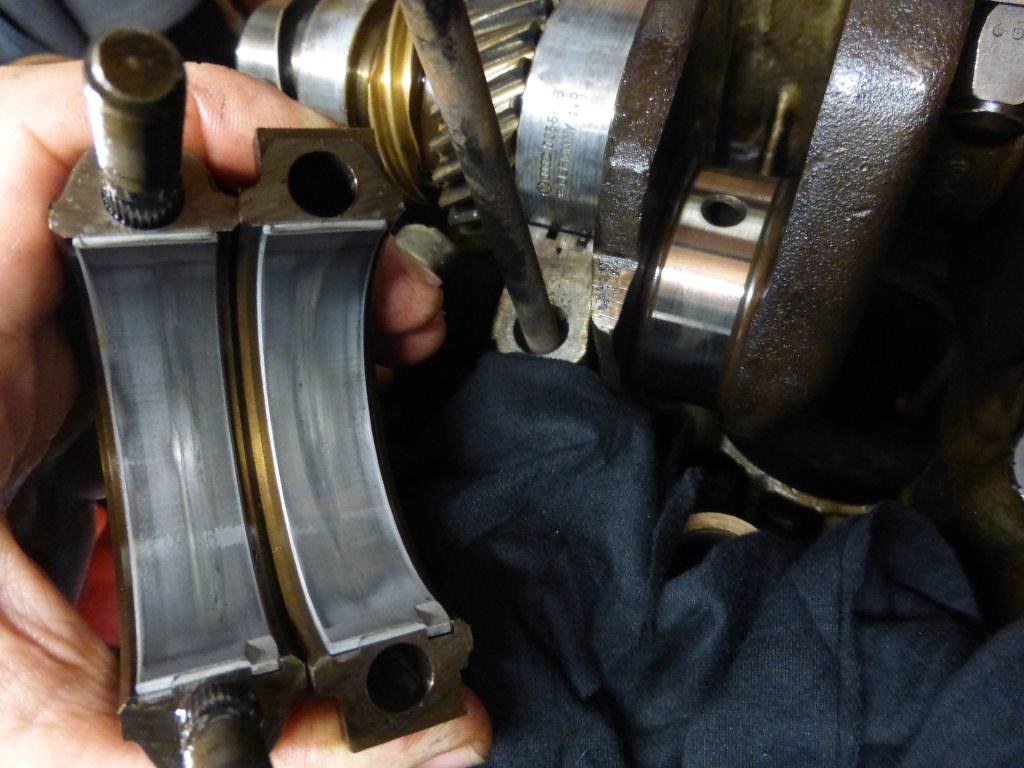
Another thing I just remembered, the pic above shows these are stretch bolts in the con rods ( late DG and DJ had them) will need replacing with standard bolts, stretch type are not reusable ( although I'm sure people do) and obsolete
I have some con rods from an early DG may nick the standard bolts from there
https://www.vwheritage.com/shop/1131054 ... -in-m9-66/" onclick="window.open(this.href);return false;
I have some con rods from an early DG may nick the standard bolts from there
https://www.vwheritage.com/shop/1131054 ... -in-m9-66/" onclick="window.open(this.href);return false;
-
itchyfeet
- Registered user
- Posts: 12427
- Joined: 23 Jul 2007, 17:24
- 80-90 Mem No: 12733
- Location: South Hampshire
Re: WBXlog
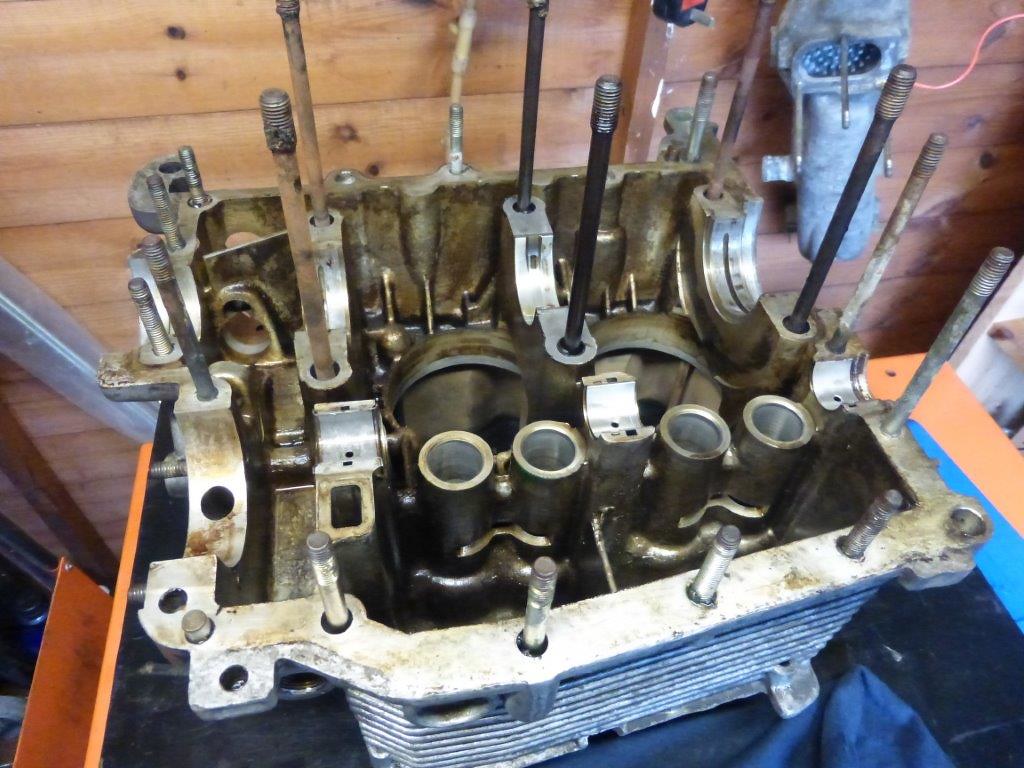
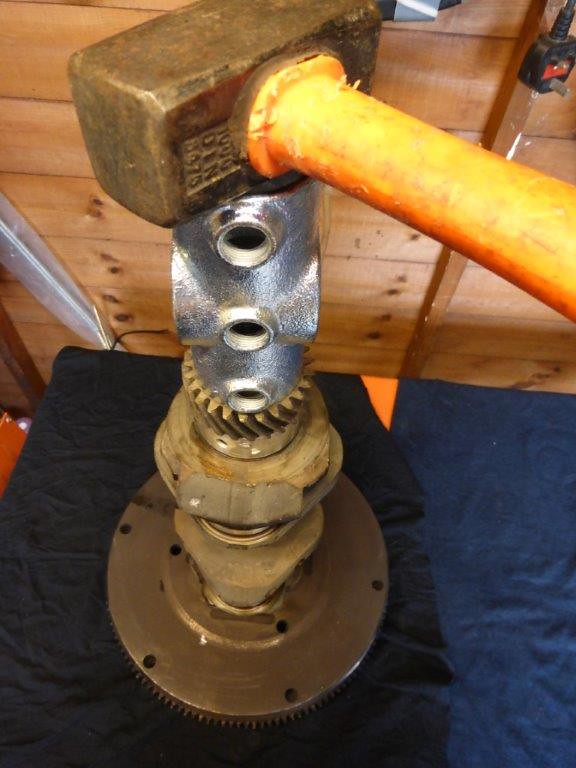
So little time so much to do, Lupo back on the road now so on with the engine.
Popped the crank out to measure, interesting how clean this engine is inside, not black like many, that's 10,000 litres of LPG being burnt
 P1050330 by Paul_Barr, on Flickr
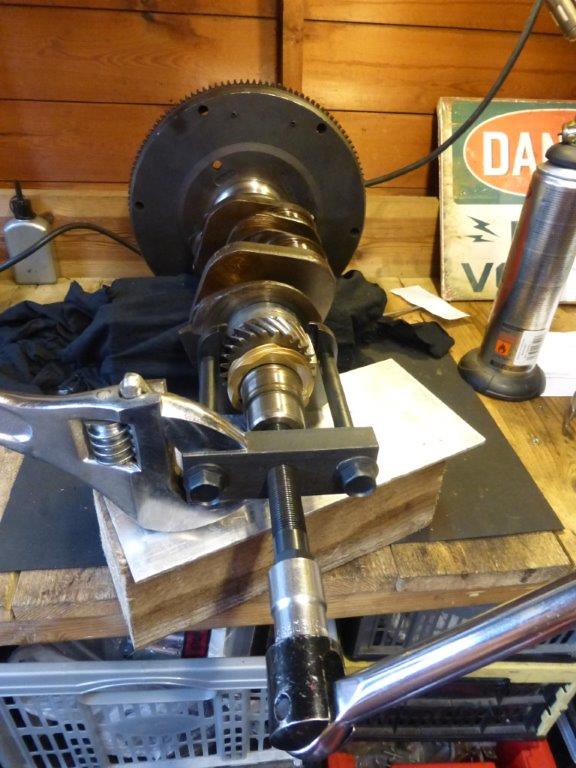
easiest to bolt the crank to the flywheel to measure, you can than easily rotate to measure in different places
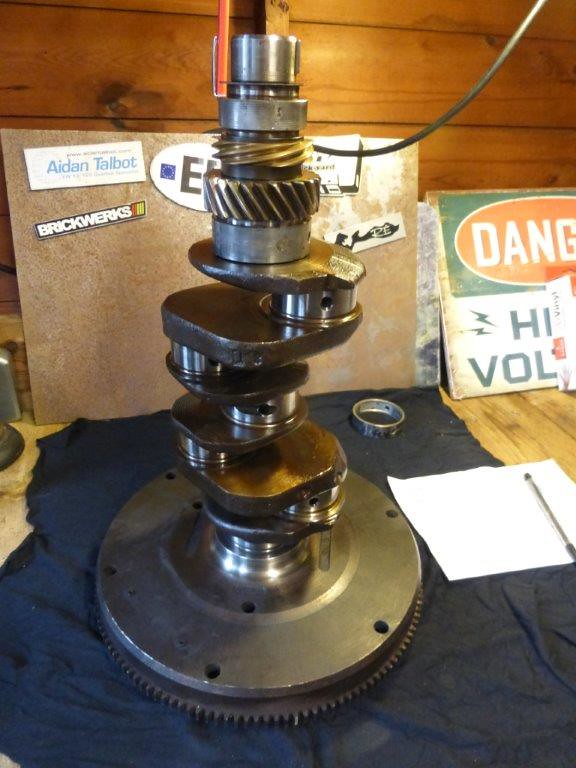 P1050326 by Paul_Barr, on Flickr
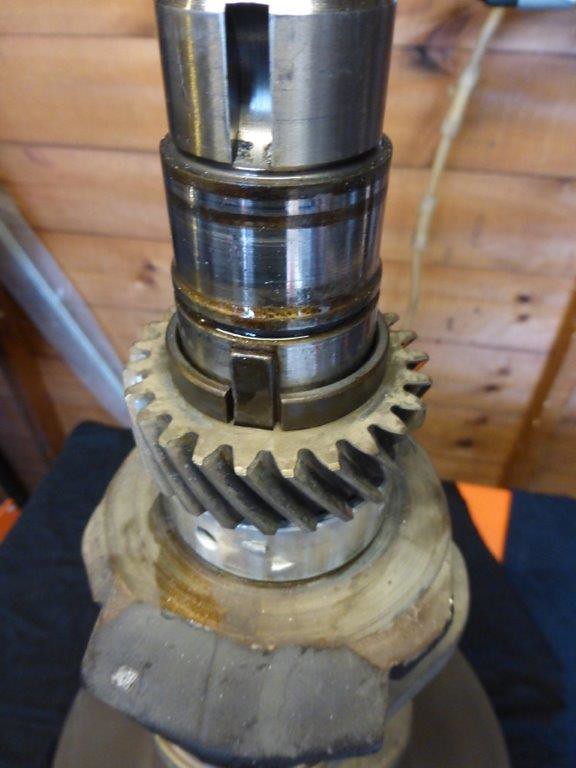
every thing is bob on spec.
 P1050323 by Paul_Barr, on Flickr
two bearings still to measure but woodruff key and cam gear needs removing to do this, the gear looks scuffed, probably because the bearing is shot there is too much play, I have another I could fit.
 P1050324 by Paul_Barr, on Flickr
Popped the crank out to measure, interesting how clean this engine is inside, not black like many, that's 10,000 litres of LPG being burnt
P1050330 by Paul_Barr, on Flickreasiest to bolt the crank to the flywheel to measure, you can than easily rotate to measure in different places
P1050326 by Paul_Barr, on Flickrevery thing is bob on spec.
P1050323 by Paul_Barr, on Flickrtwo bearings still to measure but woodruff key and cam gear needs removing to do this, the gear looks scuffed, probably because the bearing is shot there is too much play, I have another I could fit.
P1050324 by Paul_Barr, on Flickr
Last edited by itchyfeet on 05 Jul 2017, 17:03, edited 1 time in total.
-
itchyfeet
- Registered user
- Posts: 12427
- Joined: 23 Jul 2007, 17:24
- 80-90 Mem No: 12733
- Location: South Hampshire
Re: WBXlog
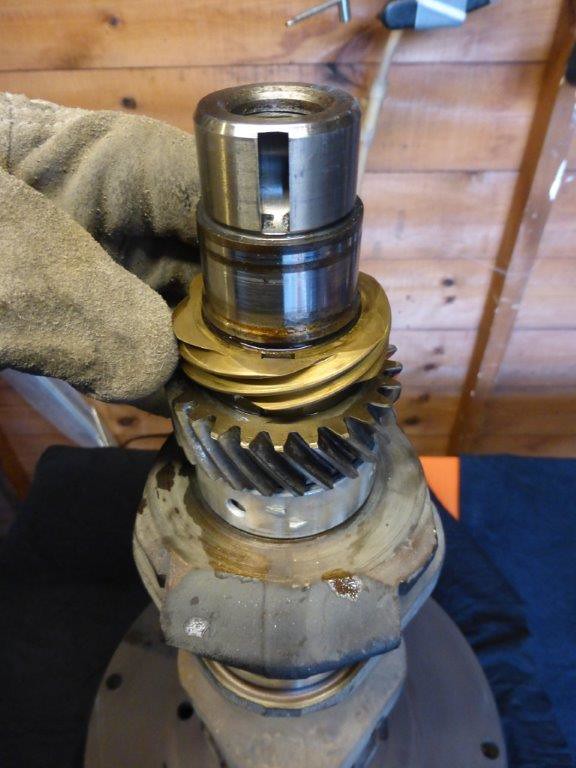
A bit more done tonight, as things are removed I marked them all flywheel side with a marker pen so I have a reference later.
Woodruff key tapped out gently with a hammer and screwdriver, oil thrust ring off and bearing 4 will come off, measures up good, note the dirt build up where the groove in the bearing is, I'm tempted to leave it rather than risk damaging the surface.
 P1050342 by Paul_Barr, on Flickr
 P1050344 by Paul_Barr, on Flickr
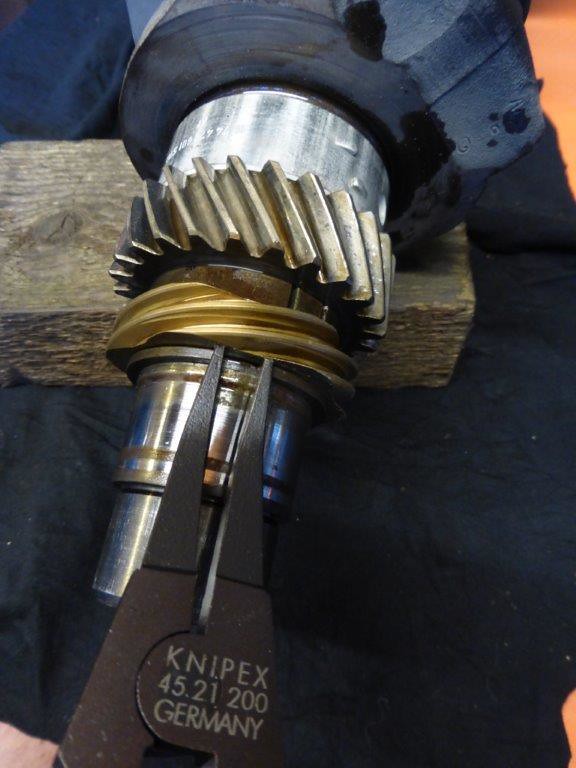
Circlip off using special pliers ( listed post2)
 P1050346 by Paul_Barr, on Flickr
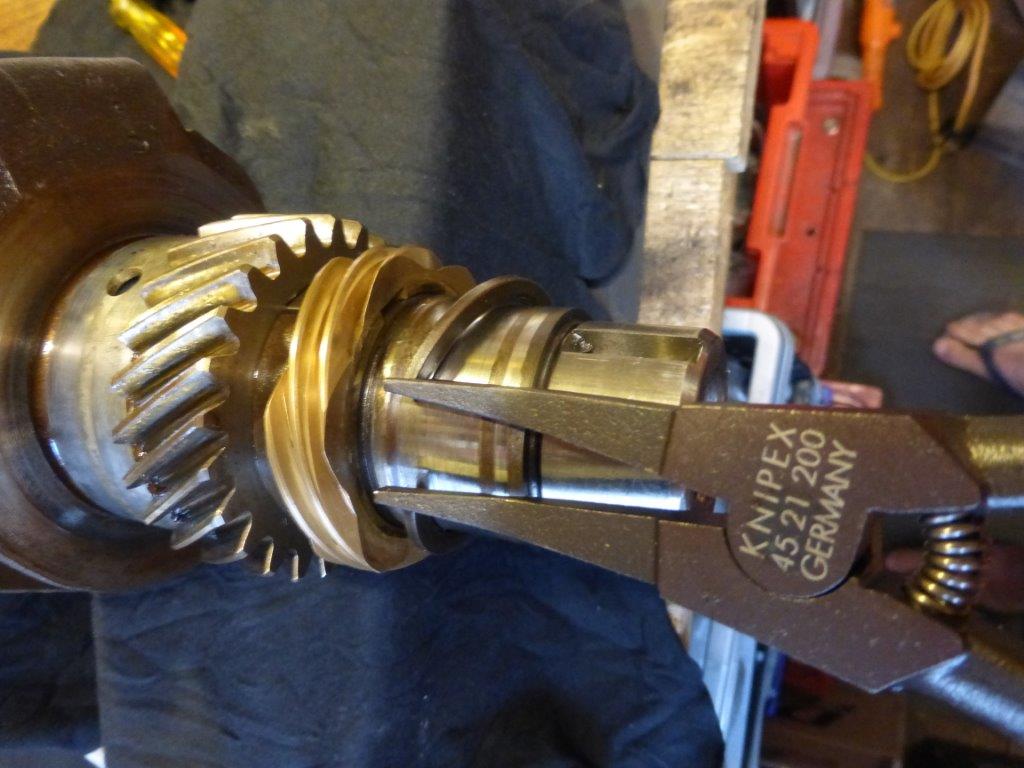
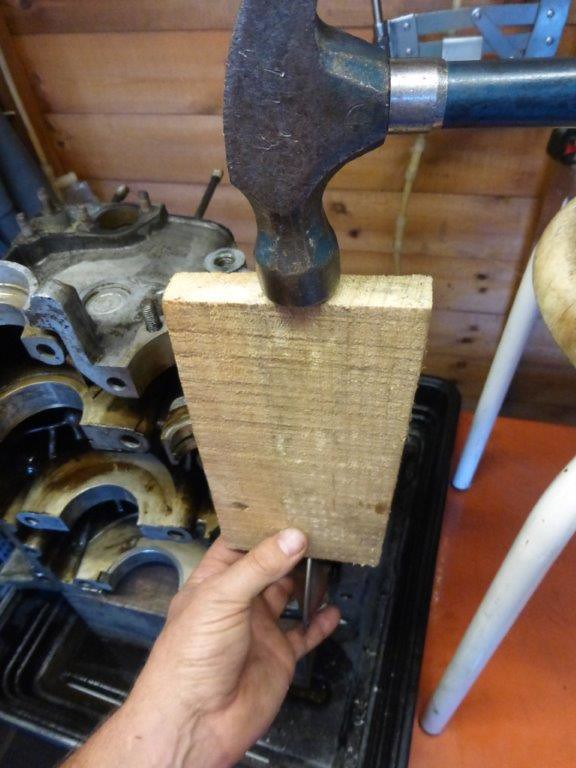
Gear puller in place ( listed post 2) with a large adjustable to hold it all steady and a 2 foot breaker bar to turn the puller.
Some gently applied heat to help things move and it came off nicely, no swarf from the brass distributor gear and no major scratches to shaft.
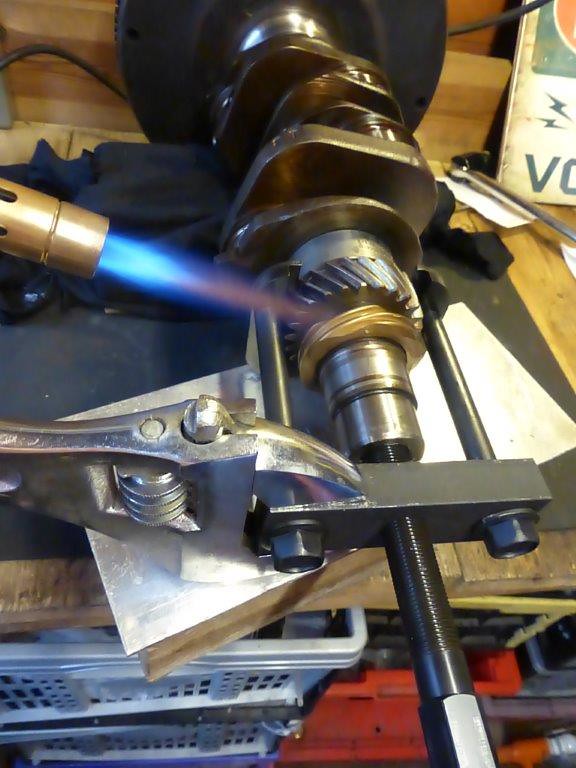 P1050347 by Paul_Barr, on Flickr
 P1050348 by Paul_Barr, on Flickr
 P1050349 by Paul_Barr, on Flickr
bearing 3 measures up good too, none of the journals are under all at the top ( standard) size of the range so need bearings 025198461A.
http://forum.club8090.co.uk/viewtopic.php?f=37&t=155330" onclick="window.open(this.href);return false;
 P1050350 by Paul_Barr, on Flickr
tickled the cam bearings out being careful not to damage the case
 P1050352 by Paul_Barr, on Flickr
pushed the two halves of bearing 2 out
 P1050354 by Paul_Barr, on Flickr
Brickwerks order placed for the first batch of bits I need.
Woodruff key tapped out gently with a hammer and screwdriver, oil thrust ring off and bearing 4 will come off, measures up good, note the dirt build up where the groove in the bearing is, I'm tempted to leave it rather than risk damaging the surface.
P1050342 by Paul_Barr, on FlickrP1050344 by Paul_Barr, on FlickrCirclip off using special pliers ( listed post2)
P1050346 by Paul_Barr, on FlickrGear puller in place ( listed post 2) with a large adjustable to hold it all steady and a 2 foot breaker bar to turn the puller.
Some gently applied heat to help things move and it came off nicely, no swarf from the brass distributor gear and no major scratches to shaft.
P1050347 by Paul_Barr, on FlickrP1050348 by Paul_Barr, on FlickrP1050349 by Paul_Barr, on Flickrbearing 3 measures up good too, none of the journals are under all at the top ( standard) size of the range so need bearings 025198461A.
http://forum.club8090.co.uk/viewtopic.php?f=37&t=155330" onclick="window.open(this.href);return false;
P1050350 by Paul_Barr, on Flickrtickled the cam bearings out being careful not to damage the case
P1050352 by Paul_Barr, on Flickrpushed the two halves of bearing 2 out
P1050354 by Paul_Barr, on FlickrBrickwerks order placed for the first batch of bits I need.
Last edited by itchyfeet on 05 Jul 2017, 17:06, edited 1 time in total.
-
itchyfeet
- Registered user
- Posts: 12427
- Joined: 23 Jul 2007, 17:24
- 80-90 Mem No: 12733
- Location: South Hampshire
Re: WBXlog
Started the internal clean up tonight
Over a tray again with Paraffin to remove any visible swarf and dirt.
I'm aiming to get nothing inside an oil way, these will be blown through later.
 P1050355 by Paul_Barr, on Flickr
oil strainer looked Ok at first glance but has a lot of swarf deep inside.
Removed retaining bolt and it's hard to remove without tapping out with a hammer and wood.
 P1050357 by Paul_Barr, on Flickr
 P1050359 by Paul_Barr, on Flickr
back flushed with paraffin
my guess is a lot of this was from the pervious rebuild because it's too much for the one half a cam bearing that's gone.
 P1050360 by Paul_Barr, on Flickr
Over a tray again with Paraffin to remove any visible swarf and dirt.
I'm aiming to get nothing inside an oil way, these will be blown through later.
P1050355 by Paul_Barr, on Flickroil strainer looked Ok at first glance but has a lot of swarf deep inside.
Removed retaining bolt and it's hard to remove without tapping out with a hammer and wood.
P1050357 by Paul_Barr, on FlickrP1050359 by Paul_Barr, on Flickrback flushed with paraffin
my guess is a lot of this was from the pervious rebuild because it's too much for the one half a cam bearing that's gone.
P1050360 by Paul_Barr, on Flickr
Last edited by itchyfeet on 05 Jul 2017, 17:08, edited 1 time in total.
-
itchyfeet
- Registered user
- Posts: 12427
- Joined: 23 Jul 2007, 17:24
- 80-90 Mem No: 12733
- Location: South Hampshire
Re: WBXlog
Cleaned the other half of the case tonight, so that's 1 hour each side.
I'm not painting it so the inside was what I was concentrating on but dirt left after the initial clean down was also removed from outside so it can't get inside later.
Meticulously removing dirt and debris and not relocating it was my aim, moving the case around means that run off of paraffin is straight out into the tray and never back inside, avoiding anything going into the oil ways. Toothbrush and paintbrush, no wire brushes.
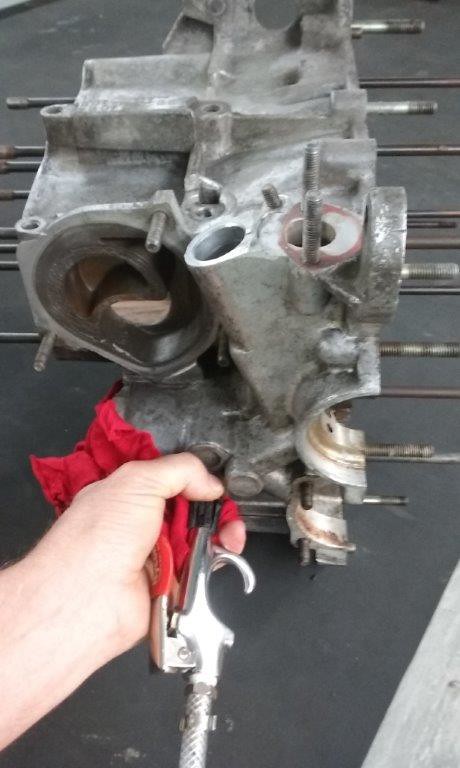
Sprayed down with carb cleaner and then sprayed into the oil ways ( inc crank) with carb cleaner. This lot is going to work with me tomorrow to be blown out with an airline.
 P1050365 by Paul_Barr, on Flickr
I'm not painting it so the inside was what I was concentrating on but dirt left after the initial clean down was also removed from outside so it can't get inside later.
Meticulously removing dirt and debris and not relocating it was my aim, moving the case around means that run off of paraffin is straight out into the tray and never back inside, avoiding anything going into the oil ways. Toothbrush and paintbrush, no wire brushes.
Sprayed down with carb cleaner and then sprayed into the oil ways ( inc crank) with carb cleaner. This lot is going to work with me tomorrow to be blown out with an airline.
P1050365 by Paul_Barr, on Flickr
Last edited by itchyfeet on 05 Jul 2017, 17:09, edited 1 time in total.
-
hightop ratty
- Trader
- Posts: 290
- Joined: 05 Oct 2012, 12:05
- 80-90 Mem No: 2717
- Location: Port Talbot
- Contact:
Re: WBXlog
Going to be keeping a very close eye on this post (blew my 2.1 petrol on way to vanfest) - looking at all my options, but want to do a proper job (do properly 1st, saves money & time).
-
itchyfeet
- Registered user
- Posts: 12427
- Joined: 23 Jul 2007, 17:24
- 80-90 Mem No: 12733
- Location: South Hampshire
Re: WBXlog
blew out the oil ways with an airline today ( rubbish pics on a phone) also did the oil strainer.
 20160916_105028 by Paul_Barr, on Flickr
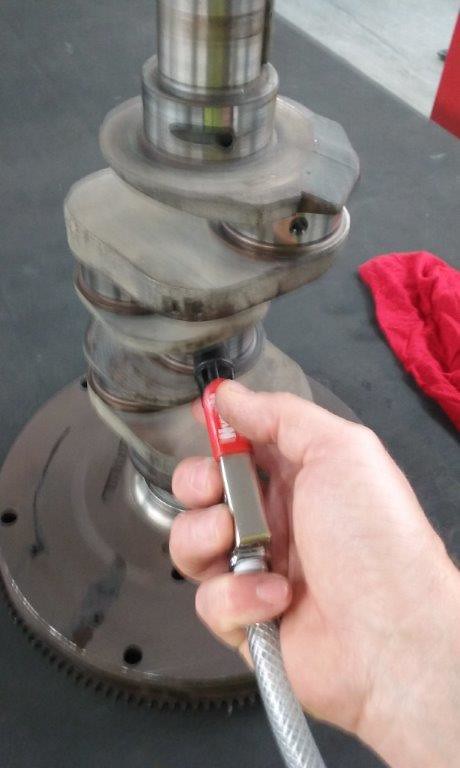 20160916_105513 by Paul_Barr, on Flickr
20160916_105028 by Paul_Barr, on Flickr20160916_105513 by Paul_Barr, on Flickr
Last edited by itchyfeet on 05 Jul 2017, 17:11, edited 1 time in total.
-
itchyfeet
- Registered user
- Posts: 12427
- Joined: 23 Jul 2007, 17:24
- 80-90 Mem No: 12733
- Location: South Hampshire
Re: WBXlog
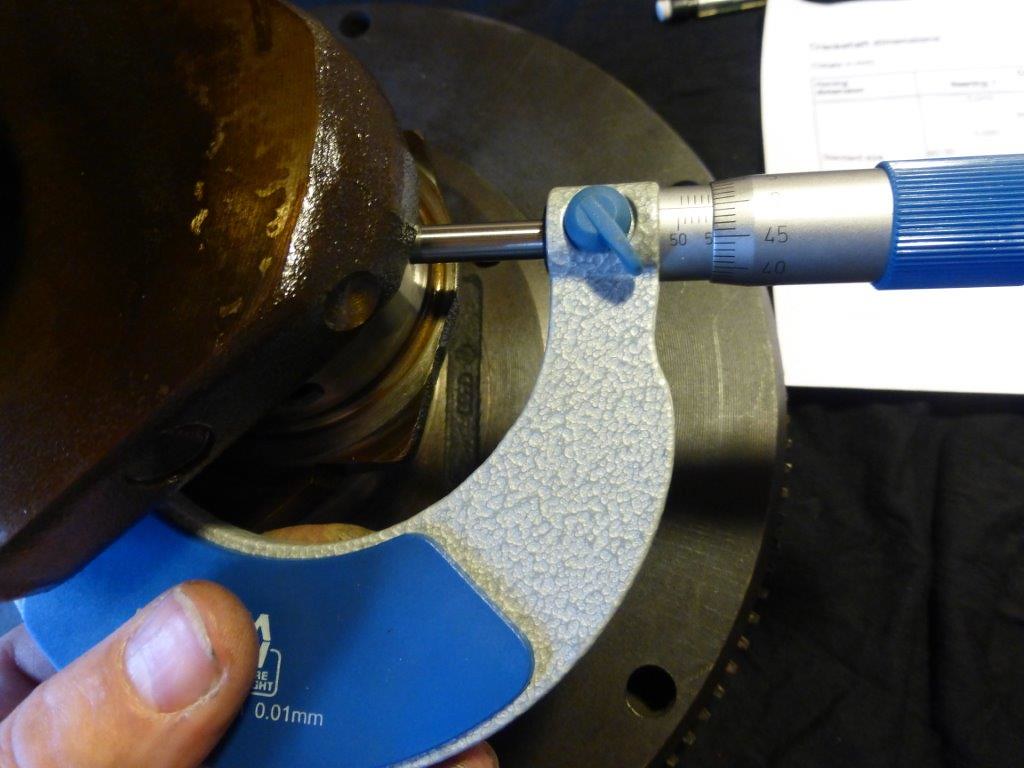
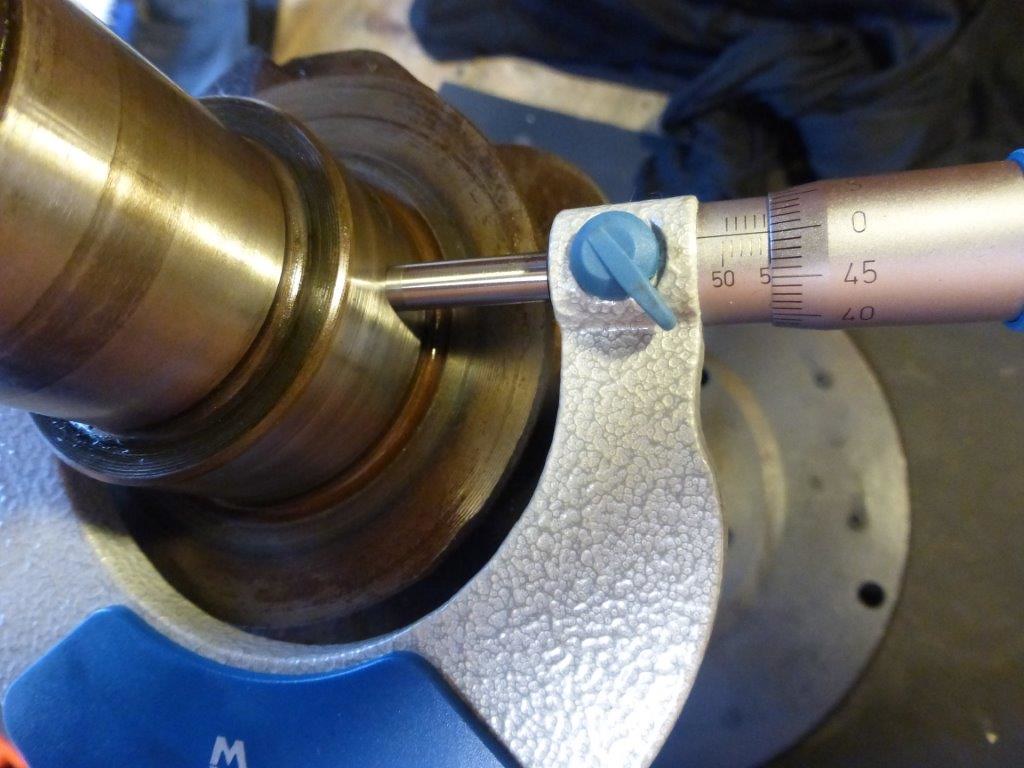
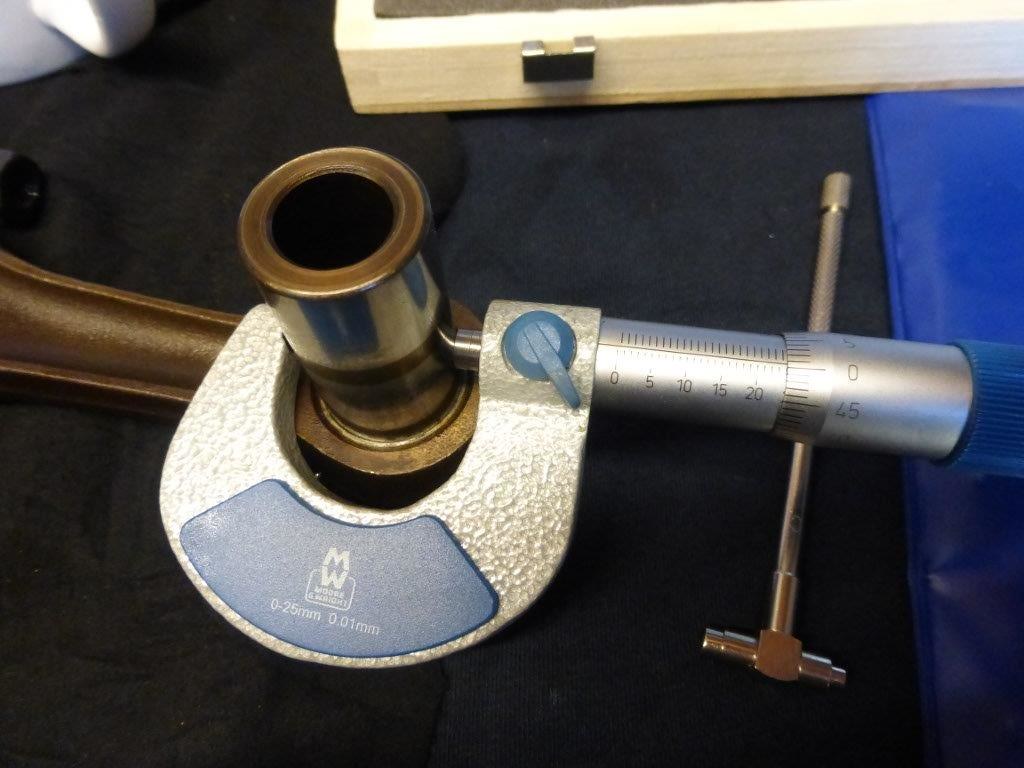
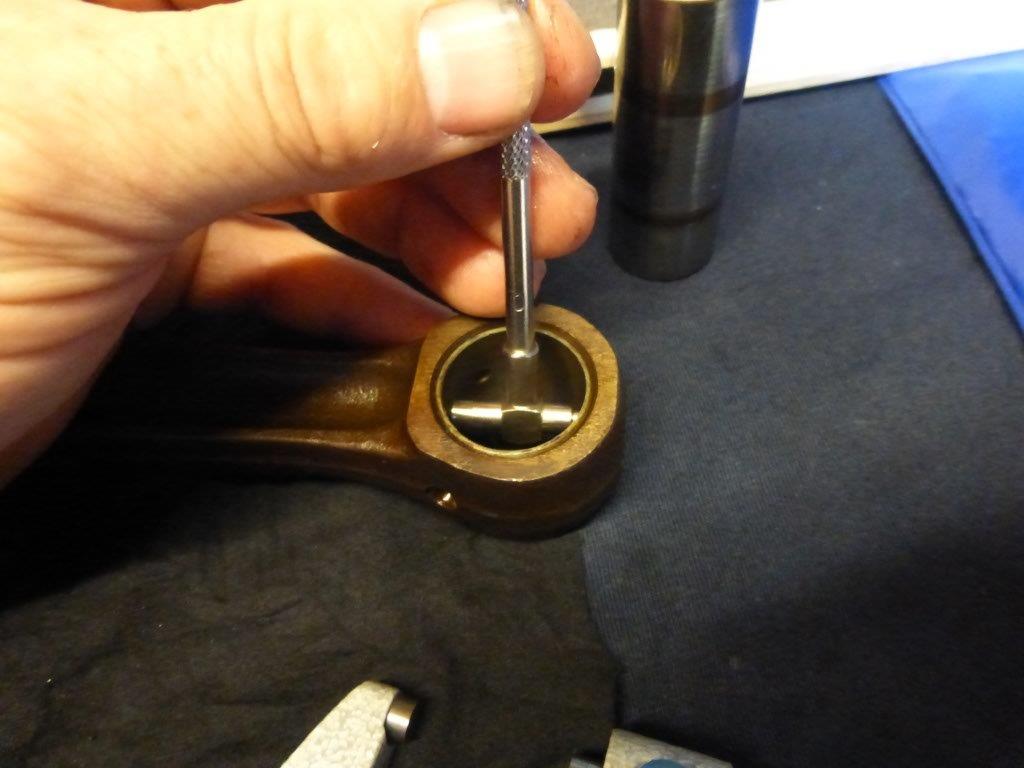
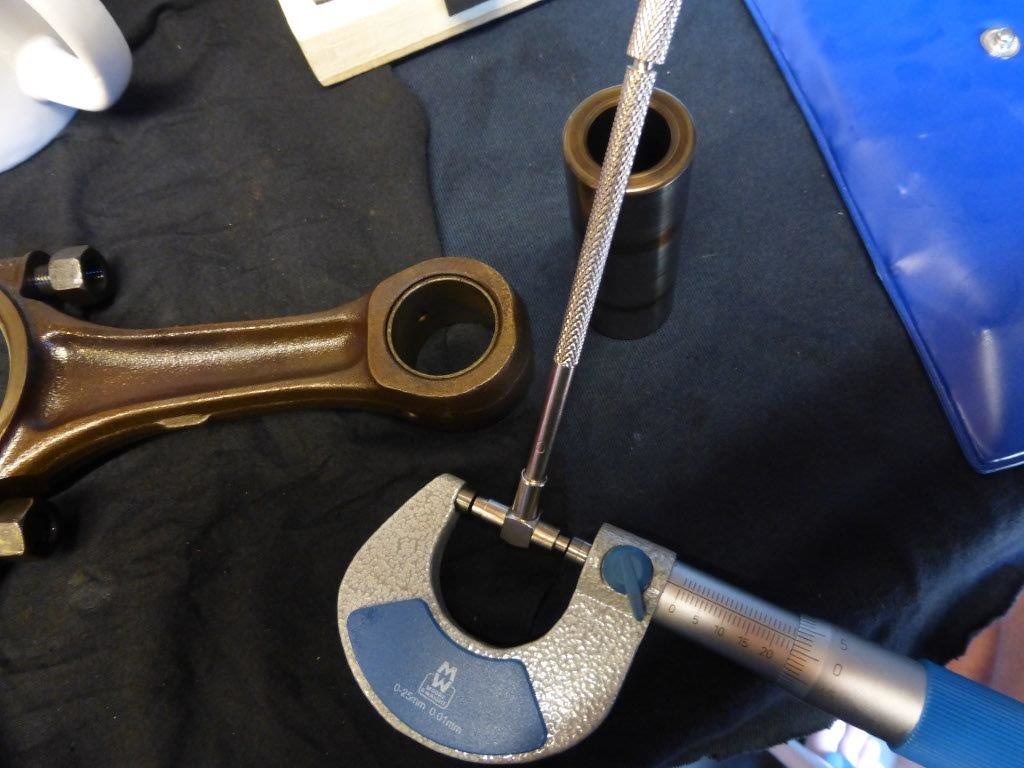
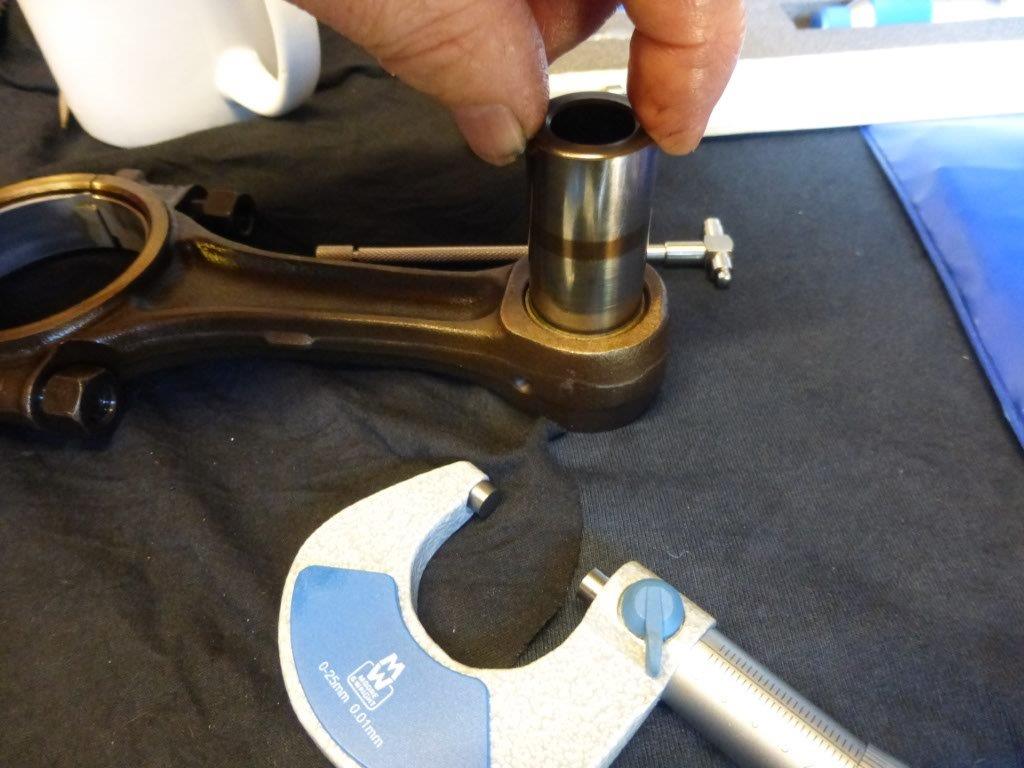
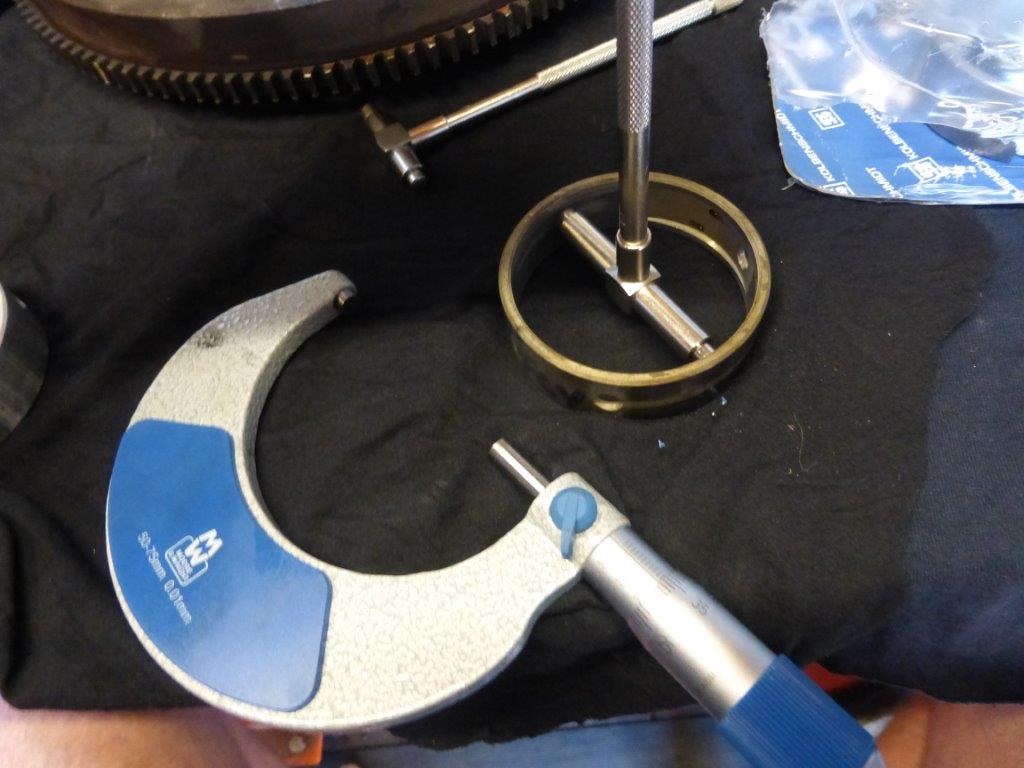
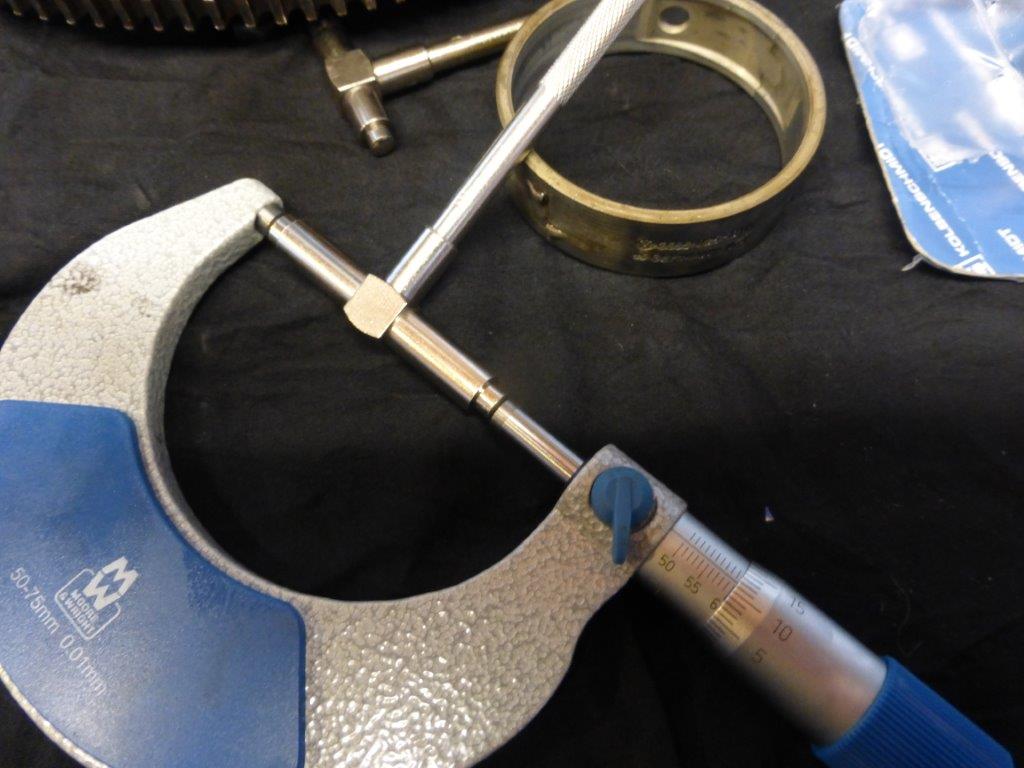
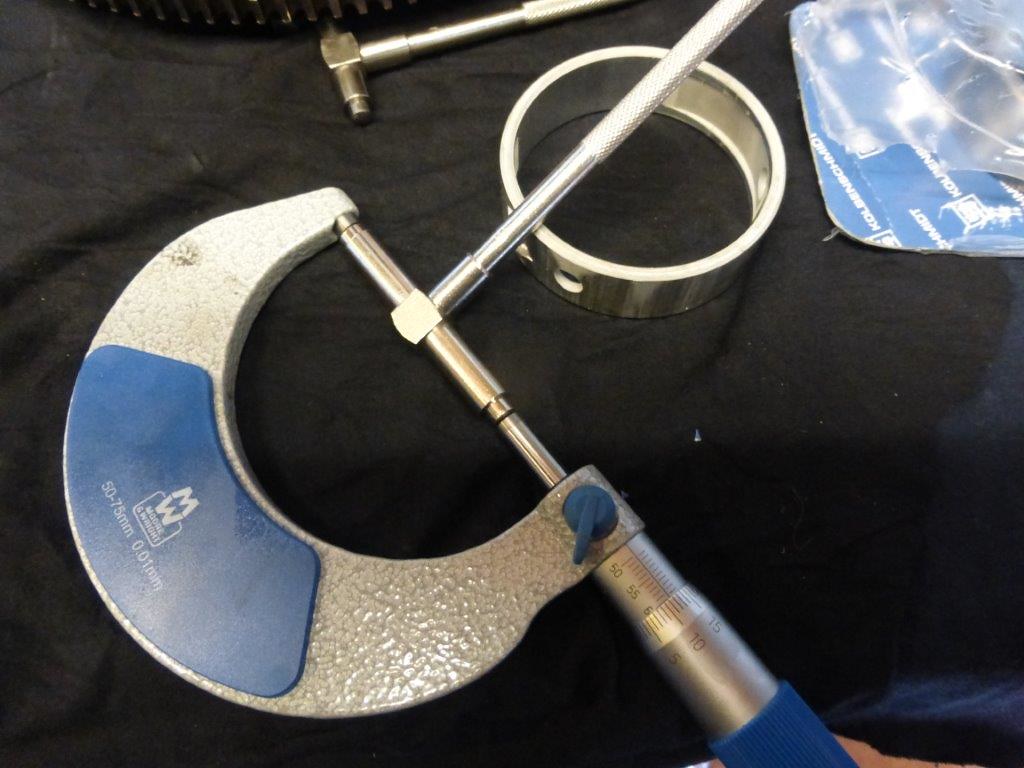
Measured up the Con rod little end bush with a telescopic bore gauge and measured Gudgeon pins.
I can't find anything in Bentley about tolerance for this but a post on the Samba says that for air cooled the spec is (.0004-.0008") or 0.01-0.02mm
http://www.thesamba.com/vw/forum/viewtopic.php?t=396794" onclick="window.open(this.href);return false;
interesting info here too.
http://www.thesamba.com/vw/forum/viewto ... c&start=20" onclick="window.open(this.href);return false;
So I have nearly 0.02mm in the axis of compression/power I can feel some movement in this axis, within limits but I have decided not to put these back, I'm going to treat it to a new set of rods and keep these for spares.
I have bought some semi finished bushes for £8 but a machine reamer is another 30 quid and I have never done it before so a job for another rebuild.
 P1050381 by Paul_Barr, on Flickr
 P1050383 by Paul_Barr, on Flickr
 P1050384 by Paul_Barr, on Flickr
 P1050385 by Paul_Barr, on Flickr
I can't find anything in Bentley about tolerance for this but a post on the Samba says that for air cooled the spec is (.0004-.0008") or 0.01-0.02mm
http://www.thesamba.com/vw/forum/viewtopic.php?t=396794" onclick="window.open(this.href);return false;
interesting info here too.
http://www.thesamba.com/vw/forum/viewto ... c&start=20" onclick="window.open(this.href);return false;
So I have nearly 0.02mm in the axis of compression/power I can feel some movement in this axis, within limits but I have decided not to put these back, I'm going to treat it to a new set of rods and keep these for spares.
I have bought some semi finished bushes for £8 but a machine reamer is another 30 quid and I have never done it before so a job for another rebuild.
P1050381 by Paul_Barr, on FlickrP1050383 by Paul_Barr, on FlickrP1050384 by Paul_Barr, on FlickrP1050385 by Paul_Barr, on Flickr
Last edited by itchyfeet on 05 Jul 2017, 17:13, edited 2 times in total.
-
itchyfeet
- Registered user
- Posts: 12427
- Joined: 23 Jul 2007, 17:24
- 80-90 Mem No: 12733
- Location: South Hampshire
Re: WBXlog
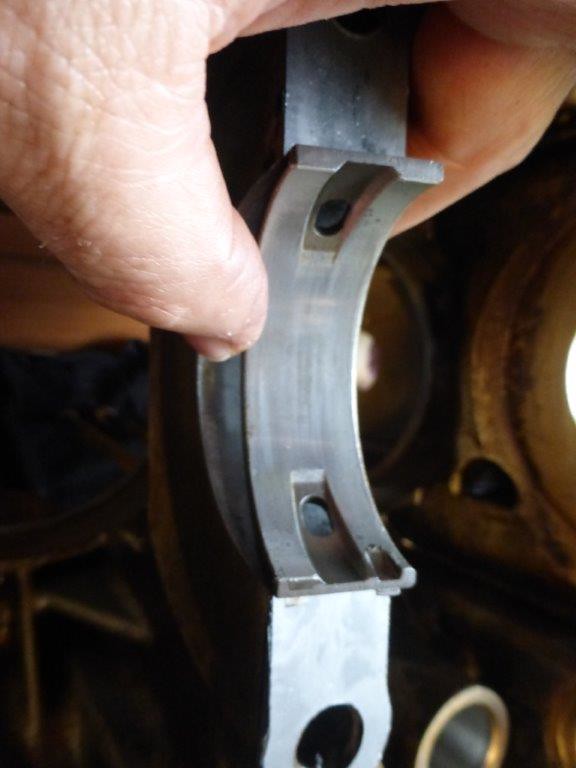
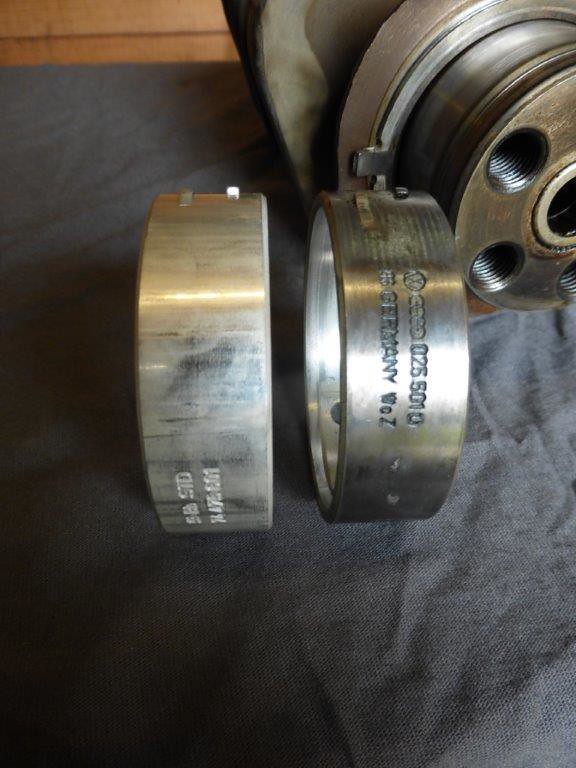
These are Kolbenschmidt 87 412 601 Main bearings from Brickwerk
I thought I would compare with the old bearings and there is no measureable wear on the inside, clearance from the crank is about 0.1mm on all, it surprised me to see this much.
I have read before that main bearings last very well.
 P1050373 by Paul_Barr, on Flickr
 P1050375 by Paul_Barr, on Flickr
 P1050376 by Paul_Barr, on Flickr
I thought I would compare with the old bearings and there is no measureable wear on the inside, clearance from the crank is about 0.1mm on all, it surprised me to see this much.
I have read before that main bearings last very well.
P1050373 by Paul_Barr, on FlickrP1050375 by Paul_Barr, on FlickrP1050376 by Paul_Barr, on Flickr
Last edited by itchyfeet on 05 Jul 2017, 17:15, edited 1 time in total.
-
itchyfeet
- Registered user
- Posts: 12427
- Joined: 23 Jul 2007, 17:24
- 80-90 Mem No: 12733
- Location: South Hampshire
Re: WBXlog
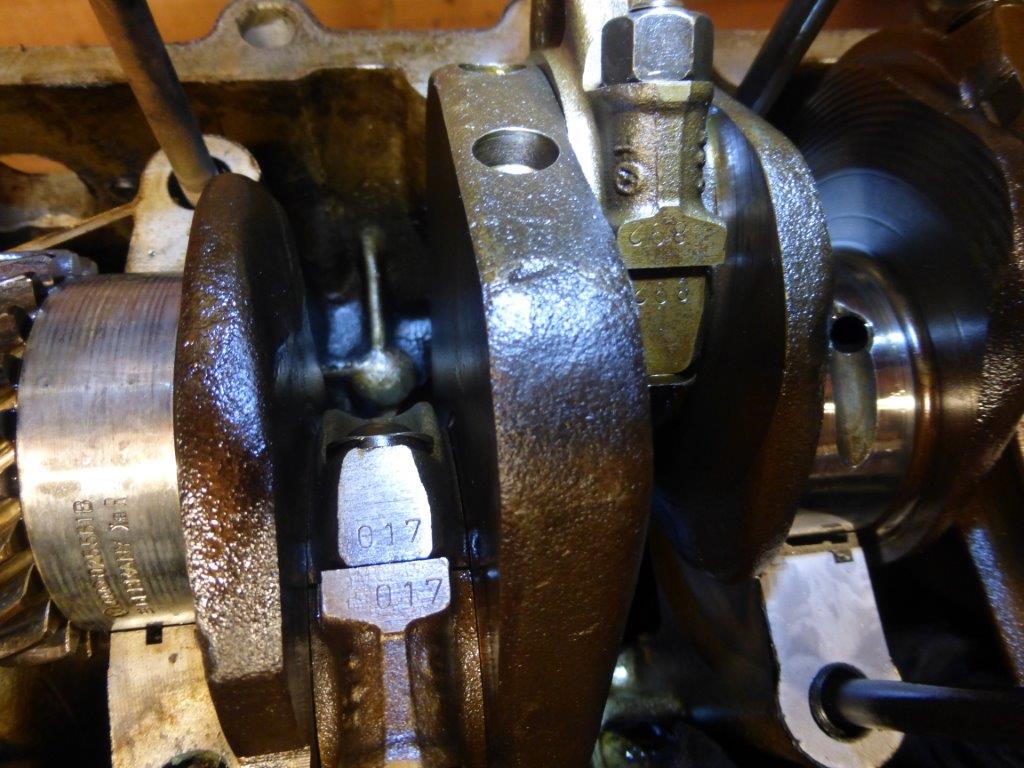
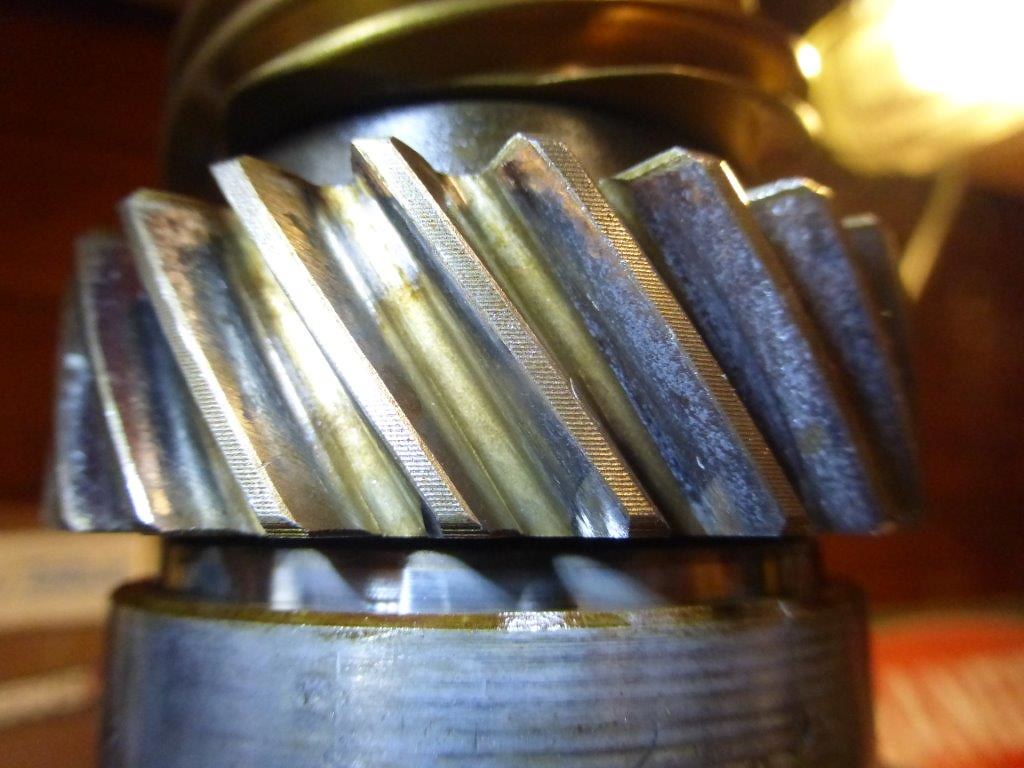
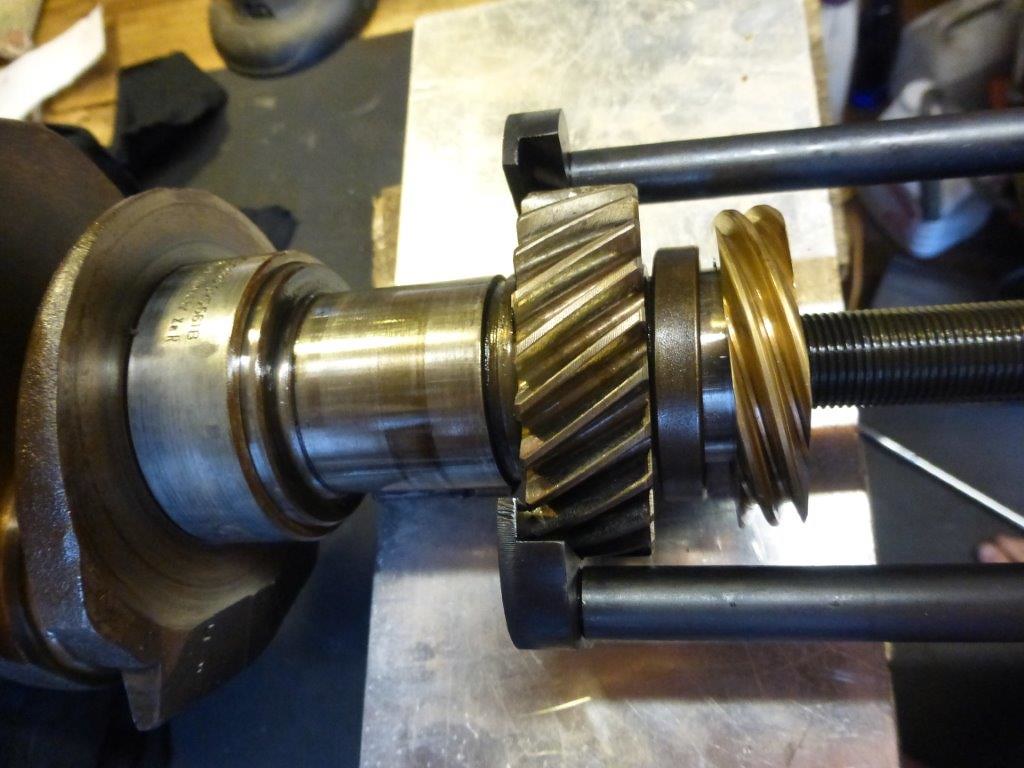
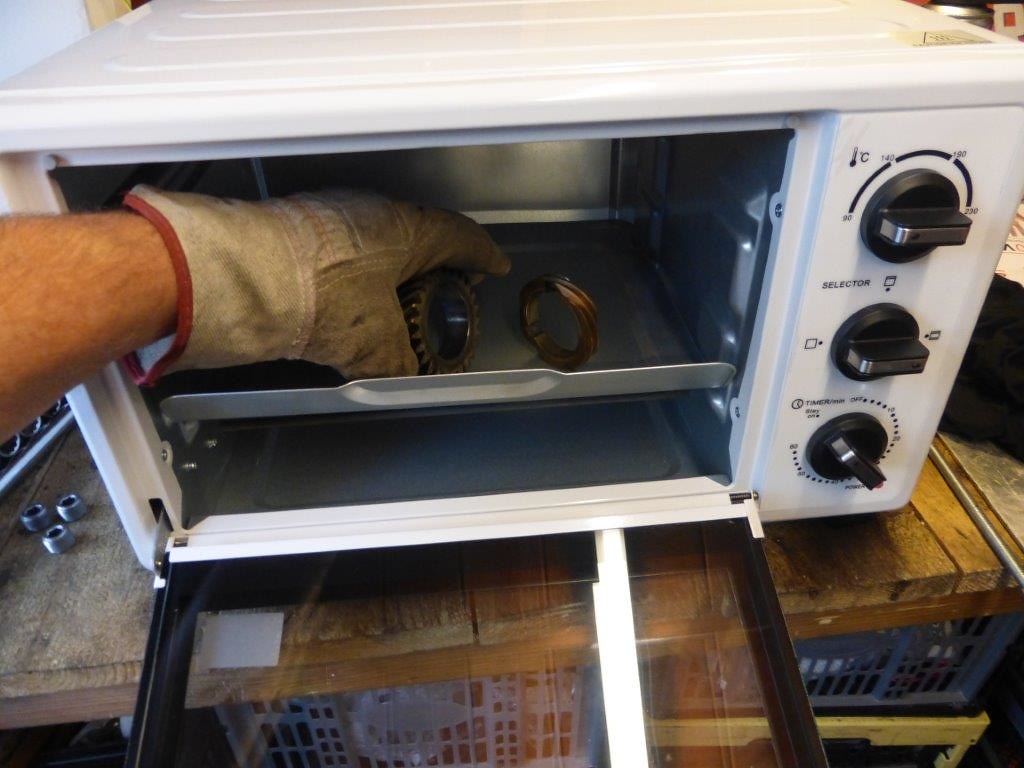
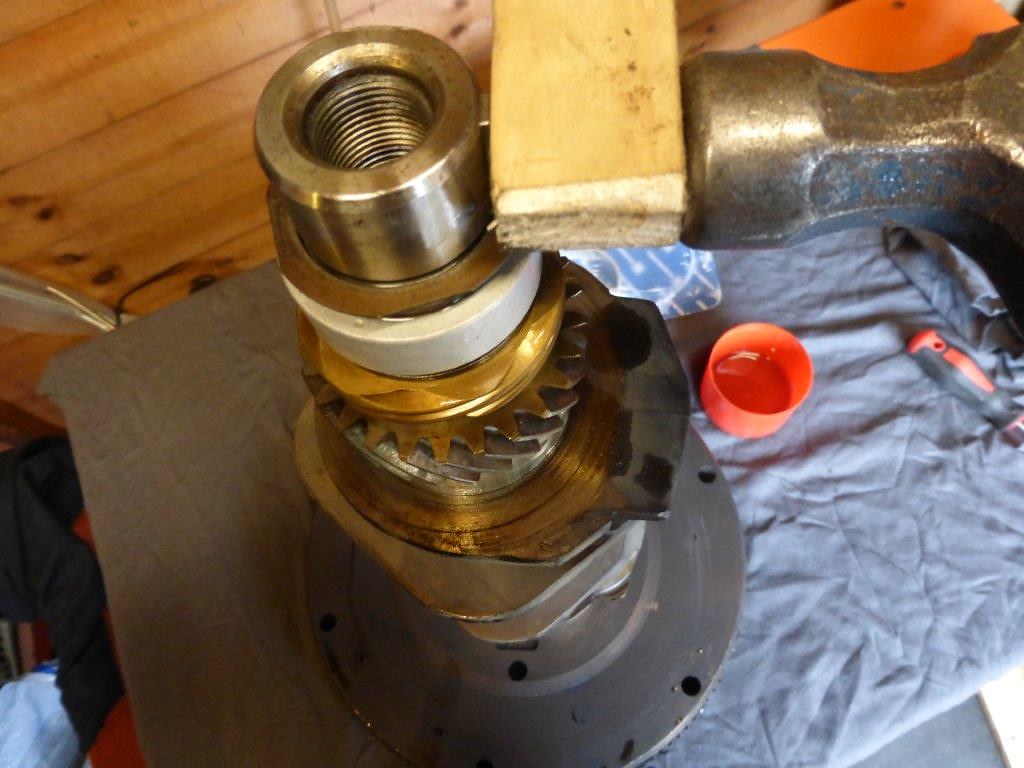
Next to reassemble cam gear and distributor drive gear, checked old bearings and the flywheel end markings I made, also checked back to the photos I took so I didn't get it wrong.
oiled bearing and fitted, also oiled shaft where gears are going.
I heated the gears in a small electric oven I bought for a test at work ( seeing what happens to some electronics at 130 degC!!) so I borrowed it to heat the gears, Gas oven would have done.
The tube to encourage them on needs to be 45mm inside to clear the woodruff key, this is a 42mm scaffold fitting I removed any sharp galv inside then cleaned it.
 P1050398 by Paul_Barr, on Flickr
first gear went on easy chamfer first
 P1050399 by Paul_Barr, on Flickr
then the spacer
 P1050400 by Paul_Barr, on Flickr
second gear just dropped on but seconds later it would not move
 P1050401 by Paul_Barr, on Flickr
circlip back on
 P1050402 by Paul_Barr, on Flickr
oiled bearing and fitted, also oiled shaft where gears are going.
I heated the gears in a small electric oven I bought for a test at work ( seeing what happens to some electronics at 130 degC!!) so I borrowed it to heat the gears, Gas oven would have done.
The tube to encourage them on needs to be 45mm inside to clear the woodruff key, this is a 42mm scaffold fitting I removed any sharp galv inside then cleaned it.
P1050398 by Paul_Barr, on Flickrfirst gear went on easy chamfer first
P1050399 by Paul_Barr, on Flickrthen the spacer
P1050400 by Paul_Barr, on Flickrsecond gear just dropped on but seconds later it would not move
P1050401 by Paul_Barr, on Flickrcirclip back on
P1050402 by Paul_Barr, on Flickr
Last edited by itchyfeet on 05 Jul 2017, 17:17, edited 1 time in total.
-
itchyfeet
- Registered user
- Posts: 12427
- Joined: 23 Jul 2007, 17:24
- 80-90 Mem No: 12733
- Location: South Hampshire
Re: WBXlog
Last edited by itchyfeet on 05 Jul 2017, 17:17, edited 1 time in total.
-
itchyfeet
- Registered user
- Posts: 12427
- Joined: 23 Jul 2007, 17:24
- 80-90 Mem No: 12733
- Location: South Hampshire
Re: WBXlog
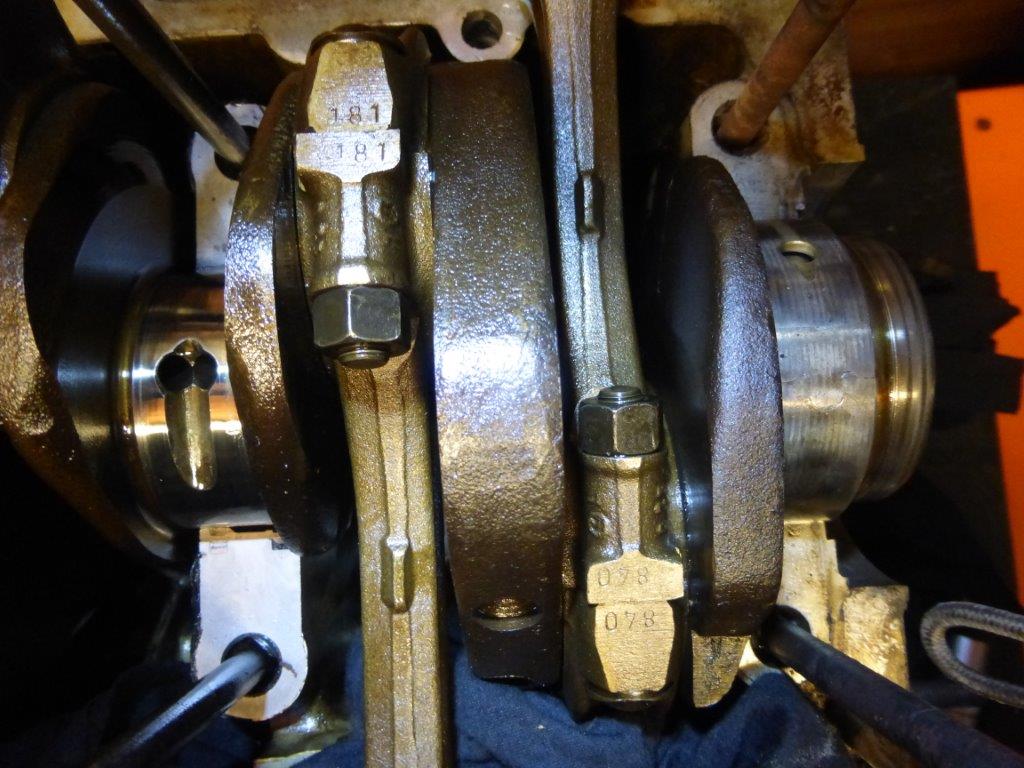
Finished off the crank this morning
Small bearing on, with oil, oil thrust washer and woodruff key on.
 P1050451 by Paul_Barr, on Flickr
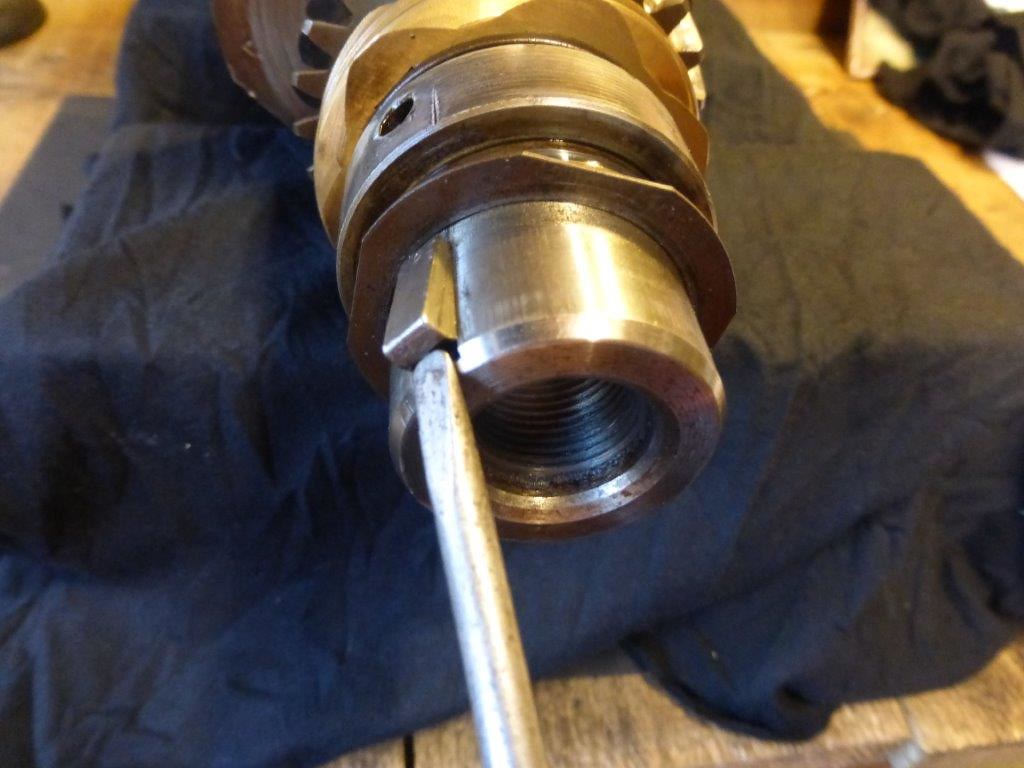
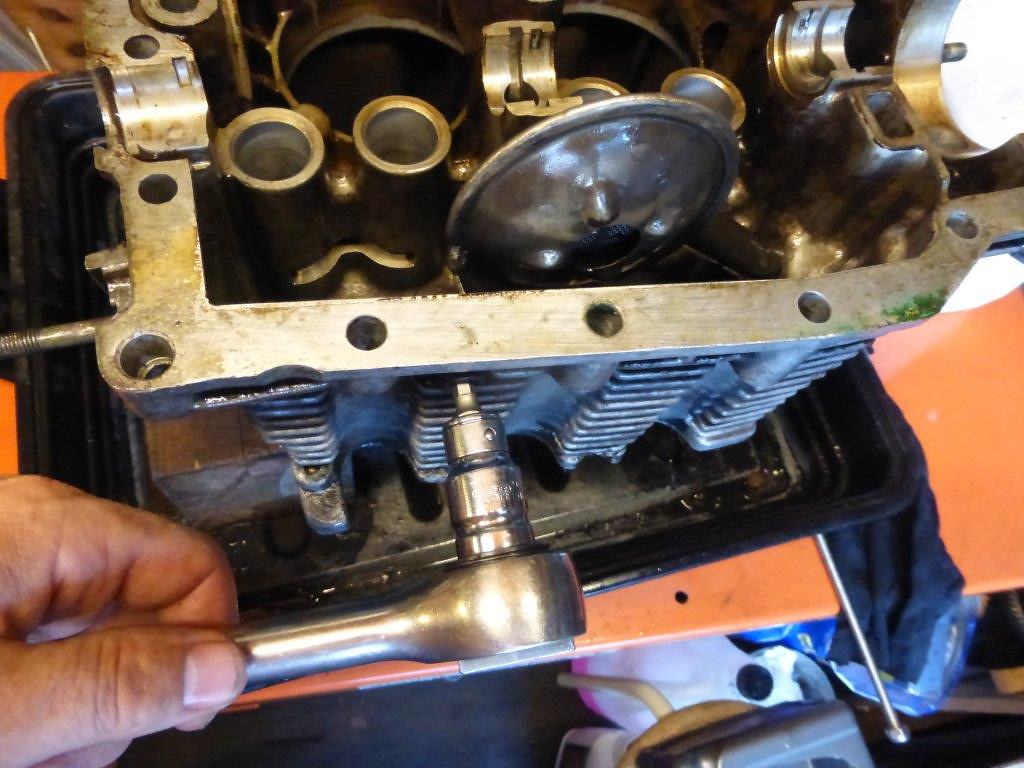
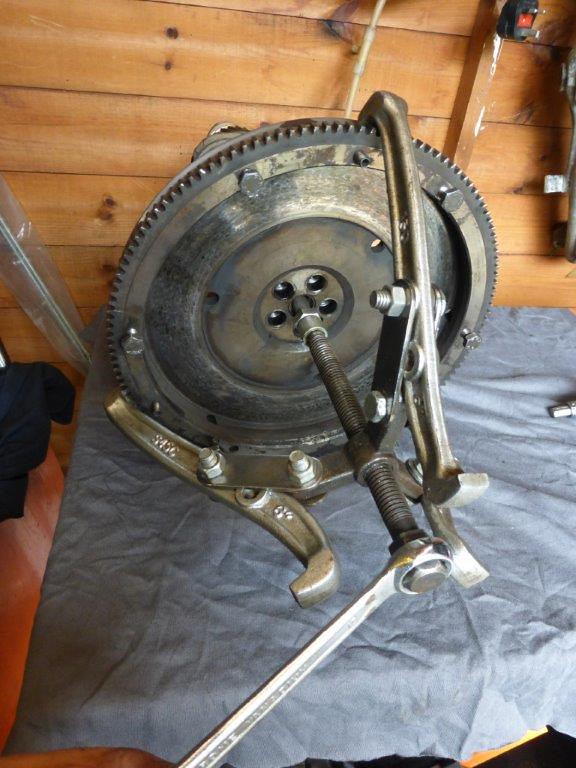
next just remove flywheel ( the sort of comment you get in Haynes)
easier said then done I used a puller with a bolt that has a small centre drilling to keep the puller located.
 P1050454 by Paul_Barr, on Flickr
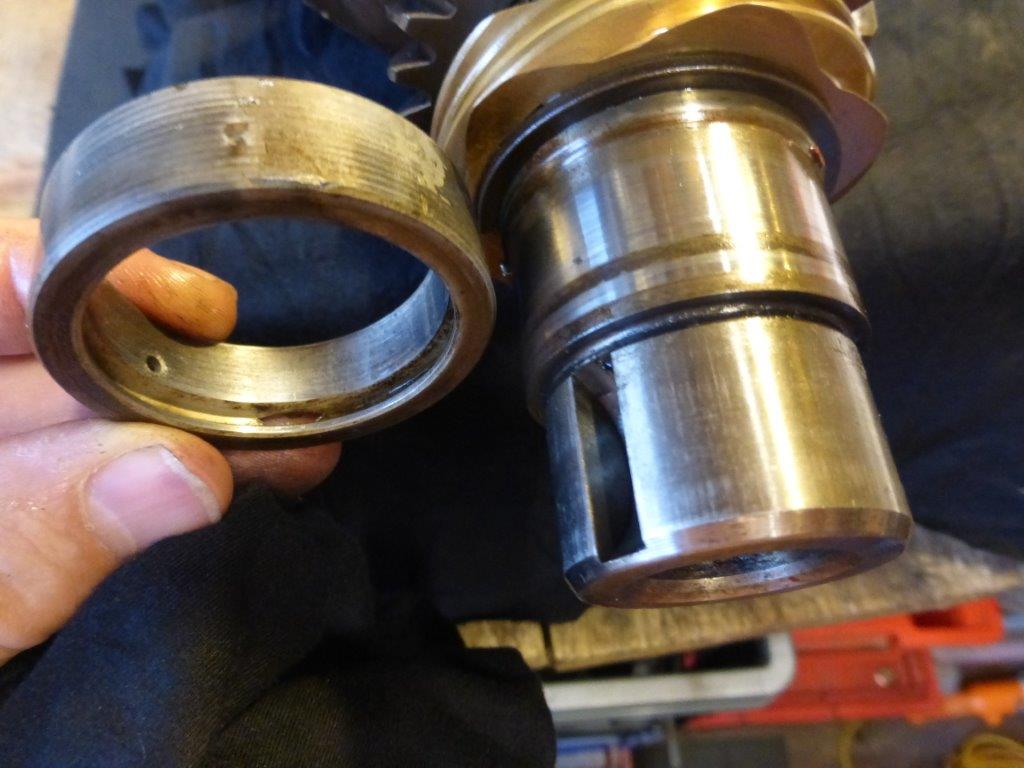
Flywheel end thrust washer on then bearing on with oil again, shows you can't rely on things like writing to determine the direction.
I'm not changing spigot bearing in end of crank ( for gearbox input shaft) because it's just a couple of years old.
 P1050457 by Paul_Barr, on Flickr
Small bearing on, with oil, oil thrust washer and woodruff key on.
P1050451 by Paul_Barr, on Flickrnext just remove flywheel ( the sort of comment you get in Haynes)
easier said then done I used a puller with a bolt that has a small centre drilling to keep the puller located.
P1050454 by Paul_Barr, on FlickrFlywheel end thrust washer on then bearing on with oil again, shows you can't rely on things like writing to determine the direction.
I'm not changing spigot bearing in end of crank ( for gearbox input shaft) because it's just a couple of years old.
P1050457 by Paul_Barr, on Flickr
Last edited by itchyfeet on 05 Jul 2017, 17:19, edited 1 time in total.
-
itchyfeet
- Registered user
- Posts: 12427
- Joined: 23 Jul 2007, 17:24
- 80-90 Mem No: 12733
- Location: South Hampshire
Re: WBXlog
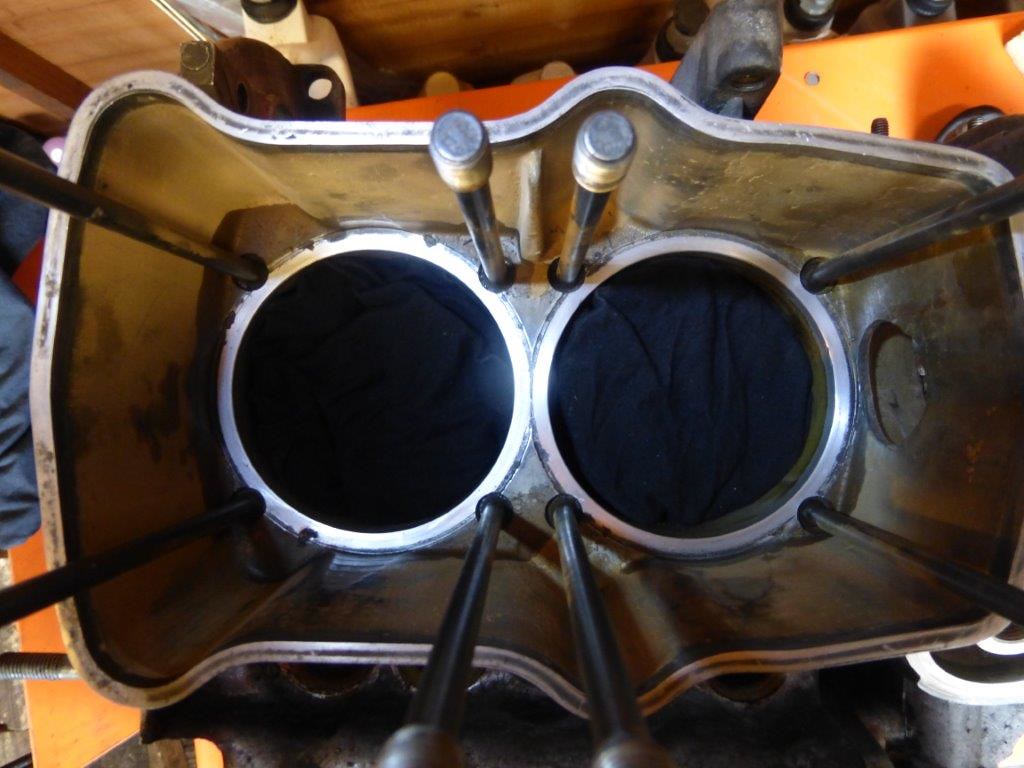
Next I finished off the case clean, it's boring so I wanted to break it up with assembling the crank.
You need a lot of clean rags to do this, don't be temped to keep reusing rags, you can buy cleaning rags by the kilo on ebay, 10Kg is around £15 delivered, these are often offcuts from the clothing industry.
The Barrel lower seal surfaces need cleaning, this took me nearly an hour a side, you could probably put it back with a quick clean and it would work but for sure the seals would not have a long life.
I used a piece of stiff plastic in the case ( to hold the rags in place) and then clean rags to stop anything going down, started with 600 wet and dry with paraffin, then finished off with 1200 wet and dry.
 P1050412 by Paul_Barr, on Flickr
 P1050414 by Paul_Barr, on Flickr
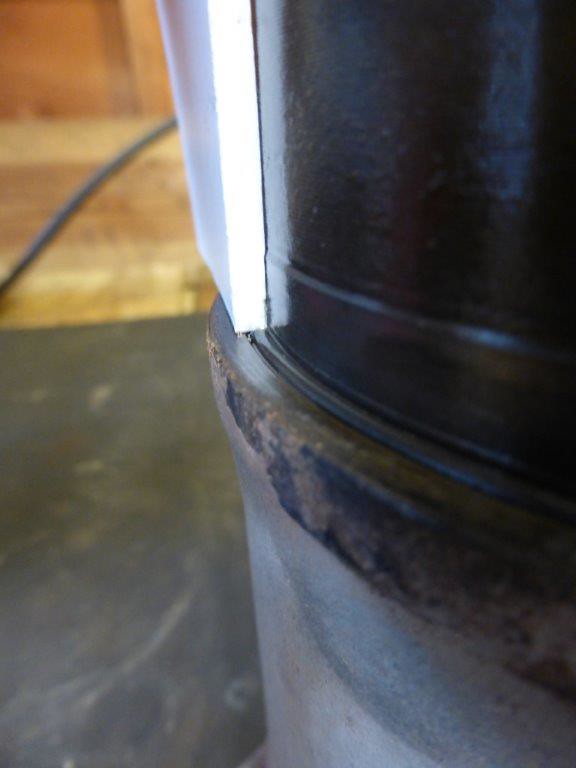
This looks like original casting flaws, there are a few on this barrel sealing surface, my guess is they were deemed acceptable because they don't come in any further that the machined holes.
Hard to measure so I used this plastic sheet, it's 3mm thick and shows the seal sits inside this flaw/damage
 P1050416 by Paul_Barr, on Flickr
 P1050417 by Paul_Barr, on Flickr
 P1050469 by Paul_Barr, on Flickr
finished
 P1050425 by Paul_Barr, on Flickr
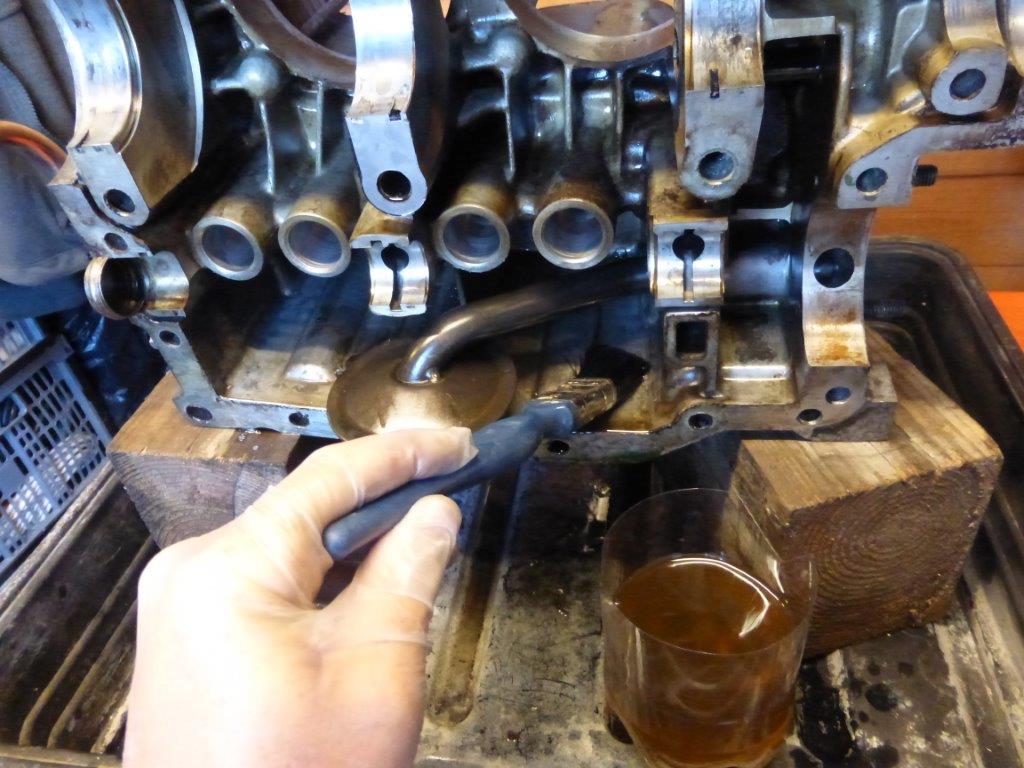
removed rags downwards and flushed out with carb cleaner
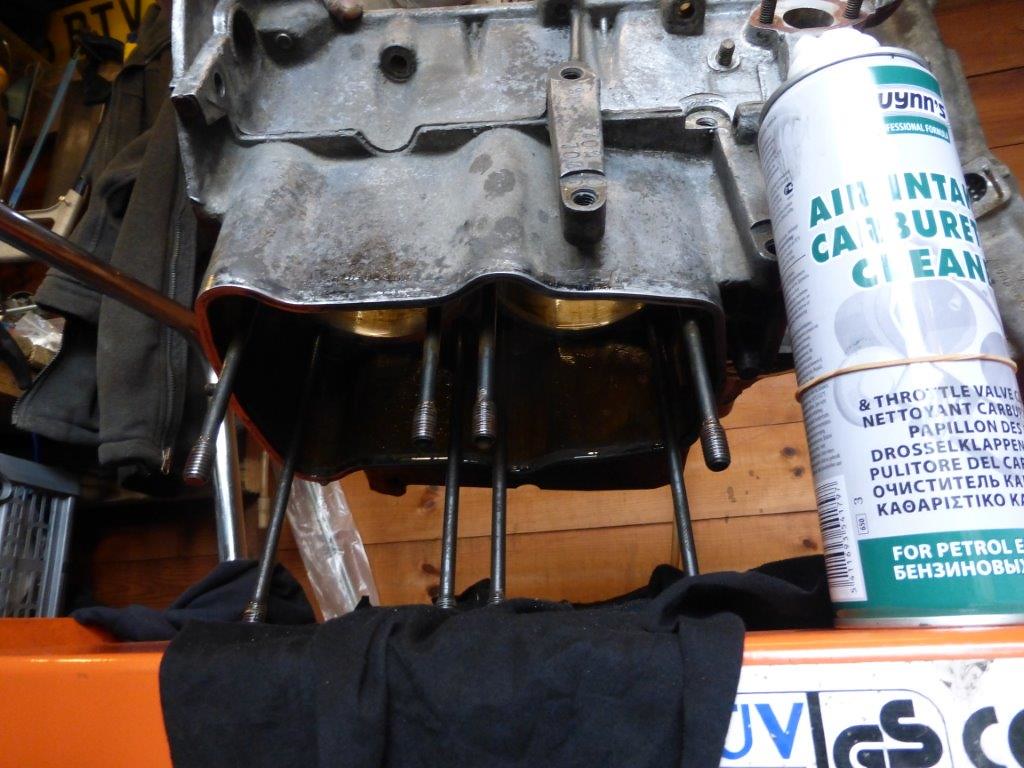 P1050427 by Paul_Barr, on Flickr
Also cleaned up the crankcase halves mating surfaces with 600 grit wet and dry and paraffin, rotating the case so any dribbles always flow out.
Studs were cleaned up by running nuts down, no wire brushes.
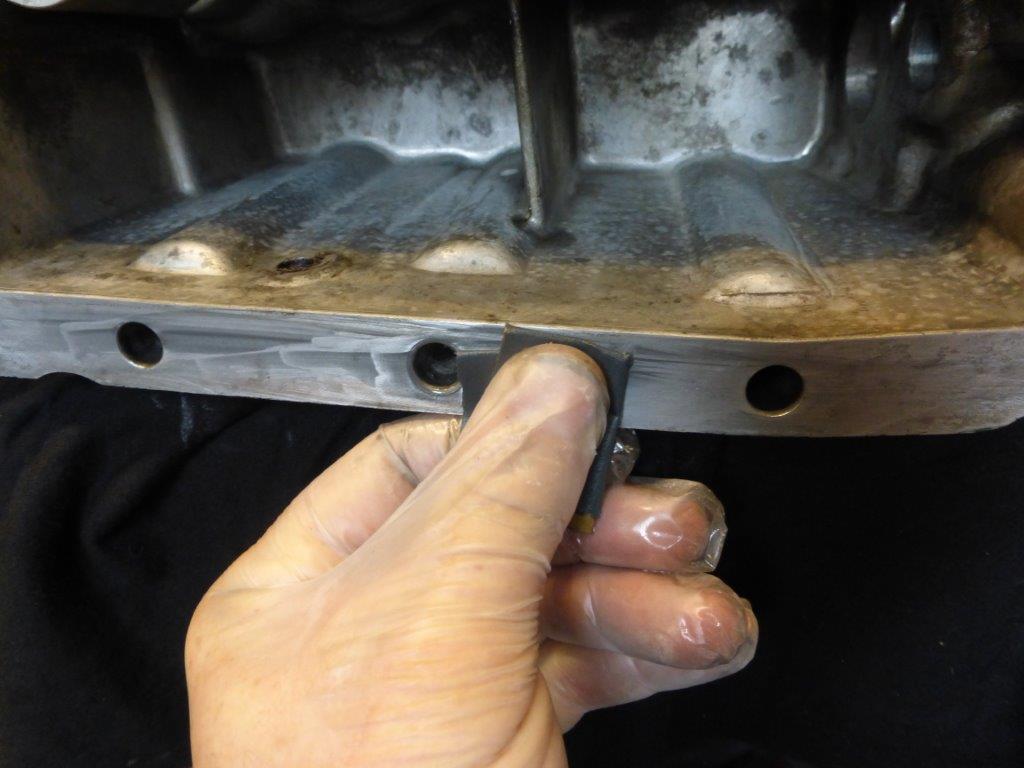 P1050430 by Paul_Barr, on Flickr
You need a lot of clean rags to do this, don't be temped to keep reusing rags, you can buy cleaning rags by the kilo on ebay, 10Kg is around £15 delivered, these are often offcuts from the clothing industry.
The Barrel lower seal surfaces need cleaning, this took me nearly an hour a side, you could probably put it back with a quick clean and it would work but for sure the seals would not have a long life.
I used a piece of stiff plastic in the case ( to hold the rags in place) and then clean rags to stop anything going down, started with 600 wet and dry with paraffin, then finished off with 1200 wet and dry.
P1050412 by Paul_Barr, on FlickrP1050414 by Paul_Barr, on FlickrThis looks like original casting flaws, there are a few on this barrel sealing surface, my guess is they were deemed acceptable because they don't come in any further that the machined holes.
Hard to measure so I used this plastic sheet, it's 3mm thick and shows the seal sits inside this flaw/damage
P1050416 by Paul_Barr, on FlickrP1050417 by Paul_Barr, on FlickrP1050469 by Paul_Barr, on Flickrfinished
P1050425 by Paul_Barr, on Flickrremoved rags downwards and flushed out with carb cleaner
P1050427 by Paul_Barr, on FlickrAlso cleaned up the crankcase halves mating surfaces with 600 grit wet and dry and paraffin, rotating the case so any dribbles always flow out.
Studs were cleaned up by running nuts down, no wire brushes.
P1050430 by Paul_Barr, on Flickr
Last edited by itchyfeet on 05 Jul 2017, 17:23, edited 1 time in total.