Page 23 of 30
Re: Replacing the dashboard plastic PCB
Posted: 25 Sep 2018, 23:55
by JuniorT25
Hi everyone don't know if it's a stupid question is there a way of checking the dash gauges to see if they work before plugging chriss PCB kit in
Re: Replacing the dashboard plastic PCB
Posted: 05 Oct 2018, 13:57
by bigbadbob76
In a word YES,

Have you assembled Chris's board and fitted it to the binnacle?
If so you need to supply +12V to the +ve terminal of the board, -ve to the ground terminal and then connect a 100ohm resistor between the coolant temp sensor terminal and ground.
This will test your temp gauge, it should put the needle somewhere near the LED on the gauge.
Then move the 100 ohm resistor to the between the fuel level sender terminal and ground.
This should put your fuel gauge somewhere around the 1/4 to 1/2 full mark.
If you havn't fitted the board yet, you need to supply the positive side of the gauge with +10V (not12V) then connect the 100 ohm resistor between the sender side of the gauge and -ve of your 10v supply.
Chris's board has a 10v regulator on it which makes it easier to test the gauges after fitting the board.
Re: Replacing the dashboard plastic PCB
Posted: 27 Oct 2018, 16:51
by nickelo
Finish!!


Painted in Shiny black, carbon fiber vinyl, polished crystals, led illumination...
Thanks

Re: Replacing the dashboard plastic PCB
Posted: 18 Nov 2018, 16:25
by nickelo
bigbadbob76 wrote:In a word YES,
Have you assembled Chris's board and fitted it to the binnacle?
If so you need to supply +12V to the +ve terminal of the board, -ve to the ground terminal and then connect a 100ohm resistor between the coolant temp sensor terminal and ground.
This will test your temp gauge, it should put the needle somewhere near the LED on the gauge.
Then move the 100 ohm resistor to the between the fuel level sender terminal and ground.
This should put your fuel gauge somewhere around the 1/4 to 1/2 full mark.
If you havn't fitted the board yet, you need to supply the positive side of the gauge with +10V (not12V) then connect the 100 ohm resistor between the sender side of the gauge and -ve of your 10v supply.
Chris's board has a 10v regulator on it which makes it easier to test the gauges after fitting the board.
My temp gauge, put needle over the les, 3/4 the engine its on normal temperture, if put one potentiometer for down gauge?
https://www.gowesty.com/product/electri ... ation-kit-" onclick="window.open(this.href);return false;
Wats component need from build one? 20 dollars its expensive... What value its potentiometer?
Thanks.
Re: Replacing the dashboard plastic PCB
Posted: 21 Nov 2018, 15:27
by bigbadbob76
nickelo wrote: if put one potentiometer for down gauge? What value its potentiometer?
100 ohm 2W should do it.
Your dash looks good.

Re: Replacing the dashboard plastic PCB
Posted: 21 Nov 2018, 15:40
by nickelo
bigbadbob76 wrote:nickelo wrote: if put one potentiometer for down gauge? What value its potentiometer?
100 ohm 2W should do it.
Your dash looks good.
Thanks for all!!
Re: Replacing the dashboard plastic PCB
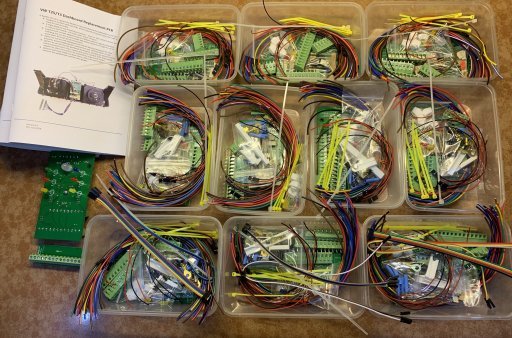
Posted: 30 Nov 2018, 15:14
by pjlevs
CJH wrote:
I showed this photo to my son, and he asked me if I'm planning to upscale production. I told him I HAVE upscaled production - 2 kits in one evening! And now I have stock on the shelves.
Instructions nearly done - tomorrow evening's job.
Hi there, do you have any of these kits available for sale still? I'd be very interested in one if so!
Re: Replacing the dashboard plastic PCB
Posted: 01 Dec 2018, 09:07
by CJH
Yep - still doing them. Work is currently leaving me with little time to work on them other than at the weekends, so apologies to anyone still waiting - should catch up this weekend.
Re: Replacing the dashboard plastic PCB
Posted: 03 Dec 2018, 23:06
by CJH
I made up enough kits at the weekend to clear the backlog and put a couple on the shelf. Unfortunately, as I was finishing them off this evening I ran out of the Dupont ribbon cable assemblies for the DOPS/clock/tacho connections, so I was only able to fully complete three of the kits - it'll take a few days to get more of those ribbon cable assemblies in. And it cleaned me out of quite a few components that I've been ordering from China, so it'll be a couple of weeks before I can make up any new kits. I'll get another batch of the PCBs at the same time (to share the postage and duty), as well as some more of the 'low fuel' boards and their components.
Re: Replacing the dashboard plastic PCB
Posted: 04 Dec 2018, 17:57
by Cobra88
Too many Takeaways Chris ???

Re: Replacing the dashboard plastic PCB
Posted: 04 Dec 2018, 18:43
by CJH
Cobra88 wrote:Too many Takeaways Chris ???
You're not making any sense - how can you have "too many takeaways"

I use those trays for posting out the built-to-order kits, to protect the LEDs. I'll run out eventually though, as my previous curry place has closed, and the one I use now uses foil tubs.

Re: Replacing the dashboard plastic PCB
Posted: 05 Dec 2018, 12:24
by garyd
Hi Chris,
I've not got around to building my kit yet. Hope to do it over Christmas when my (electrical engineer) son is at home with his tools (small soldering iron, etc)
I wondered whether there has been any updates of the instruction booklet since it was first posted online?
thanks
Gary
Re: Replacing the dashboard plastic PCB
Posted: 05 Dec 2018, 13:32
by CJH
garyd wrote:
I wondered whether there has been any updates of the instruction booklet since it was first posted online?
Not yet -
Version 0.4 is still the most up-to-date version that I have. But it does need some additions (mostly around the DOPS option) and some corrections as spotted by various kind people. I'll try and get a new version out in time for it to be useful to you.
Re: Replacing the dashboard plastic PCB
Posted: 06 Dec 2018, 21:39
by 3cylinders
How do I go about buying one of your kits ?
1.9 DG, 1991
Re: Replacing the dashboard plastic PCB
Posted: 06 Dec 2018, 22:17
by CJH
3cylinders wrote:How do I go about buying one of your kits ?
1.9 DG, 1991
PM sent.

