Replacing the dashboard plastic PCB
Moderators: User administrators, Moderators
-
AngeloEvs

- Registered user
- Posts: 1345
- Joined: 22 Nov 2007, 19:22
- 80-90 Mem No: 4709
- Location: Upwell, Norfolk
Re: Replacing the dashboard plastic PCB
DOPS conx pitch spacing is 4mm. 32mm total from first pinto last pin........
1987 DG Karisma LPG with remodelled interior

Re: Replacing the dashboard plastic PCB
AngeloEvs wrote:DOPS conx pitch spacing is 4mm. 32mm total from first pinto last pin........
Marvellous, thank you - I'll see what I can find.
"I'm a man of means, by no means....King of the Road!"
1983 Viking Xplorer, 2.1DJ
1983 Viking Xplorer, 2.1DJ
Re: Replacing the dashboard plastic PCB
Wait - is that right? Is that 4mm the pitch, or the gap? Is the 32mm centre-to-centre?
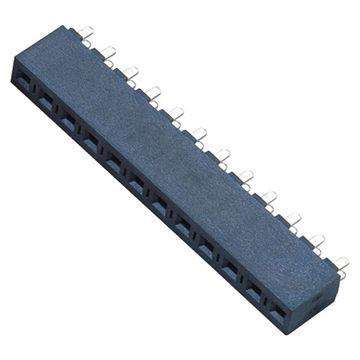
Based on this image.....

... I see pins 1 and 2 separated from pins 3,4,5 and 6. If the pitch of 1 and 2 is 4mm, the same as 3-to-4, 4-to-5, and 5-6, that's 16mm of gap. That would leave 16mm between 2 and 3, and it doesn't look that big a gap - it looks more like the same gap as 3-to-6.
If the overall spread is 32mm, and if the gap from 2-to-3 is the same as the gap from 3-to-6, then that would make the unit pitch equal to ~4.5mm.
"I'm a man of means, by no means....King of the Road!"
1983 Viking Xplorer, 2.1DJ
1983 Viking Xplorer, 2.1DJ
-
AngeloEvs
- Registered user
- Posts: 1345
- Joined: 22 Nov 2007, 19:22
- 80-90 Mem No: 4709
- Location: Upwell, Norfolk
Re: Replacing the dashboard plastic PCB
the DOPs connector has 9 slots each 4mm apart but the DOPs board only has 8 pins. The first connector on the block itself is a dummy to match the width of the slot on the speedo housing which is around 35mm length. Probably designed like this so that the block fills the slot and lines up with the DOPs board pins. then you have 8 actual connection pins, 4mm apart. so the membrane connector block is ......Dummy, 1,2 space space 5, 6, 7, 8 each 4mm apart
1987 DG Karisma LPG with remodelled interior
Re: Replacing the dashboard plastic PCB
Got it, thank you, that makes much more sense. Will have a search for 9-way x 4mm sockets this evening.
"I'm a man of means, by no means....King of the Road!"
1983 Viking Xplorer, 2.1DJ
1983 Viking Xplorer, 2.1DJ
Re: Replacing the dashboard plastic PCB
Struggling to find 4mm pitch sockets, but 2mm pitch is fairly common, and should work.
See this for example. Could you check that the 2.4mm socket width would fit the slot in the back of the speedo housing? Would the 4.3mm height of that socket be long enough to engage with the pins on the DOP board?

If it looks suitable, then I'll probably add a little PCB to the order to take an 15-pin section of that 2mm header (or perhaps a 7-pin and 3-pin section, to make the orientation obvious), and lead the necessary pins out to screw-down terminals, or perhaps to a more conventional ribbon connector for linking to the LED/connector board.
See this for example. Could you check that the 2.4mm socket width would fit the slot in the back of the speedo housing? Would the 4.3mm height of that socket be long enough to engage with the pins on the DOP board?
If it looks suitable, then I'll probably add a little PCB to the order to take an 15-pin section of that 2mm header (or perhaps a 7-pin and 3-pin section, to make the orientation obvious), and lead the necessary pins out to screw-down terminals, or perhaps to a more conventional ribbon connector for linking to the LED/connector board.
"I'm a man of means, by no means....King of the Road!"
1983 Viking Xplorer, 2.1DJ
1983 Viking Xplorer, 2.1DJ
-
AngeloEvs
- Registered user
- Posts: 1345
- Joined: 22 Nov 2007, 19:22
- 80-90 Mem No: 4709
- Location: Upwell, Norfolk
Re: Replacing the dashboard plastic PCB
The VW conx is 10mm deep by 4mm thickness, my gut feeling is that one is too small but the only way you can really establish the suitability is to try one.
A small separate PCB for the DOPs is how I did mine.
A small separate PCB for the DOPs is how I did mine.
1987 DG Karisma LPG with remodelled interior
-
CovKid

- Trader
- Posts: 8409
- Joined: 30 Apr 2006, 13:19
- 80-90 Mem No: 3529
- Location: Ralph - Coventry (Retired)
- Contact:
Re: Replacing the dashboard plastic PCB
Plus mounting an extra board only needs a dab of hot glue to hold it.
Roller paint your camper at home: http://roller.epizy.com/55554/" onclick="window.open(this.href);return false; for MP4 download.
-
AngeloEvs
- Registered user
- Posts: 1345
- Joined: 22 Nov 2007, 19:22
- 80-90 Mem No: 4709
- Location: Upwell, Norfolk
Re: Replacing the dashboard plastic PCB
....the VW connector is a really good tight fit and requires no additional support but a 3rd party alternative...... 
I just listed a spare one I have, with dashpod, in the club 'for sale' section with a Link to EBAY, you can see how I do my 'plug n play' LED panel lights in the listing
I just listed a spare one I have, with dashpod, in the club 'for sale' section with a Link to EBAY, you can see how I do my 'plug n play' LED panel lights in the listing
1987 DG Karisma LPG with remodelled interior
Re: Replacing the dashboard plastic PCB
I think the short height of that 2mm socket is standard for that pitch. I've looked at as many images and videos as I can find, and I *think* the pins reach far enough towards the speedo slot that the 2mm socket would work. But I've realised that 4mm was the wrong search term - 3.96mm seems to be a fairly standard size, and being a wider pitch the sockets are generally taller too.
This one for instance looks ideal.
Finding them for retail sale is a bit tricky though. I've put some feelers out. It would be handy to know the width of the slot in the back of the speedo. Is the standard 4mm plug a tight fit because the slot is exactly 4mm too, or is it the pin friction perhaps?
This one for instance looks ideal.
Finding them for retail sale is a bit tricky though. I've put some feelers out. It would be handy to know the width of the slot in the back of the speedo. Is the standard 4mm plug a tight fit because the slot is exactly 4mm too, or is it the pin friction perhaps?
Last edited by CJH on 01 Jun 2018, 18:43, edited 1 time in total.
"I'm a man of means, by no means....King of the Road!"
1983 Viking Xplorer, 2.1DJ
1983 Viking Xplorer, 2.1DJ
Re: Replacing the dashboard plastic PCB
AngeloEvs wrote: I just listed a spare one I have, with dashpod, in the club 'for sale' section with a Link to EBAY, you can see how I do my 'plug n play' LED panel lights in the listing
That's a really neat solution. And a bargain indeed - some would ask that for the bare dashpod.
"I'm a man of means, by no means....King of the Road!"
1983 Viking Xplorer, 2.1DJ
1983 Viking Xplorer, 2.1DJ
Re: Replacing the dashboard plastic PCB
On reflection, I wonder if this is a better solution than a bespoke PCB with a hard-to-source socket.


"I'm a man of means, by no means....King of the Road!"
1983 Viking Xplorer, 2.1DJ
1983 Viking Xplorer, 2.1DJ
-
AngeloEvs
- Registered user
- Posts: 1345
- Joined: 22 Nov 2007, 19:22
- 80-90 Mem No: 4709
- Location: Upwell, Norfolk
Re: Replacing the dashboard plastic PCB
Worth evaluating. How do the other commercially available repair kits connect to the DOP's board?
1987 DG Karisma LPG with remodelled interior

Re: Replacing the dashboard plastic PCB
Hi Angelo
Any reason why i cant reply in your pcb for sale post ?
Rick
Any reason why i cant reply in your pcb for sale post ?
Rick
____________________________________________
84 CaravelleGL 1.9 DG WBX Bronze Beige Metallic auto
84 CaravelleGL 1.9 DG WBX Bronze Beige Metallic auto

Re: Replacing the dashboard plastic PCB
You cant reply to posts in the for sale section.You will have to PM the seller.
2.1 LPG/Petrol Auto Caravelle
"The difference between genius and stupidity is that genius has its limits"
"The difference between genius and stupidity is that genius has its limits"