Replacing the dashboard plastic PCB
Moderators: User administrators, Moderators

Re: Replacing the dashboard plastic PCB
Thanks, I may give it a go 
1985 1.9TD AAZ -Starlight Interior
2015 California Beach
2015 California Beach
-
Fudgy666

- Registered user
- Posts: 295
- Joined: 28 Jan 2014, 14:29
- 80-90 Mem No: 13188
- Location: Split between South London & Herts
Re: Replacing the dashboard plastic PCB
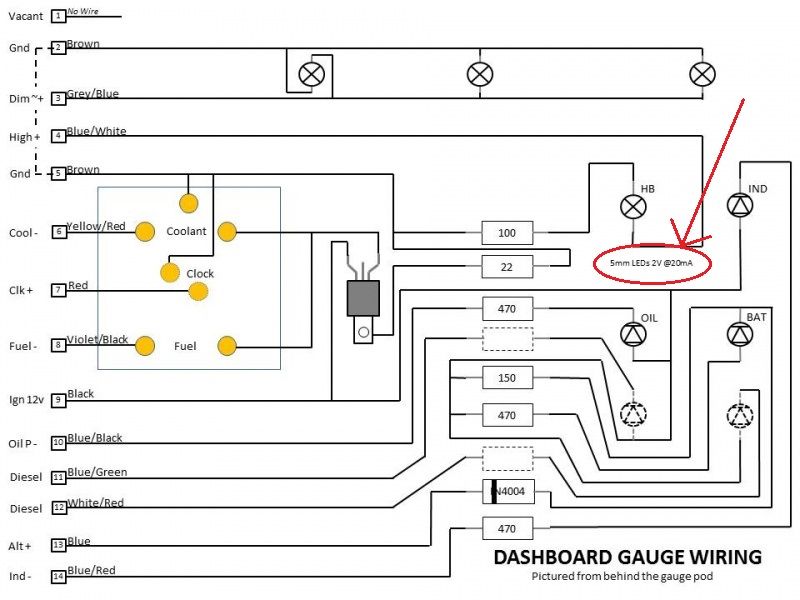
MidLifeCrisis wrote:I just replaced the plastic PCB on my dashboard broadly following Covkid's instuctions in the Wiki;
http://wiki.club8090.co.uk/index.php/VW ... _connector
I thought the PCB layout that I used might be of use/interest to others.
Cheers for sharing guys, it's encouraged me to give this a go.
I've already started sourcing a few bits, but wondered what voltage LEDs I would need.
The circuit diagram on the wiki page shows 5mm LED= 2v @ 20mA. Does this mean I will need to use 2V LED's ?
I was thinking an LED like this would be OK ?
http://cpc.farnell.com/avago-technologi ... erch=true&
1982 T25 2.0L Aircooled(CU) with Twin Solex's No idea what version/type of camper conversion
-
Oldiebut goodie

- Registered user
- Posts: 7294
- Joined: 18 Apr 2008, 01:19
- 80-90 Mem No: 11135
- Location: Eastern Angle
Re: Replacing the dashboard plastic PCB
This may help: (One suppliers offerings - pretty much the same for most 5mm leds) Just make sure that you don't buy high intensity ones - normal ones can be too bright.

1.6D 2019 VW T-Cross
200hp VW T6
1̶Y̶ ̶1̶9̶8̶7̶ ̶H̶i̶-̶t̶o̶p̶ ̶C̶a̶r̶a̶v̶e̶l̶l̶e̶
5̶0̶8̶d̶ ̶M̶e̶r̶c̶
200hp VW T6
1̶Y̶ ̶1̶9̶8̶7̶ ̶H̶i̶-̶t̶o̶p̶ ̶C̶a̶r̶a̶v̶e̶l̶l̶e̶
5̶0̶8̶d̶ ̶M̶e̶r̶c̶
-
Fudgy666
- Registered user
- Posts: 295
- Joined: 28 Jan 2014, 14:29
- 80-90 Mem No: 13188
- Location: Split between South London & Herts
Re: Replacing the dashboard plastic PCB
Nice one. Cheers for the heads up 
1982 T25 2.0L Aircooled(CU) with Twin Solex's No idea what version/type of camper conversion
-
CovKid

- Trader
- Posts: 8409
- Joined: 30 Apr 2006, 13:19
- 80-90 Mem No: 3529
- Location: Ralph - Coventry (Retired)
- Contact:
Re: Replacing the dashboard plastic PCB
Dashes vary a bit but providing you follow and work on one track at a time, hardwiring isn't so hard and ends all the intermittent issues you tend to get. Luckily the PCB is easy to follow, but above helps no end.
Dip any replacement blue LED in black paint if its lighting up your face. Doesn't actually have to be blue ofcourse - you just have to have a visual indication of when you're on full. Mine is orange now.
Dip any replacement blue LED in black paint if its lighting up your face. Doesn't actually have to be blue ofcourse - you just have to have a visual indication of when you're on full. Mine is orange now.
Roller paint your camper at home: http://roller.epizy.com/55554/" onclick="window.open(this.href);return false; for MP4 download.
-
Fudgy666
- Registered user
- Posts: 295
- Joined: 28 Jan 2014, 14:29
- 80-90 Mem No: 13188
- Location: Split between South London & Herts
Re: Replacing the dashboard plastic PCB
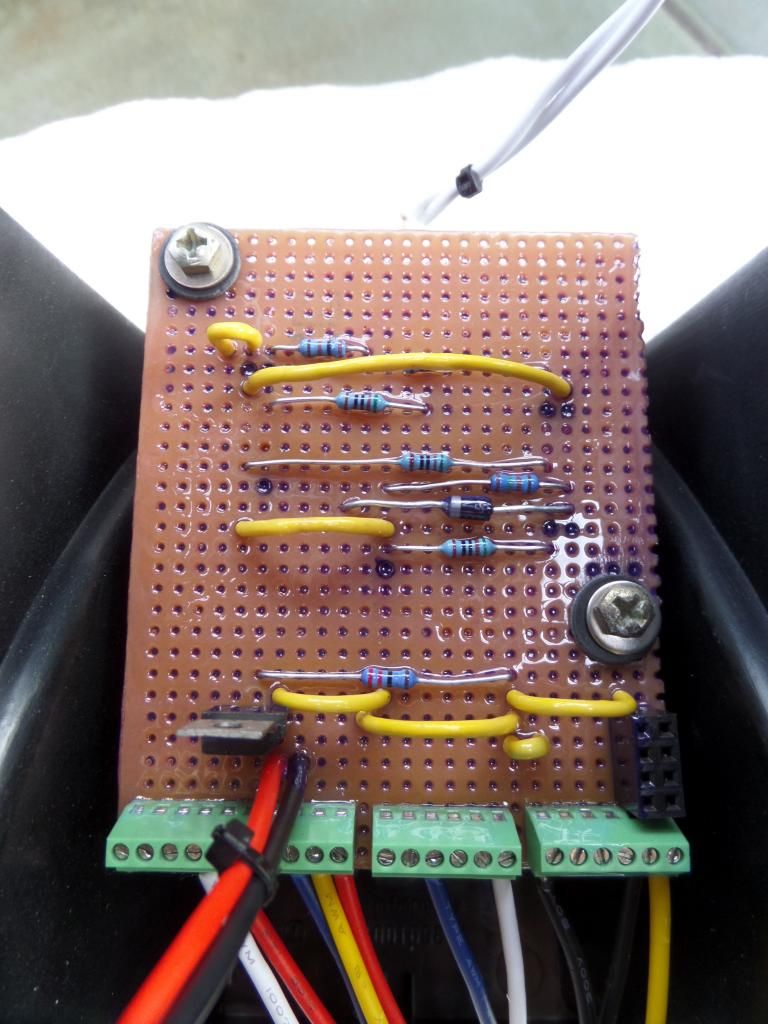
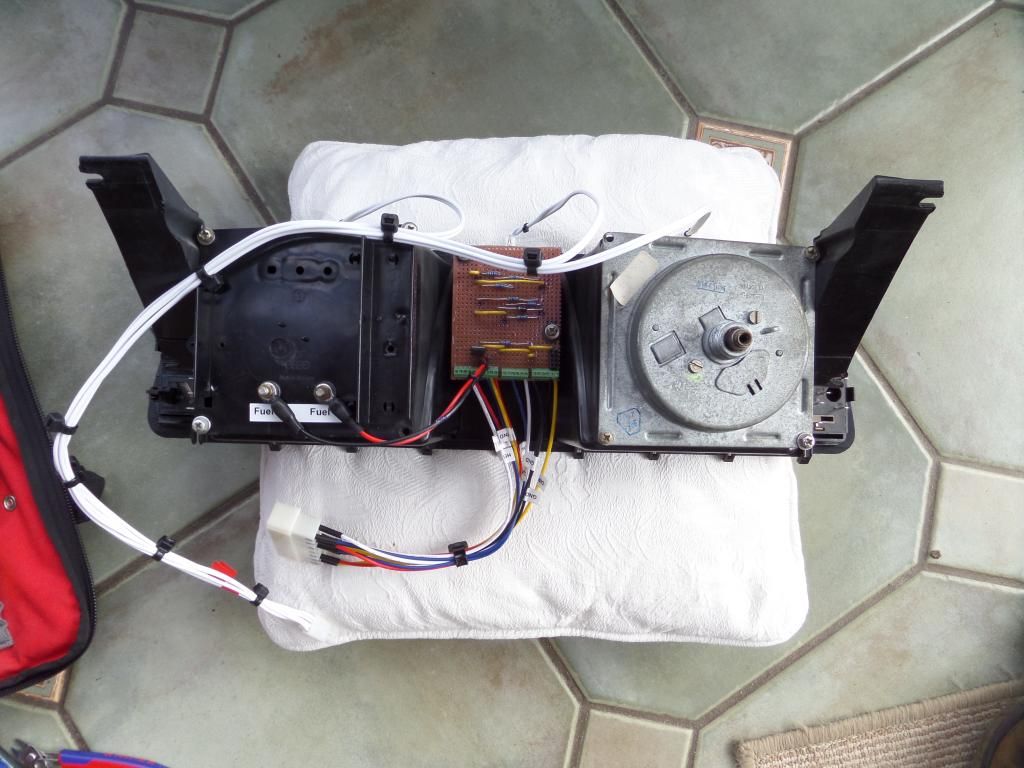
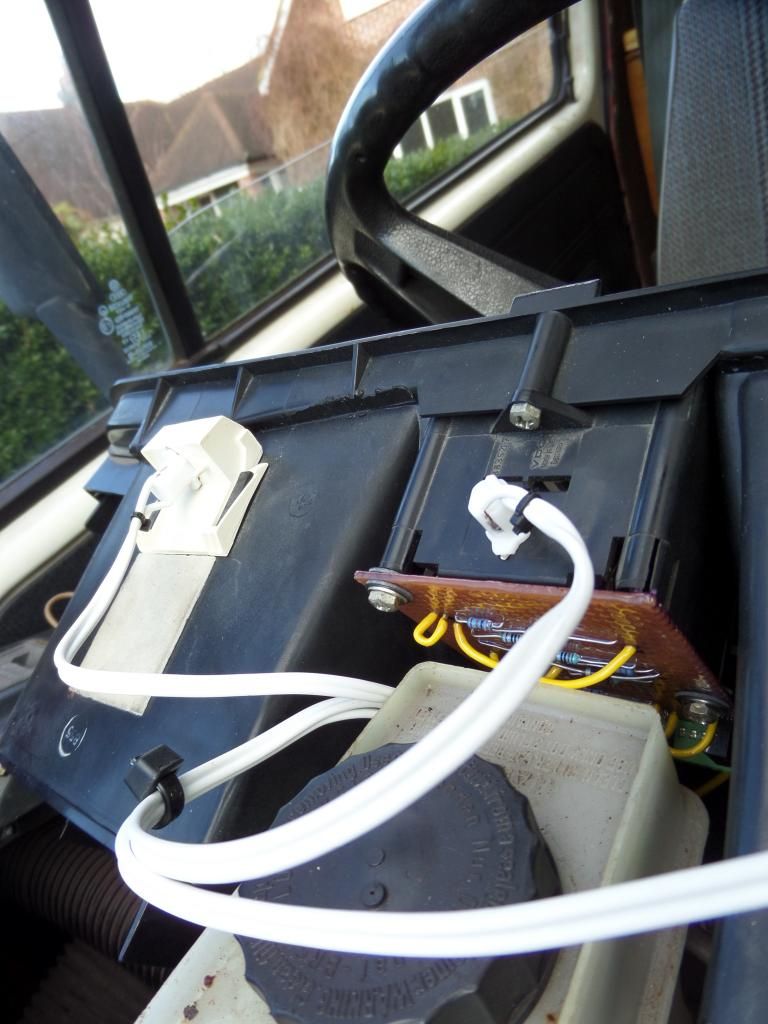
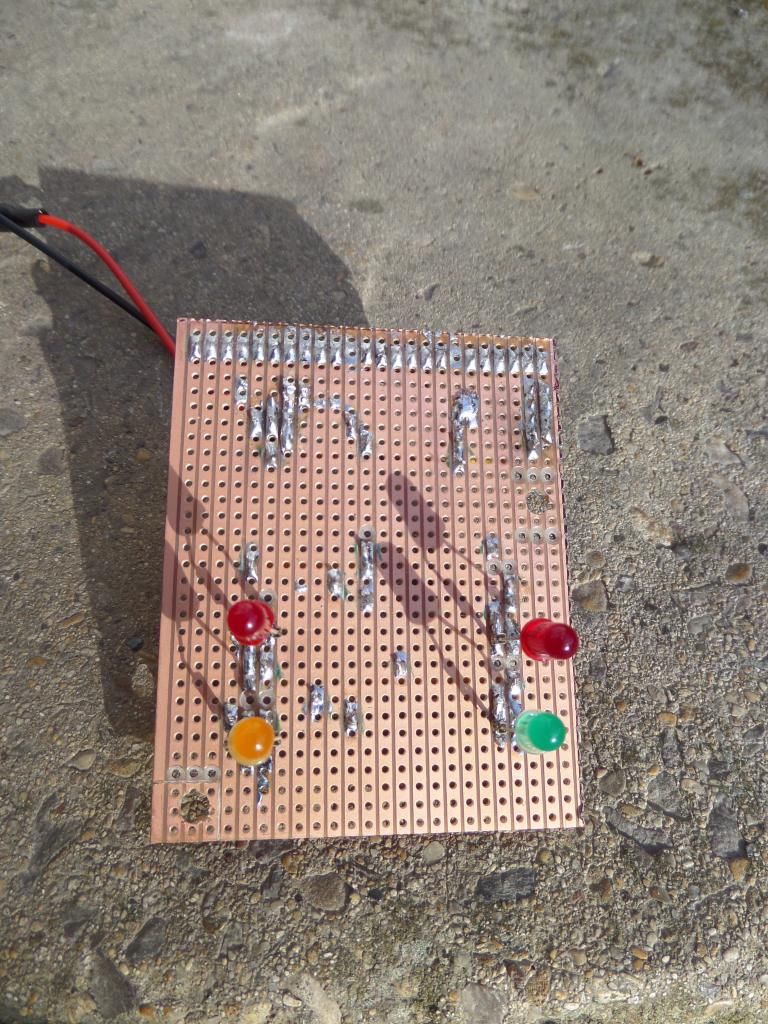
After a short delay I have got around to finishing the instrument cluster rewiring, and managed to get it fitted too.
Just followed the Wiki page so I owe a massive thank you to CovKid & Midflife Crisis, their contributions to the wiki guide are fantastic and easy to follow, actually doing most of the hardwork for me
http://wiki.club8090.co.uk/index.php/VW ... _connector
I just did a couple of things differently.
The previous owner had already added a wiring spur that fed the dash illumination lights, so i just added connectors to that & didn't power them from the new PCB board (The white cables in the photos).
And I decided to add a couple of layers of Silicon conformal coating to keep any moisture/damp out.
Apart for that, it's an exact copy of the wiki design.
Dead Chuffed it worked
-
MidLifeCrisis
- Registered user
- Posts: 566
- Joined: 20 Nov 2011, 19:07
- 80-90 Mem No: 10519
- Location: Bagshot, Surrey
Re: Replacing the dashboard plastic PCB
Nice!!
Liking the idea of the silicon conformal coating.
Liking the idea of the silicon conformal coating.
1987 Westfalia Van, Petrol 2.0 AGG
-
keytouch

- Registered user
- Posts: 952
- Joined: 17 Oct 2007, 22:31
- 80-90 Mem No: 4484
- Location: West Somerset
Re: Replacing the dashboard plastic PCB
Looks great.
How did you mount the LED's? Soldered onto the board or in some kind of holder?
What connector did you use for connecting to your wiring loom? Did you chop the original connector on your loom off?
How did you mount the LED's? Soldered onto the board or in some kind of holder?
What connector did you use for connecting to your wiring loom? Did you chop the original connector on your loom off?
Jonathan
A Camper called Wanda
1983 A reg Bilbo Marlfield conversion, 1900 Diesel 1Y engine
A Camper called Wanda
1983 A reg Bilbo Marlfield conversion, 1900 Diesel 1Y engine
-
Fudgy666
- Registered user
- Posts: 295
- Joined: 28 Jan 2014, 14:29
- 80-90 Mem No: 13188
- Location: Split between South London & Herts
Re: Replacing the dashboard plastic PCB
keytouch wrote:How did you mount the LED's? Soldered onto the board or in some kind of holder?
I actually re-used the holders that were on the original blue ribbon PCB.
Not a pretty job, but I really struggled to find an item fit for purpose.
It's a bit of a fiddle as I needed to trim the base of the connectors up, and surface mount them onto the track side of the veroboard.
Won't win any prizes for neatness, but does mean that I can still change the LED's easily.
keytouch wrote:What connector did you use for connecting to your wiring loom? Did you chop the original connector on your loom off?
Yep, I cut the original connector off of the wiring loom & binned it !
I got a heavy duty 14-pin connector off of Ebay (Possible slight overkill
http://www.ebay.co.uk/itm/Nylon-Latchin ... 3ce398f177

And just re-made both ends. I then used these screw termination blocks to get the cable onto the veroboard:
http://www.ebay.co.uk/itm/6-Pin-5PCS-2- ... 27ef65709b
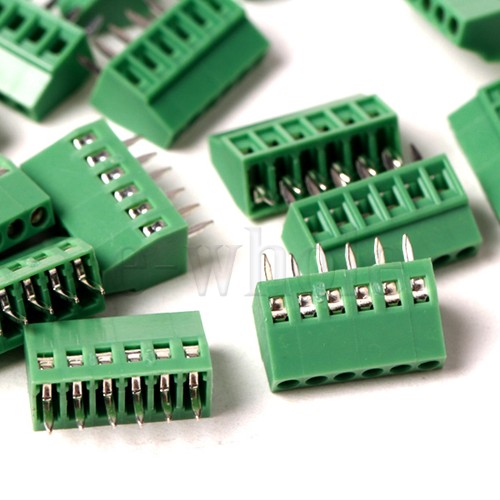
Just double check that the 'pitch' matches the spacing of the tracks on your board
Hope that helps
1982 T25 2.0L Aircooled(CU) with Twin Solex's No idea what version/type of camper conversion
-
marlton67
- Registered user
- Posts: 31
- Joined: 30 Jan 2011, 20:17
- 80-90 Mem No: 9196
- Location: Dartford
Re: Replacing the dashboard plastic PCB
Hi this is brill,
Am I correct in that after this you would just connect the wires from the main plug and "Bobs your uncle".
If so How much would you charge to make this
for me? Many Regards
Ian
Am I correct in that after this you would just connect the wires from the main plug and "Bobs your uncle".
If so How much would you charge to make this
for me? Many Regards
Ian
-
Fudgy666
- Registered user
- Posts: 295
- Joined: 28 Jan 2014, 14:29
- 80-90 Mem No: 13188
- Location: Split between South London & Herts
Re: Replacing the dashboard plastic PCB
marlton67 wrote:Am I correct in that after this you would just connect the wires from the main plug and "Bobs your uncle".
Yep, When I cut the old plug off of the wiring loom I noted the pin numbers and cable colours (Some pins will be vacant). Then to keep it easy I used the same colour/pin combination on the new 14 pin socket. Then the wiring diagram on the wiki has the pin numbers and which tracks on the Stripboard they need to be connected.
marlton67 wrote:If so How much would you charge to make this
for me?
I'm flattered you'd want me to make one for you, but honestly I have enough problems keeping up to date with the jobs with my own van. Also if you look at the dates of my posts you'll see that it took me 3 months to pull my finger out and finish the stupid thing !
I can assure you that the Wiki guide is spot on, and if I can do it anyone can do it ! Give it a go.
1982 T25 2.0L Aircooled(CU) with Twin Solex's No idea what version/type of camper conversion
-
Fudgy666
- Registered user
- Posts: 295
- Joined: 28 Jan 2014, 14:29
- 80-90 Mem No: 13188
- Location: Split between South London & Herts
Re: Replacing the dashboard plastic PCB
Just surfing Fleabay for T25 bits (Like I seem to do a lot !?!) and came across this:


http://www.ebay.co.uk/itm/VW-T25-T3-Das ... 234dbac91d
£215 seems quite expensive, but might help people that don't fancy DIY'ing it
Even looks like you don't have to replace the socket on the dash wiring loom which is a big plus.
http://www.ebay.co.uk/itm/VW-T25-T3-Das ... 234dbac91d
£215 seems quite expensive, but might help people that don't fancy DIY'ing it
Even looks like you don't have to replace the socket on the dash wiring loom which is a big plus.
1982 T25 2.0L Aircooled(CU) with Twin Solex's No idea what version/type of camper conversion
-
marlinowner

- Registered user
- Posts: 1530
- Joined: 28 Jan 2014, 12:02
- 80-90 Mem No: 13646
- Location: Scottish Borders
Re: Replacing the dashboard plastic PCB
But you can buy a new PCB for tacho petrol dash (oil pressure buzzer of doom missing) for around £90 from VW Heritage classic parts.
1993 SA VW T25/T3 2.5i Microbus/homebrew camper
1981/1968 Marlin Kitcar TR6 Engine
1981/1968 Marlin Kitcar TR6 Engine
-
greasemonkey
- Registered user
- Posts: 250
- Joined: 14 Sep 2014, 08:36
- 80-90 Mem No: 14268
Re: Replacing the dashboard plastic PCB
Was initially interested until I saw the price, and that's only for a kit that still needs soldering of the LEDs etc.
Think I'd just follow the advice above and DIY.
Think I'd just follow the advice above and DIY.
-
captain Byrne

- Registered user
- Posts: 1004
- Joined: 19 Mar 2009, 10:01
- 80-90 Mem No: 7107
- Location: Glasgow
- Contact:
Re: Replacing the dashboard plastic PCB
I did mine a much quicker & easier way.
http://forum.club8090.co.uk/viewtopic.php?f=39&t=141208" onclick="window.open(this.href);return false;
http://forum.club8090.co.uk/viewtopic.php?f=39&t=141208" onclick="window.open(this.href);return false;