Fitting claytonrite window seals and glass
Moderators: User administrators, Moderators
-
- Registered user
- Posts: 588
- Joined: 10 Aug 2015, 06:50
- 80-90 Mem No: 14800
- Location: Peel, Isle of Man
Fitting claytonrite window seals and glass
Hello
Just about to refit some windows in my van but I am a bit unsure what to do.
Seals direct say to apply sealant in the metal and glass side of the seal then fit the glass followed by the locking strip however their 'how to' video on YouTube shows it being done without sealant and only washing up liquid to help slide the glass and filler strip in. Lots of other videos don't mention silicon either and I am pretty sure there was no silicon on the seals I removed.
How did you peeps fit yours? I hate using silicon sealant. I always manage to make a right mess with it
Thanks
1987 VW T25: Subaru EJ20 using RJES parts (If it was meant to go fast it wouldn't be brick shaped!)
-
- Registered user
- Posts: 808
- Joined: 19 Jun 2010, 12:53
- 80-90 Mem No: 10165
- Location: coulsdon
Re: Fitting claytonrite window seals and glass
Hi, you are in for a fun time, I have just refitted the last of my windows with new seals, first done when I converted it 1997 then 8 years ago when resprayed now same again it is an awkward job, I have found that the best way is to push the locking strip in with a BLUNT screwdriver and work slowly around, be carefull not to cut the seal too short it is better to be a little too long 10-12mm and then the ends seal together well, i have always used waxoil before on the metal side and this time Dynax which if difficult to get the seal to stay in place whilst trying to work the glass in (masking tape helps to hold it up in position. I have never used any lubricant on the locking strip because of the salt content in washing up liquid and just struggle instead around 2 hours per window. never used silicone and would advise against due to the acid curing. if the seals are new and the correct size it should not be needed. Good luck.
1985 hi-top 2.1MV with DG carb and LPG
1955 trials buggy with 1.9 DG high lift cam and twin dell's (now sold)
1972 1303 beetle
1992 Audi 100 2.8 quattro estate
1967 Vw Madison kit
1955 trials buggy with 1.9 DG high lift cam and twin dell's (now sold)
1972 1303 beetle
1992 Audi 100 2.8 quattro estate
1967 Vw Madison kit
Re: Fitting claytonrite window seals and glass
Dont use washing up liquid.It will do the rubber no good.
2.1 LPG/Petrol Auto Caravelle
"The difference between genius and stupidity is that genius has its limits"
-
- Registered user
- Posts: 647
- Joined: 27 May 2007, 20:48
- 80-90 Mem No: 875
- Location: Weald, Kent
Re: Fitting claytonrite window seals and glass
Hi,
100% agree. I use wd40 as a lubricant for the rubber and sealing strip. You can put sealant in after the glass is in and before the sealing strip. Sometimes they leak and sometimes they don't. I usually see what happens and then use sealant if required. I find that sealant beforehand just makes what can be a tricky job, especially with new rubbers, a messy one as well.
If you PM me I have a sealing strip insertion tool you can have for the cost of the stamp.
R0B wrote:Dont use washing up liquid.It will do the rubber no good.
100% agree. I use wd40 as a lubricant for the rubber and sealing strip. You can put sealant in after the glass is in and before the sealing strip. Sometimes they leak and sometimes they don't. I usually see what happens and then use sealant if required. I find that sealant beforehand just makes what can be a tricky job, especially with new rubbers, a messy one as well.
If you PM me I have a sealing strip insertion tool you can have for the cost of the stamp.
1987/8 Autosleeper, 1.9dg (Automatic) hightop. Petrol/ LPG
-
- Registered user
- Posts: 1808
- Joined: 10 May 2013, 11:59
- 80-90 Mem No: 13706
- Location: Central Scotland
Re: Fitting claytonrite window seals and glass
That sealing strip insertion tool works well, but it helps to lubricate with water with a wee bit of soap - just added with a damp cloth as needed. I used arbomast auto grade to seal, it it’s a bit messy. However I could have done more to clean it up... My focus was on sealing though. Different from silicon in that it stays gooey.
Have you ever seen an unhappy fool?
88 Transporter with hitop camper conversion, 1.6td.
-
- Registered user
- Posts: 588
- Joined: 10 Aug 2015, 06:50
- 80-90 Mem No: 14800
- Location: Peel, Isle of Man
Re: Fitting claytonrite window seals and glass
Thanks guys. I have the fitting tool and me and my wife failed today on the first attempt. I have done what seals direct recommend and have added a bead of sealant to the metal side of the rubber and stuck it on. At least it should stay in position whilst fiddling the window in position.
Was so close. Glass was in but before fitting the filler strip I went around it one more time to make sure and end up pushing the seal out at the bottom. Better luck next time
1987 VW T25: Subaru EJ20 using RJES parts (If it was meant to go fast it wouldn't be brick shaped!)
- AngeloEvs
- Registered user
- Posts: 1345
- Joined: 22 Nov 2007, 19:22
- 80-90 Mem No: 4709
- Location: Upwell, Norfolk
Re: Fitting claytonrite window seals and glass
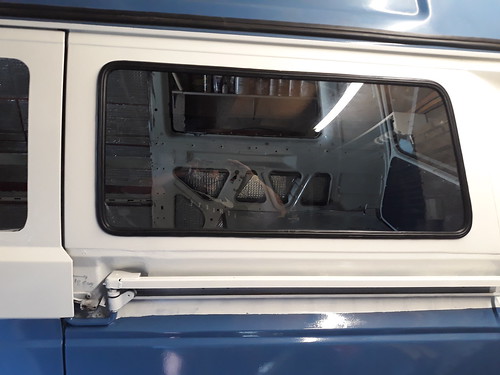
Just replaced my rear windows as there was evidence of corrosion behind the seals. Once removed the corrosion was very much surface and confined to the lower edge on both sides. There did seem to be some black sealant originally applied but very inconsistent, after cleaning the edges and repainting, I brushed grease along the lower lip from corner to corner. Sides and Top were left as these showed no sign of corrosion after 30 years'.
I replaced both sides with 5mm Bronze Tinted Acrylic. The main problem I encountered was keeping the rubber seal in place as I worked around the edges, the rubber seal continually fell away from the top lip. My van has an interior panel that sits about 30mm just behind the main outer panel. I fitted the rubber seal then used strips of wood and wedged them between the rubber seal and the inner panel about every 300mm or so. This kept the rubber seal in place and worked a treat.
Same as others, WD40 for lubrication and a steel rule helps or very thin plastic like the ones supplied with P40 filler.
Be careful with the safety glass, it is very tough when pressure is applied to the centre but the slightest nick along the edges can cause it to shatter when you are working the seal edges over the glass.
1987 DG Karisma LPG with remodelled interior
-
- Registered user
- Posts: 588
- Joined: 10 Aug 2015, 06:50
- 80-90 Mem No: 14800
- Location: Peel, Isle of Man
Re: Fitting claytonrite window seals and glass
Thanks all
1987 VW T25: Subaru EJ20 using RJES parts (If it was meant to go fast it wouldn't be brick shaped!)
- Woodyyellow
- Registered user
- Posts: 360
- Joined: 28 Oct 2012, 21:40
- 80-90 Mem No: 11769
- Location: South Devon
Re: Fitting claytonrite window seals and glass
When I refitted the windows to my van I found it quite easy.
I first fitted the rubber into the opening, pushing the rubbers well onto the steel opening and compressing the length to ensure a tight fit. A small drop of evo-stick sealing the ends together.
I then inserted the glass into the rubber using a small electrical screwdriver - with very well rounded ends and smoothed all over - as a lever and persuader. I used window cleaner in a spray bottle as a lubricant, non damaging to the seal or paintwork and it evaporates leaving no messy residue.
Once the glass was in, then I fitted the locking strip. I had bought the correct tool, well worth having, and again using the window cleaner as lubricant inserted it with no problems. Compress the length at the end joint, as much as possible as the process of inserting the locking strip stretches it.
I found conflicting advice on the internet as to where the joins should be, in the end I put the seal join at the bottom and locking strip join at the top. No leaks at all so far, been in 2 years now.
From start to finish each window only took 30 minutes or so.
1987 1.9 WBX DG Hi-Top. Soon to be Subaru ej20
I'm an old guy but I still learn new stuff!
-
- Registered user
- Posts: 588
- Joined: 10 Aug 2015, 06:50
- 80-90 Mem No: 14800
- Location: Peel, Isle of Man
Re: Fitting claytonrite window seals and glass
Hopefully the next two windows will be easier now I know how its done. Success though and I do have the special tool. Would be a nightmare without...
Before and after sound deadening and insulation for the floor by Mark Shaw, on Flickr
1987 VW T25: Subaru EJ20 using RJES parts (If it was meant to go fast it wouldn't be brick shaped!)